The end of the Plug and Play MIMA, and MIMA2
MIMA introduction
MIMA Operation
MIMA Users Page
Installing MIMA with The Plug and Play harness
FAQ
Installing MIMA with the pin replacement harness
Installation and introduction
1. Disassembly
2. Installing the harness tubes
3. Threading the Harness
4. Removing the pins from the Multilock connectors
5. Installing the rear connections
Pulling the connectors and securing the harness
Unlocking the pins on the BCM connectors
BCM connections
Format of pin instructions
MCM connections
Securing the connections
6. Mounting the MIMA system in the car.
7. Accessing and connecting to the ECM
8. Overall wiring test
9. First power up test
10. The first MIMA operational test
11. Confirming temp probe and fan control operation, and final checkout
12. Mounting the low profile display
13. Removing the MIMA harness
software
The MIMA Joystick
The MIMA Display
The FAS system
DIY MIMA L
Cable impedance problem with last MIMA systems.
Learning to drive with MIMA
Hardwired Harness
Theory of Operation

Unlocking the pins on the BCM connectors

Unlocking the pins on the BCM connectors
BCM pin release
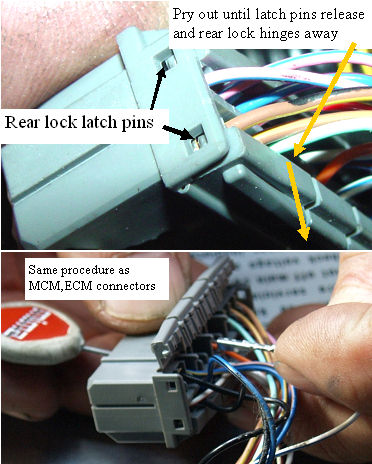
Before you start with the pins, remove the black tape that is covering the BCM wires. This will allow better access to the connector rear which will help a lot.
The "all pin lock" on the BCM connectors is like a hinge. The rear section is pried out until it releases and swings back. This releases the pins on half of the connector. The pins are then individually released by using the pin tool in an identical way as the MCM and ECM connectors.