Mikes You Tube VideosStarted a You tube channel, here are the links to various videos.
|
Solar survival trailer 1`Finally did a video on my solar survival trailer
Shows the tracker, boiling water, cooking eggs,ham,burgers,hotdogs,chicken, melting rocks and glass
Survival trailer |
Full MIMA installThe full video showing the Plug and Play install of MIMA
MIMA install Video |
NewFirst look at the input shaft side of the 5 speed Insight transmissionFirst look at the running gear train of the Honda Insight 5 speed transmission.
5 speed tranny Input shaft first look |
New code V 2.4 This code instruction is for V 2.4 of the code and will be updated as we develop new code. It has full discharger support, for cycling, pulse Internal resistance testing, and high current IR test( not released yet).
The user interface is much more intuitive for the user, includes the new option bit setup which is so much simpler than V 1.2.
This version requires that you have upgraded your chargers hardware to include the mew 18F4620 microcontroller, and has the AUX port connector installed.
New code V 2.4 operation video |
Installing a harness in the second generation Honda CivicStep by step install of a grid charger harness in the second generation Honda Civic.
******************************************************
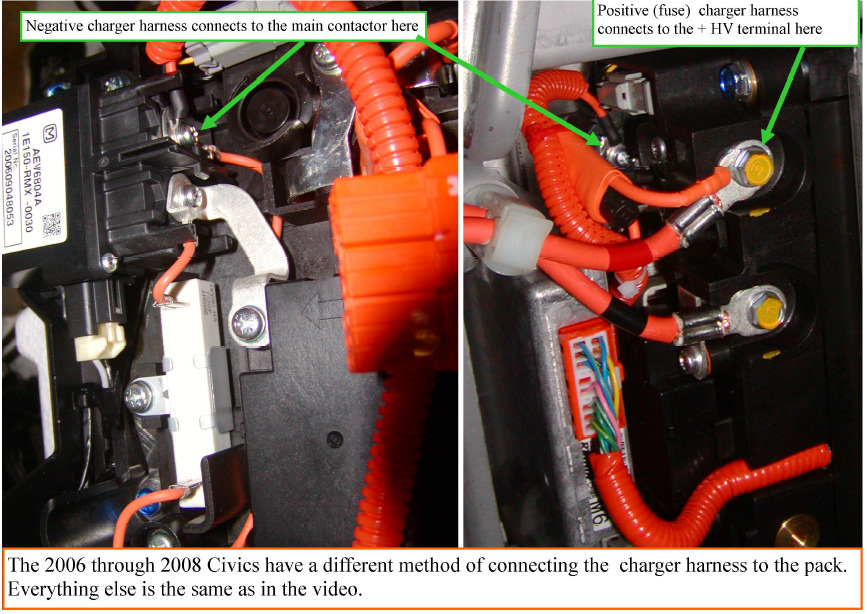
Note that the 2006 through 2008 civic may have a different HV connector board from what the video shows.
Please refer to this photo for the correct + and - connection points.
2006-2008 civic connection points
2006--- Honda civic harness install |
Upgrading the Grid chargerIf I send you a new chip with new software. this video shows how to disassemble the charger and swap the chip. It also shos how to upgrade an earlier charger that does not have the AUX connector.
Upgrading the grid charger |
Programmer P3 Charger during programmingDownloading the PicKit2 software
downloading the Hex code
reprogramming the charger
Charger during programming |
Smart Charger Datalogger Part 1 Checking the serial port on the PCThis first step towards using the datalogger is to get the serial set up in the PC.
The charger has a serial output that is configured as an RS232 port. Most computers have USB, so an RS232 to USB adapter is required to get the data into the PC.
I use a Sewell device that cost less than $10.
Each device will require a driver, and this must be installed before the device will work. This video shows how to examine the connection using the device manager,to confirm that this is working.
Installing and testing the serial port |
Smart Charger Datalogger Part 2 Downloading the config and datalogger programsThis video shows how to download unzip, and install the Datalogger and config programs
Downloading and installing the programs |
Smart Charger Datalogger Part 3 operating the config generator to generate the config fileUsing the config program to generate the config file
Generating the config file |
Smart Charger Part 4 Operating the datalogger part1Here we get into operating the datalogger.
We see how to download and upload data from the charger we see how to view and change the charger variables, how to start and stop the charger, and how to view the results of the datalogging and how to name the database files
Operating the datalogger Part 1 |
Smart Charger Datalogger Part 5 Using the file compare, and file control Here we look at how the program can be stopped and restarted and how we control the database files. we can automatically generate a new file each time we stop and restart the datalogger, or we can append the old file each time we restart, the file compare is used to view and compare old database files
View and compare the old files |
Using the charger/discharger to determine which sticks need to be replacedWhen the charger no longer can keep your pack operational, it can be used to determine the low capacity subpacks by looking at the sequence that they drop out when discharging.
Finding the bad subpacks |
|