Making a small solar concentrator | 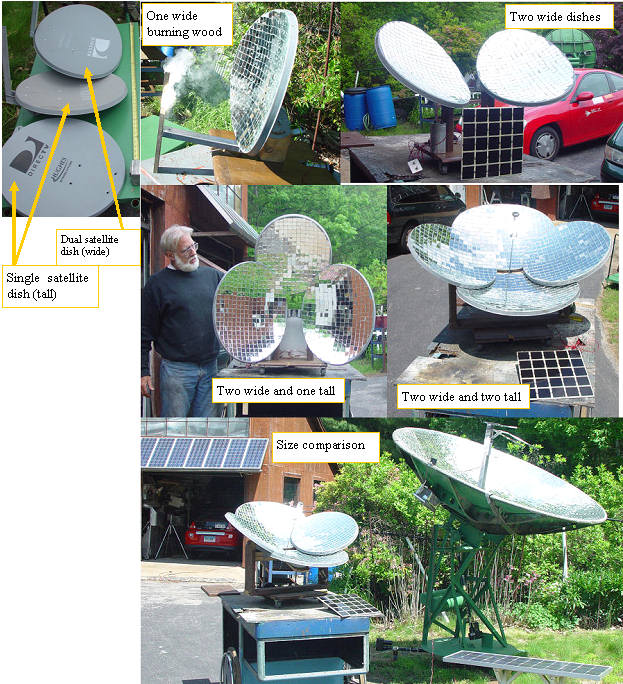 | | | turn old small dishes into solar concentrator |
This blog will be about how I constructed a sun tracking solar concentrator from bathroom mirror tiles, and surplus small dishes that seem to be everywhere.
Thanks to Dan Dumas for donating the four dishes.
The bathroom tiles with silicone rubber adhesive will last for 20 or more years with no degradation, while aluminized mylar and other foils and tapes will deteriorate in months if left in the weather, so it is a bit more work, but the dish will work as good 10 years from now as it does today
|
Cutting the mirrors
| 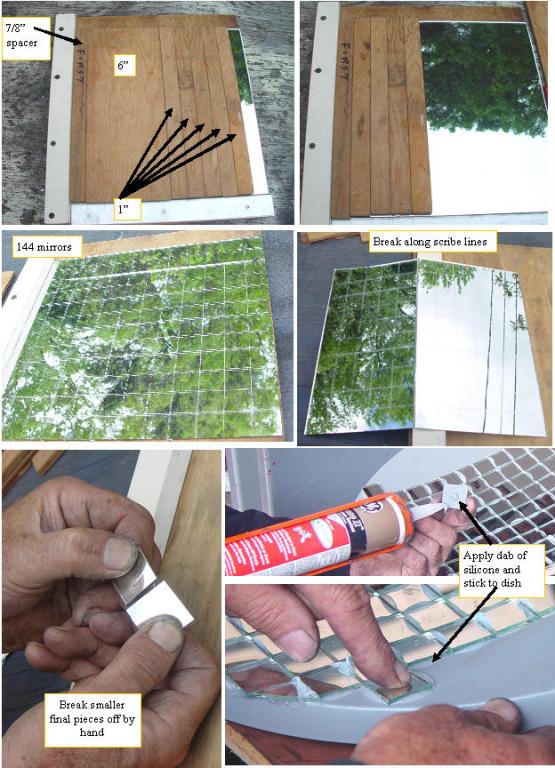 | | | cutting and gluing mirrors |
Get several boxes of bathroom mirror tile from your local lumber yard.If you have a choice, get the thinner tiles to keep the weight of the dish down.
Wear eye and hand protection when cutting glass.
I built a simple cutting jig from some 1/4" plywood and scraps of pine.
The wood cutting jig is placed over the mirror tile, and with a sharp glass cutter, you scribe a line, remove the 1" spacer, and scribe again. The first spacer must be the glass cutters thickness thinner than the rest, which for my glass cutter was 7/8". When all the scribe lines are finished, wipe or blow off the glass surface to remove any chips of glass,then turn 90 degrees, and scribe from the other direction.
When all the scribe lines have been finished, apply downward pressure while placing the central scribe line over the edge, (***always break away from your face****), as tiny shards of broken glass can be produced and thrown in the direction of the break.Repeat until the pieces get small, then break them by hand.Each 12 " mirror will produce 144 1" mirrors. Apply a small dab of silicone to the mirror rear, and carefully stick to dish.Don't worry if some silicone pushes out between the cracks, as we will cut that off after the silicone has cured for several days.
|
cleaning up the dish
|  | | | cleaning up the dish |
After the silicone has cured for several days, proceed to cut off the excess material with a razor blade.
The edge of the mirror can be trimmed by scribing a line at the approximate outer diameter, then break off the pieces with a hammer.Sand the edges to remove sharp edges. |
Single dish construction
| 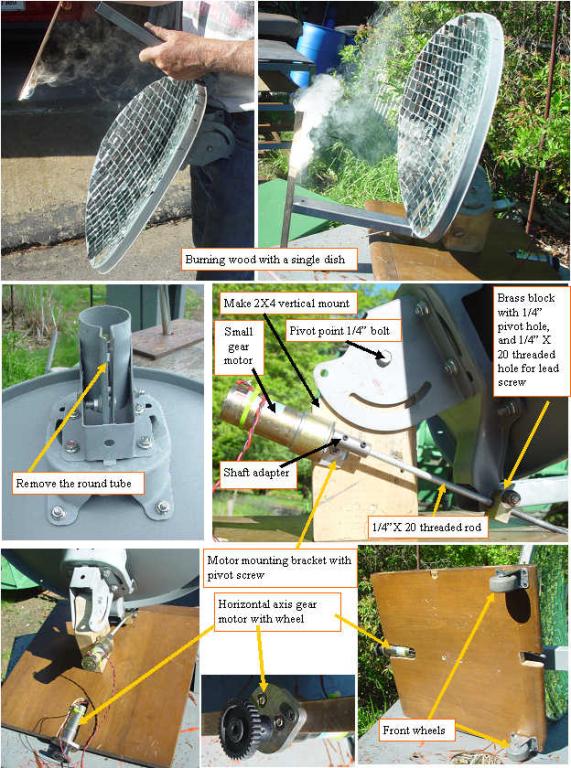 | | | Single dish setup |
I started with a single dish to get an idea of the energy it would produce. As you can see, it can ignite a piece of wood, and should cook a hotdog if you can hold it in the focal point. I started with a square piece of an old cabinet top for the dish base, but any piece of wood will work.I mounted two non swiveling wheels on the wooden base, and cut a notch for a gearmotor with drive gear, to act as the horizontal tracker drive.
A piece of 2X4 was trimmed to fit loosely in the dish mount after the steel tube clamp was removed, and added a 1/4" through bolt to serve as the vertical axis pivot.
A second gearmotor was mounted on a sheet metal bracket, on the side of the 2X4 upright. A steel rod was drilled with a 1/4" hole on one end, and the motor shaft diameter hole from the other, with two set screw holes to keep it all together. A brass block was drilled with a 1/4" hole to act as a pivot and a second threaded 1/4-20 hole at right angles to act as a lead screw nut. While this all worked pretty well, I was not satisfied with the power output so I moved on to the quad dish. |
multiple dish considerations
|  | | | mounting multiple dishes |
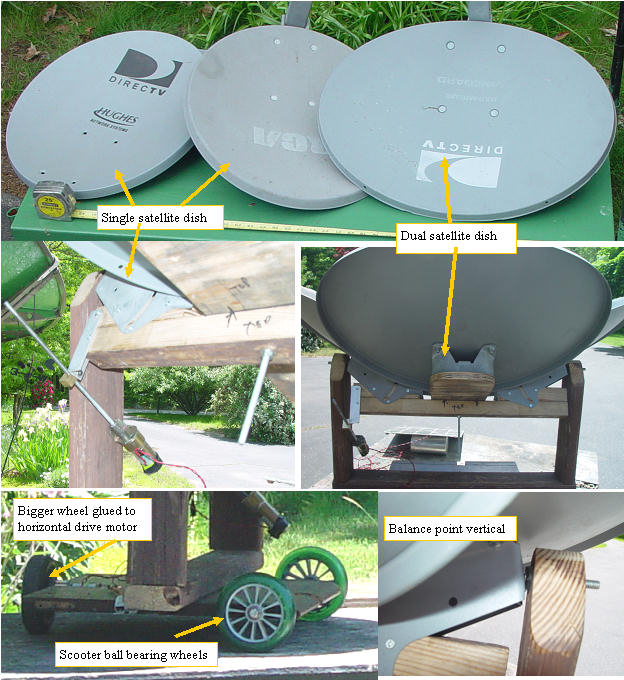
Wanting more power than a single dish can produce, I carefully looked at the mounting systems that were used on the two different types of dish.
The dual satellite dishes are wider than they are tall,and the single satellite dishes are taller than they are wide.
I started with the dual satellite dishes, and determined that if I cut off the mounting base at the first level, and mounted both dishes on a simple piece of plywood that the angles were perfect. I mounted the first dish, and only clamped the second to the plywood. I manually aimed the already mirrored dishes at the sun with an easy to view target for the concentrated sunlight. I adjusted the clamped dish towards or away from the hard mounted first dish until both of the focal points overlapped on the target. I hard mounted the second dish in this position.
Next I made a cross arm out of some 2X4 stock and mounted the single satellite dishes to also intersect the same focal point. I had to lay the second two dishes over the first to get all of them on the same focus point. I replaced the horizontal drive small caster wheels with some nice ball bearing scooter wheels, and mounted a larger diameter horizontal drive wheel on the gear motor. Once the dishes were mounted, I did a center of gravity determination and drilled holes for two axles that were supported by the same 2X4 U support. The vertical drive gearmotor was remounted to a short aluminum angle arm to give better mechanical leverage. |
Making the tracker PC board
| 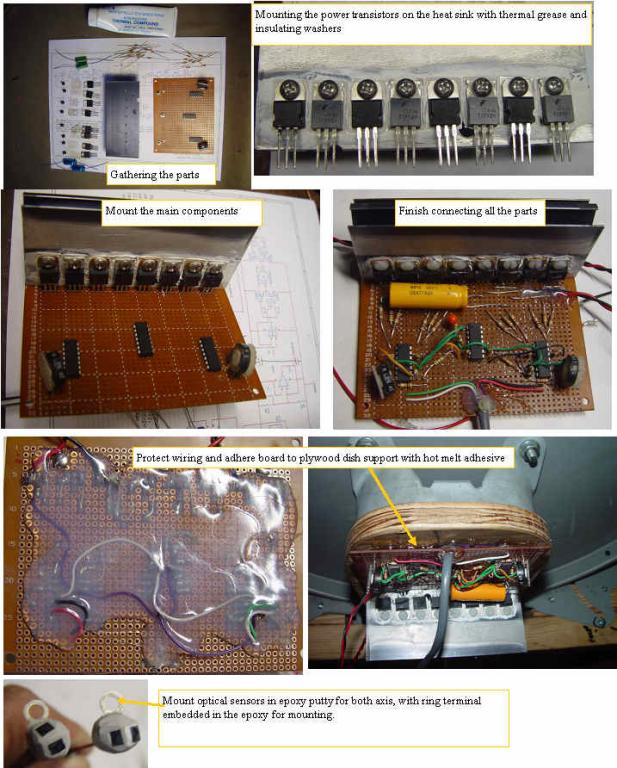 | | | Tracker board |
Gather the parts required for the tracker, and build the board. I used perf board with .1" on center hole grid.
The power transistors need to be mounted with insulating washers for the screws, and insulating pads between the heat sink and the transistor collectors.
The layout shown in the photo with roomy construction makes it easier to build. Once the board is built and tested, I glued it directly on the plywood support for the large dual satellite dishes. The opto sensors were soldered to the shielded cable at right angles, and then covered with epoxy putty, with an embedded ring terminal to act as a mounting system.
Simple Tracker schematic |
Making the furnace self powered
|  | | | Batteries not included or required |
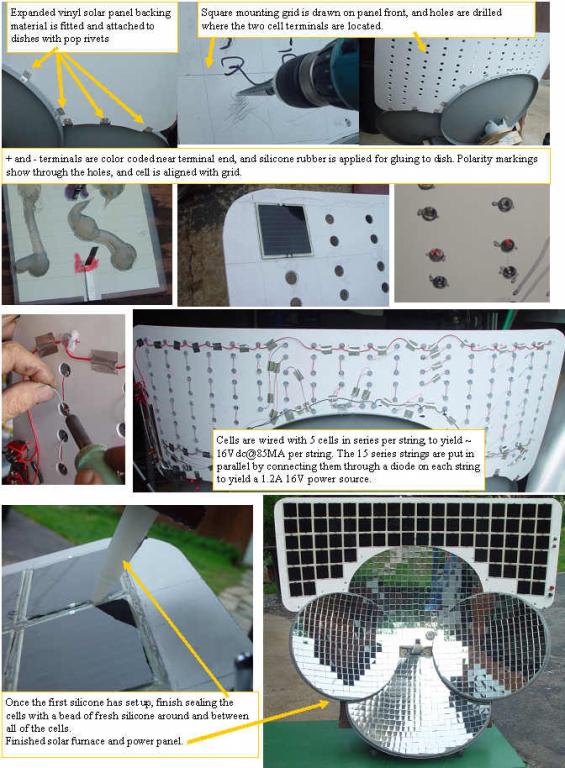
I was not going to be satisfied until the whole mini solar furnace was self powered, so I used some outdoor UV resistant expanded vinyl sign board, which was carefully fitted and attached to the quad dish assembly with angle brackets and pop rivets. I drew a grid to allow easy alignment and consistent spacing of the cells, and drilled two holes through the vinyl at the + and - cell termination points.I colored the back of the cells with red and black sharpie marker so I would be able to see the polarity of the cell after it was mounted. After all cells were mounted, I connected them in 15 strings of 5 cells each. To avoid back feeding of the parallel strings, I isolated each of the 15 strings from the buss with a diode.The panel generates sufficient power to run the self tracking system, so all of the energy required is produced carbon free.
Now what can we do with the energy produced?
Steam engine, Sterling engine, Cooking, melting lead, heating hot water, distilling water........?
More about the big 7' dish |
Mikes Blogs: |
