Replacing gasoline with solar electric lawn equipment | 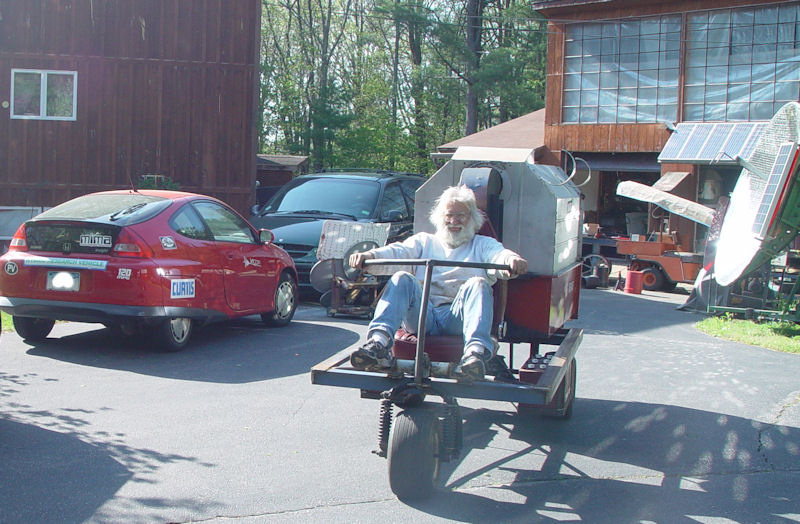 | | | Version one |
I live in the country, have a large lawn and garden, and cringe when I think about how much carbon the little gas motors on my lawnmower, roto tiller, leaf vacuum,wood chipper, chain saw, and backhoe generate while I use them to keep my property green.
I am planing to convert all of my machines to solar recharged electric versions.
I want to develop an interchangeable electric drive motor, with a modular battery pack that is solar charged.
My first vehicle to use the modular motor is my telephone truck described in my plugging into the sun blog.
The next part of the system is the three wheeled electric base platform for multiple yard tools.
an electric leaf vacuume, wood chipper, dump truck, brush cutter will be the first tools.
The blog starts at the bottom of the page.
|
Getting the lead out |  | | | culling out the good from the bad |
I needed the big Trojan T105 batteries for the solar battery bank, so I needed to make a replacement.
Most of the yard buggy use is to move something from one part of the yard to the other, or to collect wood, so the buggy only needs enough battery to make a couple of trips around the yard, instead of the giant heavy lead batteries which pack 220AH, I decided to make up some prius packs equivalent to the 48V lead pack, but with only 15-20AH. They charge faster, and are much lighter.
Started by reconditioning the old gen one (288V) modules. These modules came from several sources, including two packs that were in tough shape, so it was not surprising to find very poor performance from more than half of the modules. The grid charger is a nice tool for this, and to prevent the distortion of the modules durng the gassing stage of the charge, I made some end plates with 3/4" plywood, and some long 1/4-20 threaded rods to compress the modules.
I made a special paralleling cable where I can plug the 48V modules into a common buss, and then plug both ends of the buss cables into the 50A Anderson connectors already on the buggy.
WOW! the NIMH internal resistance is much lower than the lead acid, so the voltage droop under full load is almost non existent, compared to the lead batteries. Can scrub out at will on any surface, so now the issue will be to get enough weight over the rear wheels, so I can pull my trailers. Will rig up a solar quick charger for the packs, but until then, my grid charger will do the job but more slowly.
(Posted 4/11/2014 by mikey) |
More serious rake and vacuum attachment | 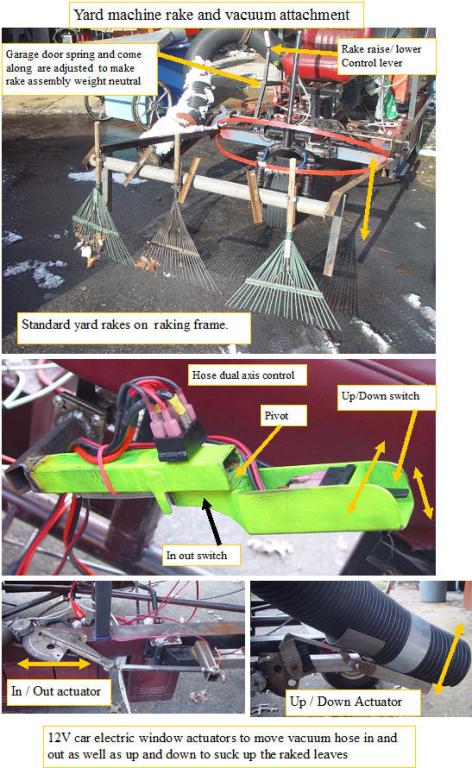 | | | Getting serious about raking |
I needed a bigger faster raking and leaf pickup process, so I built a two axis arm for controlling the 8" diameter hose from the e-tek powered electric vacuum.
The arm is powered by some automotive electric window motors with actuators. One moves the hose out to the right and back, and the other tilts the hose up and down.
The control handle for this motorized hose assembly uses two radioshack DPDT 20A 12V spring return to center heavy duty switches. The one mounted in the handle controls the up and down motor, and the one in the rear section of the control handle is actuated when the handle is rotated out and in around the pivot. The window motors move fast, and by adjusting the attachment points and control arms I was able to get a fast stable control of the hose.
The rake frame took several tries to get right, with the most important aspect being the best rake angle to the ground. Straight down works best, which is equivalent to the rake passing right past your feet while manually raking. The weight of the raking frame is counter balanced by a large garage door spring attached to the control handle. The spring is tensioned with a come along that can be tuned to make the rake frame neutral, and slightly lifted off the ground. To rake, I push the rake frame control handle forward, then I back up the machine. The beauty of this approach is that the rake stroke can be quite long. After one or two passes with the rake to bring the leafs into a pile, the pile of leaf is sucked up with the robotic hose arm.
It works nicely, but I decided to build a large vacuum nozzle that will sit on the rake frame, and suck up the leafs as they are raked, so fewer passes will be required. I got the nozzle built, but the snow stopped my testing, so I will have to wait until spring to further refine the attachment.
(Posted 12/20/2009 by mikey) |
Electric rake #1 | 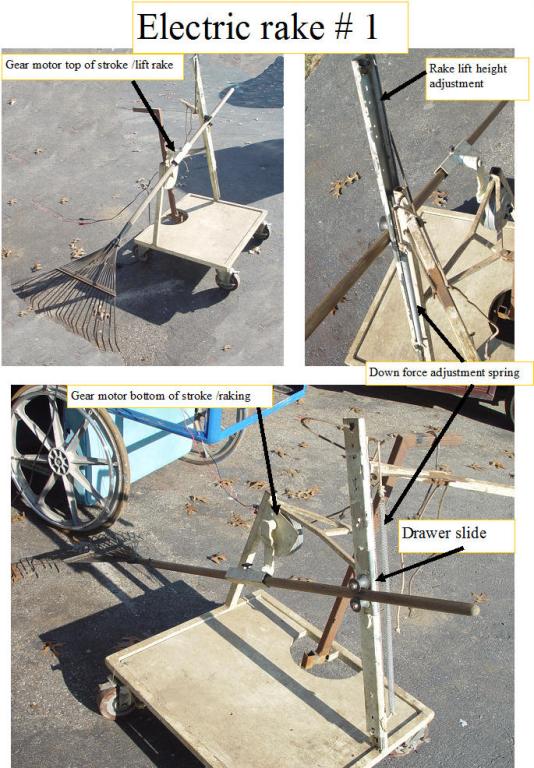 | | | Electric rake #1 |
Raking leaves when your property has a lot of oak and Maple trees can be a big chore each year. Several years ago, I made my first attempt at an electric raking machine.
Yes, yard blowers and vacuums are available, but most of them are gas powered, and they do not really rake the lawn which clears thatch.
I built this contraption from a surplus gearmotor, a drawer slide, a screen door spring, and some rope.
The rake is lifted when the motor crank starts moving up, as the drawer slide has an adjustable rope that limits the handle up travel. Once the gear motor crank starts the down stroke, the rake hits the ground, and the rear of the handle responds by stretching the adjustable screen door spring, which is adjusted for the correct raking down force.The gearmotor arm sweeps rearward for the raking stroke, then lifts the rake at the end of the rearward stroke.
It works pretty well, but is a bit slow and has a fairley short stroke, so while it is a cool electric raking machine concept, It needed a lot of work to make it be a time and labor saver.
Back to the drawing board.
(Posted 12/20/2009 by mikey) |
creature comforts 1 | 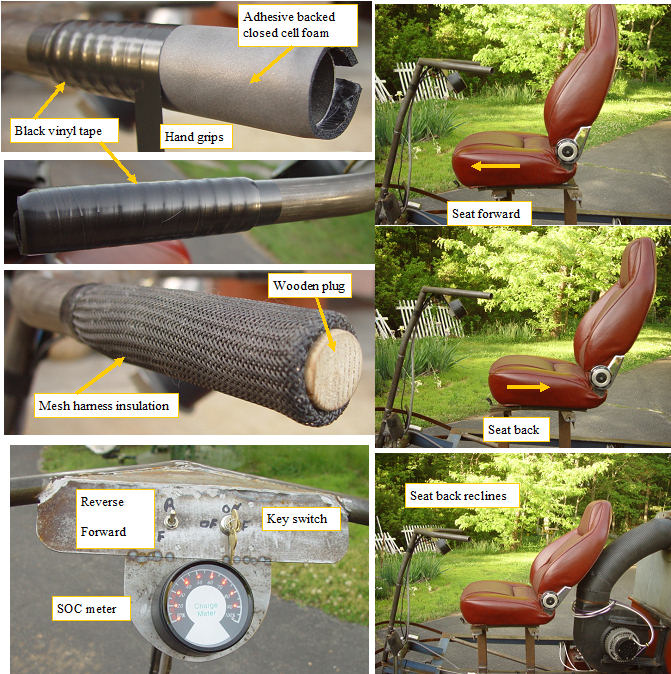 | | | Creature comforts |
I have been saving a cool bucket seat that I picked up at least ten years ago so I cut off the mounting brackets welded on some angle iron and steel tube, and welded the whole assembly to the torque tube. The front to back adjustment was retained, so big and little people can drive the machine. The handle bars tube is pretty big, so rather than looking for some custom hand grips, I made my own. Some 1/8" buna -n closed cell foam with adhesive back was applied to the bare steel. The foam was carefully wrapped with black electrical tape, which was then painted with PVC pipe cement to hold it together.I covered the tape with a nylon braid to give some grip, and tucked the end into the tube end and tapped in a wooden plug to hold things together.Feels nice.
(Posted 5/25/2009 by mikey) |
The yard machine takes shape | 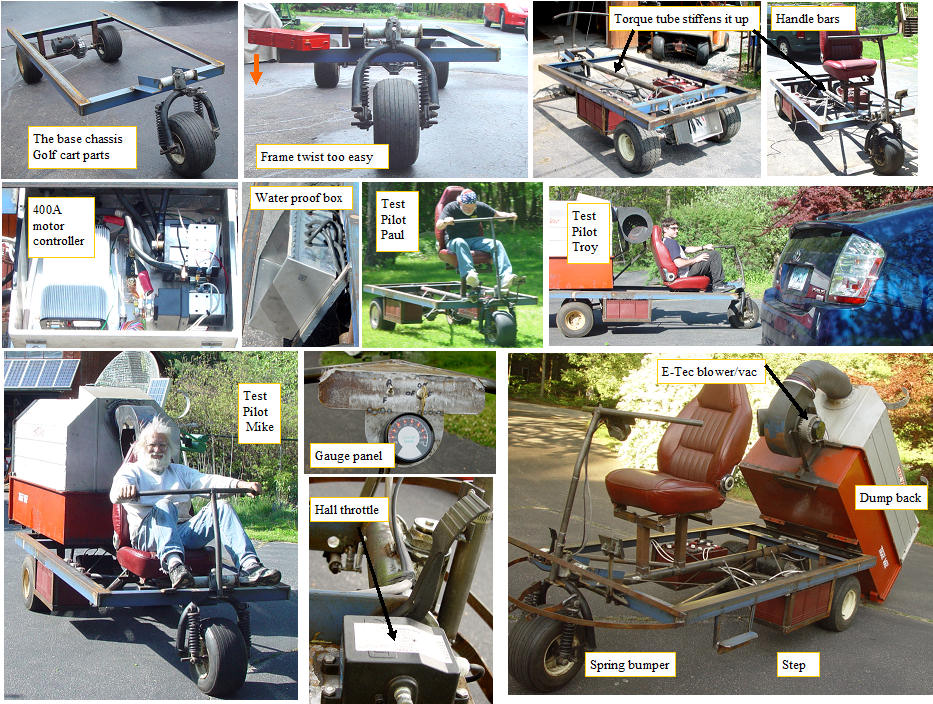 | | | The yard machine starts to take shape |
I have been collecting bits and pieces of electric golf carts for many years, and decided that it was time to put them to some use.
I took a rear end from a club car golf cart, and a front wheel with steering bearing from an ezgo.
The three wheels were attached to a welded square frame. I chose to eliminate the rear suspension to make the buggy more or less load independent.
I wanted a single front wheel so I could turn the long machine in a short radius.
The chassis was very easy to twist, and was not stable until I welded in the central torque tube and cross braces which stiffened things up nicely. I bent some steel tube into some handle bars, and mounted an old car seat. The brakes were fixed and adjusted, and a mechanical ratcheting brake from a golf cart was mounted and connected. now that I had some brakes I added a kelly controls PWM motor controller with reversing contactor and mounted it in a water proof aluminum box right behind the motor. The six golf cart batteries were split into two battery hangers and mounted low and just in front of the rear wheels.
Partners in crime Paul Provost and Troy Coverstone ran some test runs to confirm that the thing was fun to drive and reasonably safe.I added an instrument panel with what was supposed to be an led SOC meter. It was not very accurate until I hacked into it and figured out how to adjust it (see mikes tips).
We mounted the leaf vac next, with an e-tec motor and additional controller.
(Posted 5/25/2009 by mikey) |
|
