SOC reset device | 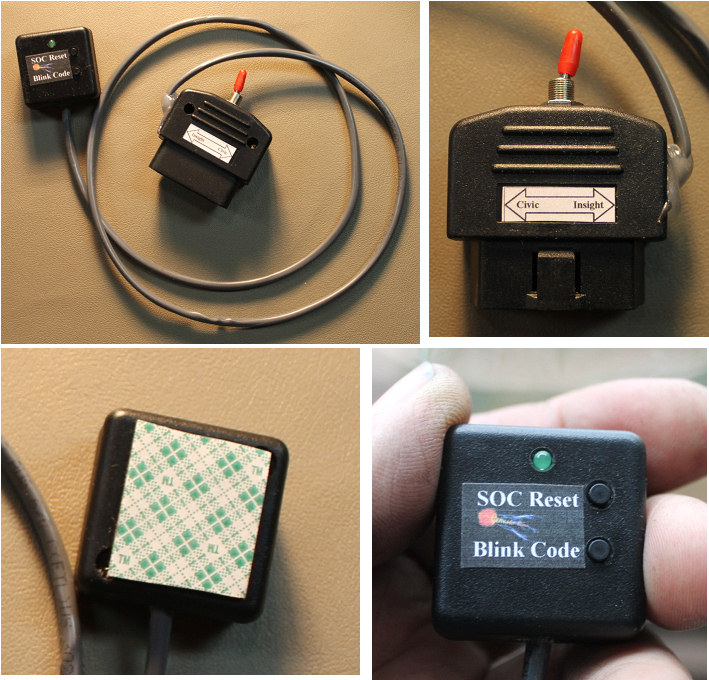 | | | finished SOC reset device |
NOTE***********************
At this time, the SOC reset device is only fully functional on the Honda Insight 2000-2006.
The civic functions are not working,so do not buy this for a civic.We have removed the switch on the new batch, to avoid confusion and possible switching by mistake.
**************************
Price $65, which includes the postage to anywhere in the US.
******************************************************************* only 12 left.
************************
After a grid charge, the car may or may not recognize that a charge has happened.
It seems that if the SOC is over half when the car was last turned off, and a charge was applied to the pack,the SOC may not show the change.
If the car is reset by disconnecting the 12V battery, or if fuse # 18 is pulled under the dash, the SOC will reset to full.
None of these is an easy to use technique to get the car in sync with the freshly charged batteries true SOC.
Thanks to Peter Perkins work on decoding the communication over the OBDII port, for his OBDII C&C device, he has discovered the codes required to set the SOC to 19 bars, which will allow us to charge, then set the SOC to full, so the car properly handles the fully charged pack.
Thanks Peter for sharing these codes. Of course Peters OBDC&C gauge can also do this function, as well as a lot more.
The final SOC reset is now available, and thanks to Peter Perkins, we have included several more functions that the typical IMA user will find useful.
1- SOC reset = 19 bars on the SOC bargraph.
2- SOC reset = 6 bars
3- Clear IMA codes
4- Clear Check engine codes
5- IMA fan low speed
6- IMA fan high speed
7- IMA fan off
8- Initialize OBDII com
The SOC 19 bar and SOC 6 bar functions could cause the battery to be charged at inappropriate times if activated by mistake, so the entry of the 8 codes has a special entry procedure to minimize the risk of false activation.
example:
To check fan operation we have 3 fan codes 5, 6 and 7, lets use fan high code 6 as an example.
Press the top SOC reset button 6 times quickly. After a short delay, the led will blink 6 times to confirm that it registered the correct 6 presses.
Shortly after the 6 blinks, the led will come on steady. Press the SOC reset button once while the led is lit, and the command for fan high speed will be sent to the car.
Shortly after the press the fan will run at high speed.
If you changed you mind, or found that it blinked the incorrect number of times, just wait until the steady led goes out and try again.
The command will not be sent until you do a single press of the SOC reset button when the steady led is on.
To do SOC reset to 19 bars, one would follow the exact same procedure except you will only press the SOC reset button one time, the LED on the device will only blink 1 time, then press the SOC reset button again when the steady led is on to send the command.
Another function on the SOC reset device is the Blink code button.
If something is wrong with the car, the "IMA" or "check engine" lights will illuminate on your dash.
If you have a code reader, and connect it to the OBDII port, it will give a trouble code like P1449.
If you don't have a code reader with you, you can still determine what is wrong with the car, by using the SOC reset device second function, or the blink code reader.
If there is a trouble code, and you press and hold the bottom Blink code button, the IMA and check engine lights will blink the 2 digit codes.
The IMA codes will blink the IMA trouble light on the dash, and a check engine code will blink the on dash check engine light.
The slow blinks are the tens digit, the fast blinks are the units digit. If more than one trouble code is set in the car, the IMA or check engine will blink each two digit code in sequence, and then start over again.
The blink codes are actually better diagnostics than the Pcodes. as an example, the P 1449 actually has 4 blink codes.
P& blink codes Page 1
Blink code What it means
72----------Battery Module overheating (the whole battery is getting too hot)
73----------Battery cell overheating( the PTC detected one cell getting too hot)
74----------Battery Module Individual Voltage deviation ( the pack is out of balance, so a subpack is at a different voltage than the rest)
78----------Battery Module Deterioration(pack capacity below the minimum allowed)
The rest of the blink and P codes are here:
P& Blink codes Page 2
P& Blink codes Page 3
The device in theory should also perform the same functions on a first generation civic when the switch on the OBDII connector is set to the civic position, but I do not have a civic to test it on, so I am not able to confirm that it works on the civics at this time.
Price of the SOC reset device will be $60, which includes the shipping in the US.
Contact me via e-mail if you want one of these.
Mike
|
Some SOC reset usage tips.Install:
Since the SOC device does not provide any feedback as to OBDII data, permanent installation may depend on your expected frequency of charging. The devices have an aggressive adhesive pad on the rear, that sticks strongly to clean surfaces. The adhesive is able to be removed, but I can't swear that the process will be easy or leave no trace,after the device has been attached for some time. We also include a small label that has an adhesive back, that shows the key entry codes for the different functions. This label could be attached to the SOC device rear if permanent install is not desired, or could be attached to the dash next to the device if it will be mounted on the dash.
The other end of the cable plugs into the OBDII connector, and has a selector switch to select the Insight or gen 1 Civic modes.
1. Checking the fan operation:
When a grid charger harness is installed, it is a good idea to confirm that the stock fan controls are working, as a reversed wire or poor connection on the fan control board could allow the fan to run with the charger, but in theory the car circuit that we switch to when the charger is unplugged may not be able to run it.
Of course if you follow the video and are careful to make good connections, the risk of that is minimal, but the fan activation functions on the SOC device can easily confirm the fan operation.
Just boot up the car, and key in function 5 or 6 on the SOC reset, and listen for the fan to come on. selecting function 7 will turn it off.
2. The ability to set the SOC to 19 bars, is a great way to get the car in better sync with the freshly charged pack, after an overnight charge. Simply turn on the ignition, plug in the SOC reset, and key in function 1 on the device. The SOC display should rise at about 1 bar/second until it is at 19 bars.
3. The reset to 19 bars and reset to 6 bars allows you to "fool" the car into thinking that the SOC is at either of those levels at any time. There is some evidence that one can use this functionality to charge the pack to a higher than normal level and drain it to a lower than normal level, essentially giving the pack a wider cycle than the car would do on it's own.
When the pack is actually low, and you set the SOC to 19 bars, it will cause the car to continue to use assist even though the pack is more empty than the car would have allowed,similar to the MIMA pack whack, where we charge and discharge the pack using MIMA's ability to reach higher and lower SOC levels.
When the pack is actually near full, and we set the SOC to 6 bars,the car will charge more fully than it would have normally. Doing this could potentially do some damage to the pack, but we do not have enough experience to say for sure, the high and low voltage limits that seem to limit things on both ends while using MIMA to do this may not work the same when this mismatch is SOC reset generated, so until some controlled test are done, it is best to not do this.
Especially if you do not know what the battery voltage is doing.
4. A press and hold of the bottom blink code button will display The blink codes on both the check engine and IMA indicators, and can be read by counting the slow (10'S) and fast (units) blinks of the indicator, and then looking up the codes here:
Blink codes:
Blink codes page 1
Blink codes page 2
Blink codes page 3
5. The IMA codes should be cleared first when both the IMA and the check engine indicators are on.
If the check engine code does not clear, try doing function 8, the OBDII initialization, then do the OBDII code clear. If it still does not clear, there may be a persistent code present than cannot be cleared, same with the IMA codes.
(Posted 10/31/2012 by mikey) |
|
