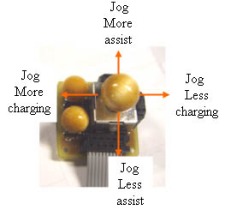
The end of the Plug and Play MIMA, and MIMA2
MIMA introduction
MIMA Operation
MIMA Users Page
Installing MIMA with The Plug and Play harness
FAQ
Installing MIMA with the pin replacement harness
Installation and introduction
1. Disassembly
2. Installing the harness tubes
3. Threading the Harness
4. Removing the pins from the Multilock connectors
5. Installing the rear connections
6. Mounting the MIMA system in the car.
7. Accessing and connecting to the ECM
8. Overall wiring test
9. First power up test
10. The first MIMA operational test
Ammeter zero level
Jog the calibration
11. Confirming temp probe and fan control operation, and final checkout
12. Mounting the low profile display
13. Removing the MIMA harness
software
The MIMA Joystick
The MIMA Display
The FAS system
DIY MIMA L
Cable impedance problem with last MIMA systems.
Learning to drive with MIMA
Hardwired Harness
Theory of Operation

Jog the calibration

Jog the calibration
To jog the calibration, you must be moving over 19 mph, and be in PIMA (mode 2). A single jog, is moving the joystick to the desired position, then allowing it to return to center. Each time you do this, you change the set-point in that direction by 2 units out of a total of 118.