The end of the Plug and Play MIMA, and MIMA2
MIMA introduction
MIMA Operation
MIMA Users Page
Installing MIMA with The Plug and Play harness
FAQ
Installing MIMA with the pin replacement harness
software
The MIMA Joystick
The MIMA Display
The FAS system
DIY MIMA L
Cable impedance problem with last MIMA systems.
Learning to drive with MIMA
Hardwired Harness
Level 1 Installation
2. Disassembly
3. Thread the Harness
4. Threading the Harness, Cont'
Finishing Threading Through
Cover the work area
Comfortable position
Unplug connectors
5. Opening the Harness
6. Level 1 Install (rear connections)
7. Fan Diodes Install
8. Battery Amp Monitor Rear Connections
9. Mounting the MIMA system in the car.
10. Level One wiring test.
11. Level 1 Check first power up
12. The first MIMA operational test
13. Testing the fan control wiring
14. Confirming temp probe and fan control operation
Level 2 install
Theory of Operation

Unplug connectors

Unplug connectors
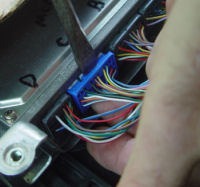
Unplug MCM connectors A , B, and C, and the BCM connector A. You also need to unplug the small grey fan connector at the far passenger side of the harness. There is a push clamp at the bottom of all of the connectors that must be pressed and held as the connector is pried out of the MCM and BCM body. A large flat blade screwdriver prying the top out, while you press the release clamp seems to be the easiest way to get them out. Make sure the clamp is released, or you could damage the connector rather than remove it.
It is also a good idea to use a sharpie to mark the connector with the proper number so it is easy to put it back together.