The end of the Plug and Play MIMA, and MIMA2
MIMA introduction
MIMA Operation
MIMA Users Page
Installing MIMA with The Plug and Play harness
FAQ
Installing MIMA with the pin replacement harness
software
The MIMA Joystick
The MIMA Display
The FAS system
DIY MIMA L
Cable impedance problem with last MIMA systems.
Learning to drive with MIMA
Hardwired Harness
Level 1 Installation
2. Disassembly
3. Thread the Harness
4. Threading the Harness, Cont'
5. Opening the Harness
Don't go too far
Wire ties Can be saved if you know the trick
Remove the tape
Harness is open and ready to work with
6. Level 1 Install (rear connections)
7. Fan Diodes Install
8. Battery Amp Monitor Rear Connections
9. Mounting the MIMA system in the car.
10. Level One wiring test.
11. Level 1 Check first power up
12. The first MIMA operational test
13. Testing the fan control wiring
14. Confirming temp probe and fan control operation
Level 2 install
Theory of Operation

5. Opening the Harness

We will be removing all of the outer covering of the MCM/BCM harness.

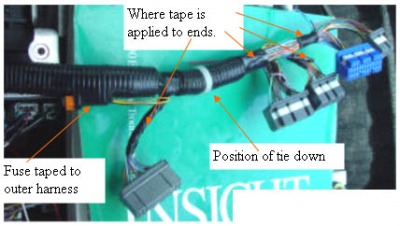
This is where you will start to feel worried about how you will ever put this back together so it looks normal, but it is actually not so difficult to do. Everything in the harness we will be taking apart back here is just taped together, with some plastic tubes in some places. The key to making it look stock when it is back together is to look carefully at how the tape has been applied now before you remove it. Look how the inspection label is held on with tape, how the connector end was taped, and where the tape stopped.

5. Opening the Harness

Don't go too far
Wire ties Can be saved if you know the trick
Remove the tape
Find the end of the tape and remove all of it. If you need to use scissors, do it with utmost care, as you do not want to cut or bare any of the wires in this harness. Gentle and careful go a long way here.
Harness is open and ready to work with
Level 1 Installation:
2. Disassembly
3. Thread the Harness
4. Threading the Harness, Cont'
5. Opening the Harness
6. Level 1 Install (rear connections)
7. Fan Diodes Install
8. Battery Amp Monitor Rear Connections
9. Mounting the MIMA system in the car.
10. Level One wiring test.
11. Level 1 Check first power up
12. The first MIMA operational test
13. Testing the fan control wiring
14. Confirming temp probe and fan control operation