The end of the Plug and Play MIMA, and MIMA2
MIMA introduction
MIMA Operation
MIMA Users Page
Installing MIMA with The Plug and Play harness
FAQ
Installing MIMA with the pin replacement harness
software
The MIMA Joystick
The MIMA Display
The FAS system
DIY MIMA L
Cable impedance problem with last MIMA systems.
Learning to drive with MIMA
Hardwired Harness
Level 1 Installation
2. Disassembly
3. Thread the Harness
4. Threading the Harness, Cont'
5. Opening the Harness
6. Level 1 Install (rear connections)
7. Fan Diodes Install
8. Battery Amp Monitor Rear Connections
9. Mounting the MIMA system in the car.
51232136393
Connecting the white ground wire.
10. Level One wiring test.
11. Level 1 Check first power up
12. The first MIMA operational test
13. Testing the fan control wiring
14. Confirming temp probe and fan control operation
Level 2 install
Theory of Operation

9. Mounting the MIMA system in the car.

9. Mounting the MIMA system in  the car.
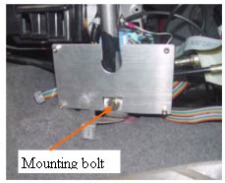
The mounting bracket for MIMA is mounted to the left pillar on the front of the shift console using the bolt that is already there. The board must be removed from the bracket prior to mounting the bracket.

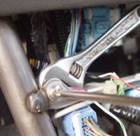
The upright steel tube will protrude through the notch in the bracket. Before mounting the bracket, stick some black tape on the tube to prevent shorting of the board to the tube.

Loosen the bolt, slide the bracket behind it, and down as far as possible, then tighten the bolt. Re mount the card to the bracket. Do not connect the Main connector or the Power /fan connector at this time.


Connecting the white ground wire.
The fan and auxiliary power control outputs use the car chassis as the power ground, and therefore the white wire with the ring terminal coming out of the harness in the shift console must be connected. Using the provided 8-32 screw and nut, attach the ground wite to the hole in the front support arm as shown.
Level 1 Installation:
2. Disassembly
3. Thread the Harness
4. Threading the Harness, Cont'
5. Opening the Harness
6. Level 1 Install (rear connections)
7. Fan Diodes Install
8. Battery Amp Monitor Rear Connections
9. Mounting the MIMA system in the car.
10. Level One wiring test.
11. Level 1 Check first power up
12. The first MIMA operational test
13. Testing the fan control wiring
14. Confirming temp probe and fan control operation