We should have everything mounted,all cables routed and plugged in, both plug in adapters plugged in, the MIMA kill switch turned on, and the display and joysticks plugged in. Attach the 12V ground under the hood, and turn on the IMA switch in the rear. When we turn on the ignition, the two HV terminals in the rear will be hot, so make sure that no one is fooling back there. Turn the key but do not start the car. The MIMA display should scroll left and right. and the dash should light up as normal with no check engine or IMA lights.
Test 1: Confirm car starts, and no IMA codes The 12V battery should be reconnected at this time. Start the car. The car will probably start with the IMA motor, but may also start with the 12 V starter.
Since the harness was disconnected from the MCM and BCM, the SOC will probably be at empty, and 4 green regen bars will be lit as the car tries to charge the battery. The charge will continue until the BCM determines that the pack is in fact full, at which point the SOC gauge will do a positive reset and rapidly go to full.
If you see any codes, turn off the car, and do the MCM reset below.
If no codes go to test 2.
if codes are present, read what they are, and contact me so we can determine what is wrong.
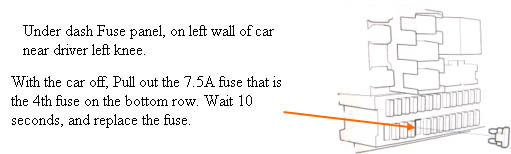
MCM reset
After the reset, the IMA battery SOC indicator may show no charge. This is normal, and will correct itself, once the car is driven several miles. A more aggressive (and wasteful) technique is the forced charge. The Forced charge procedure is to pull the #15 EPS fuse (40A) from the under hood fuse/relay box, then start the engine in neutral and hold the rpm at ~3500 rpm till the battery gauge becomes normal.
So far the simplest techniques is to just drive normally for 5-10 minutes, and the batteries should charge right up.