The end of the Plug and Play MIMA, and MIMA2
MIMA introduction
MIMA Operation
MIMA Users Page
Installing MIMA with The Plug and Play harness
FAQ
Installing MIMA with the pin replacement harness
Installation and introduction
1. Disassembly
2. Installing the harness tubes
3. Threading the Harness
4. Removing the pins from the Multilock connectors
5. Installing the rear connections
6. Mounting the MIMA system in the car.
7. Accessing and connecting to the ECM
8. Overall wiring test
The test plug
Test 1: Confirm car starts, and no IMA codes
MCM reset
Test 2: confirm 13.6 volts
Test 3: confirm VSS
Test 4: confirm battery amp monitor connections
Confirming Pins 4&5 the MAMODE1 signal
Confirm Pins 7&8 CMDPWR signal
Confirm TPS sensor signal Pin 18
Confirming the MAP signal on pin 20
9. First power up test
10. The first MIMA operational test
11. Confirming temp probe and fan control operation, and final checkout
12. Mounting the low profile display
13. Removing the MIMA harness
software
The MIMA Joystick
The MIMA Display
The FAS system
DIY MIMA L
Cable impedance problem with last MIMA systems.
Learning to drive with MIMA
Hardwired Harness
Theory of Operation

MCM reset

MCM reset

After the reset, the IMA battery SOC indicator may show no charge. This is normal, and will correct itself, once the car is driven several miles.
A more aggressive (and wasteful) technique is the forced charge.
The Forced charge procedure is to pull the #15 EPS fuse (40A) from the under hood fuse/relay box, then start the engine in neutral and hold the rpm at ~3500 rpm till the battery gauge becomes normal.


So far the simplest techniques is to just drive normally for 5-10 minutes, and the batteries should charge right up.
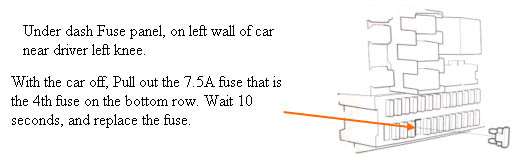