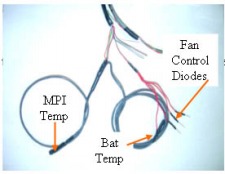
Placing the temp probes and fan diodes
The rear MIMA harness splits into two smaller cables that have the two temperature probes on their ends, as well as 4 wires with diodes connecting to the red/black wire of the cable.
The four diodes are already tied into the harness, so all we need to do is install the probes in the correct locations, using the white thermal grease to optimize heat conduction to the probe.
|
|