Mounting to the e-brake
|
 | |
|
E-brake joystick
|
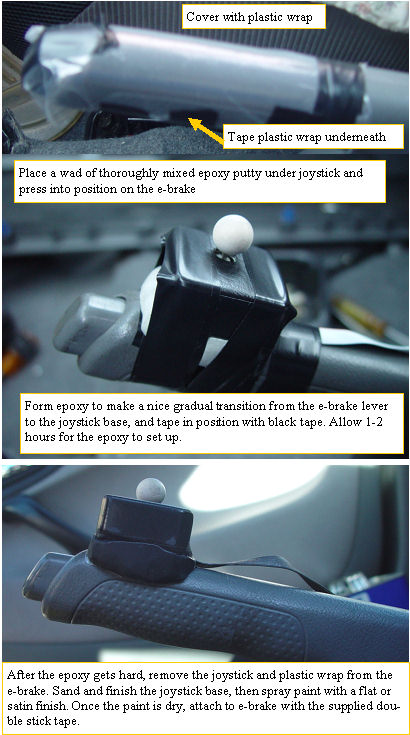
The e-brake lever is a nice place for one of the joysticks. It sits by your side, and is easily accessible with your right thumb. The round e-brake lever is covered with saran wrap or other plastic wrap. The material is tightly taped to the brake lever with masking or black tape on the bottom side.The epoxy putty that I supplied should be divided into three equal amounts of each of the two parts. Mix up one of the divided A and B epoxys. Mix it thoroughly until it is of uniform color. Form it into a square that fits nicely under the joystick. Press the joystick into the epoxy over the e-brake area that you want to mount it to. Once it is fully seated, form the epoxy to make a nice interface from the joystick to the e-brake lever. Using black tape, tape the joystick to the e-brake lever, and let it sit for several hours to set up. When the epoxy has fully cured,(24Hours), sand and paint the epoxy with a satin or flat black paint and let dry. It is best not to paint the mounting surface so the double stick will adhere better.
Because we are depending on double stick to hold the joysticks and display in position, it is very important that the surface that the doublestick will stick to is clean and free of oil or wax. I recommend that you wipe the dash where the display will mount, the e-brake lever, and shift lever where the joysticks will mount with 99% pure alcohol, to remove any oil or wax.
When the paint is dry, apply two strips of the double stick mounting tape, and stick it in position on the e-brake. The ribbon can be stuck down to the e-brake shaft with more doublestick between the ribbon and the shaft.(sorry I forgot to include enough for that) The ribbon is routed under the rug after you place a layer of duct tape over the part that will be in contact with the floor pan as it passes next to the DB-25 to the shift console.
|
|
