Getting the ribbon and joystick connector through the shift boot
|
 | |
|
Feeding the joystick wire through the shift boot
|
Ok this is another place we test your manual dexterity.
To get the joystick wire to neatly and safely pass through the shift boot, and still allow the shift knob to be screwed in or out was a challenging problem.
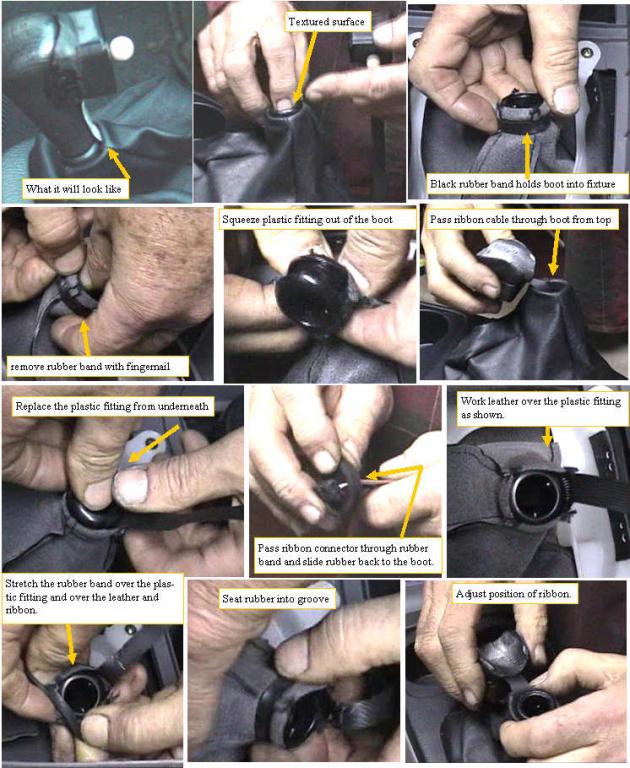
A careful look at the small plastic fitting right at the top of the leather shift boot will show that it is textured on the knob side and is larger and smooth on the inside where it is inside the boot.
A look from underneath the boot will show that a black rubber band is holding the leather into the groove in the plastic fitting. We will remove that rubber band and then push the plastic fitting through to the inside, and temporarily remove it. We pass the joystick ribbon into the boot from the outside, making sure that we have rotated the joystick to the correct mounting position relative to the boot.We put the plastic fitting back into the boot, and get it back into the proper relationship with the leather. The ribbon connector is passed through the rubber band, and the band is put back over the leather, fixture, and ribbon. Now the whole shift console is ready to be reinstalled, and after installing, the shift knob is screwed back in, and the shift joystick is stuck to the shift lever with double stick. The excess ribbon is folded up and tucked just to the front of the shift mechanism.
|
|
