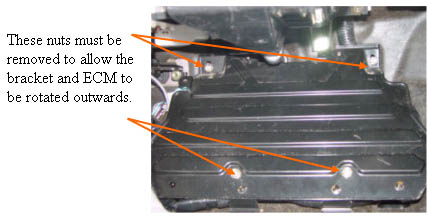
Getting the ECM separated from the bracketRemove the two 10mm nuts at the top, and the two 10 mm nuts at the bottom of the ECM bracket. Lift the bottom of the bracket up and out, and rotate the assembly counter clockwise, to get at the final two 10 mm bolts that hold the ECM to the bracket from underneath.
Be very careful not to stress or break any of the wires, this assembly should rotate with little strain on the harness if you do it correctly. Remove the last two bolts that are holding the ECM to the bracket,from underneath then remove the bracket.
This is the most difficult step of the whole installation, as the harness is in a bad place to work comfortably. I found it easiest to kneel on a soft cloth just outside the open passenger door while leaning into the car to make the connections.
|
|