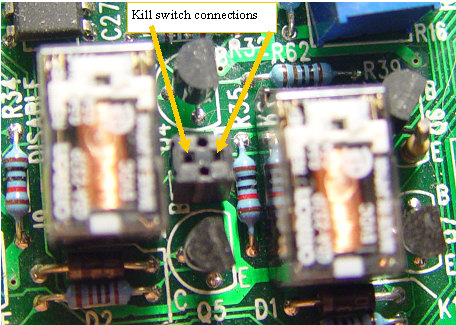
The end of the Plug and Play MIMA, and MIMA2
MIMA introduction
MIMA Operation
MIMA Users Page
Installing MIMA with The Plug and Play harness
Installation and introduction
1. Disassembly
2. Gaining access to the opening behind the seats
3. Threading the DB-25 to the front
4. Installing the rear connections
5. Mounting the MIMA system in the car.
Running the DB-25 under the rug
The distribution board
Mounting the MIMA kill switch
The Kill sw socket
6. Accessing and connecting to the ECM
7. Installing the MIMA joysticks
8. Mounting the display
9. First powerup
10. The first MIMA operational test
Installing MIMA in a RHD Insight
FAQ
Installing MIMA with the pin replacement harness
software
The MIMA Joystick
The MIMA Display
The FAS system
DIY MIMA L
Cable impedance problem with last MIMA systems.
Learning to drive with MIMA
Hardwired Harness
Theory of Operation

The Kill sw socket

The Kill sw socket
Make sure to plug in the kill switch here

It is difficult to see the tiny two pin connector on the MIMA controller board that the kill switch plugs into. This is where the pins go. If the kill switch is not plugged in correctly, or is turned off, MIMA will not be able to control the IMA.