The end of the Plug and Play MIMA, and MIMA2
MIMA introduction
MIMA Operation
MIMA Users Page
Installing MIMA with The Plug and Play harness
FAQ
Installing MIMA with the pin replacement harness
Installation and introduction
1. Disassembly
Shift console removal
Remove rear storage compartment
Remove all the torq and 10mm bolts from the rear covers.
Continued...
2. Installing the harness tubes
3. Threading the Harness
4. Removing the pins from the Multilock connectors
5. Installing the rear connections
6. Mounting the MIMA system in the car.
7. Accessing and connecting to the ECM
8. Overall wiring test
9. First power up test
10. The first MIMA operational test
11. Confirming temp probe and fan control operation, and final checkout
12. Mounting the low profile display
13. Removing the MIMA harness
software
The MIMA Joystick
The MIMA Display
The FAS system
DIY MIMA L
Cable impedance problem with last MIMA systems.
Learning to drive with MIMA
Hardwired Harness
Theory of Operation

Shift console removal

Unscrew the shift knob by turning it counter clockwise until it is off the screw.

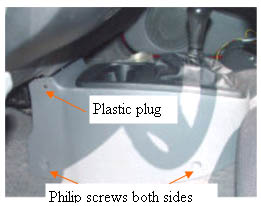
Remove the four screws (2 on each side) at the corners of the shift console cover, and pop out the plastic plugs with the upholstery tool. The shift console cover should now lift right out of the car. The plugs are in there pretty good, so pry carefully with the tool provided. If the plug breaks, you will have to get a replacement from your Honda parts department.

Shift console removal