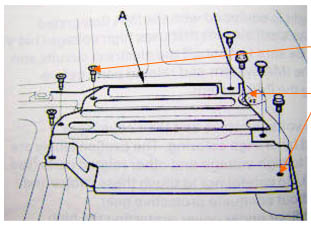
The end of the Plug and Play MIMA, and MIMA2
MIMA introduction
MIMA Operation
MIMA Users Page
Installing MIMA with The Plug and Play harness
FAQ
Installing MIMA with the pin replacement harness
software
The MIMA Joystick
The MIMA Display
The FAS system
DIY MIMA L
Cable impedance problem with last MIMA systems.
Learning to drive with MIMA
Hardwired Harness
Level 1 Installation
2. Disassembly
Shift console removal
Remove rear storage compartment
Remove all the torq and 10mm bolts from the rear covers.
Continued...
3. Thread the Harness
4. Threading the Harness, Cont'
5. Opening the Harness
6. Level 1 Install (rear connections)
7. Fan Diodes Install
8. Battery Amp Monitor Rear Connections
9. Mounting the MIMA system in the car.
10. Level One wiring test.
11. Level 1 Check first power up
12. The first MIMA operational test
13. Testing the fan control wiring
14. Confirming temp probe and fan control operation
Level 2 install
Theory of Operation

Continued...

Once all of the screws are removed, the switch turned off, and the final screw removed, you must also remove the small aluminum cover to the right (from rear) of the electronics area.

This cover has a variety of different bolts and screws the plastic screws on the front look like standard Philips, but may not unscrew, and will need to be pried out. There are two bolts on the back, one is hidden by the carpeting. Finally the plastic push plugs will need to be pried out. Once this panel is out, the big cover should easily lift out.

Continued...