The end of the Plug and Play MIMA, and MIMA2
MIMA introduction
MIMA Operation
MIMA Users Page
Installing MIMA with The Plug and Play harness
Installation and introduction
1. Disassembly
2. Gaining access to the opening behind the seats
3. Threading the DB-25 to the front
4. Installing the rear connections
5. Mounting the MIMA system in the car.
Running the DB-25 under the rug
The distribution board
Mounting the MIMA kill switch
The Kill sw socket
6. Accessing and connecting to the ECM
7. Installing the MIMA joysticks
8. Mounting the display
9. First powerup
10. The first MIMA operational test
Installing MIMA in a RHD Insight
FAQ
Installing MIMA with the pin replacement harness
software
The MIMA Joystick
The MIMA Display
The FAS system
DIY MIMA L
Cable impedance problem with last MIMA systems.
Learning to drive with MIMA
Hardwired Harness
Theory of Operation

Mounting the MIMA kill switch

Mounting the MIMA kill switch
Mounting the kill sw

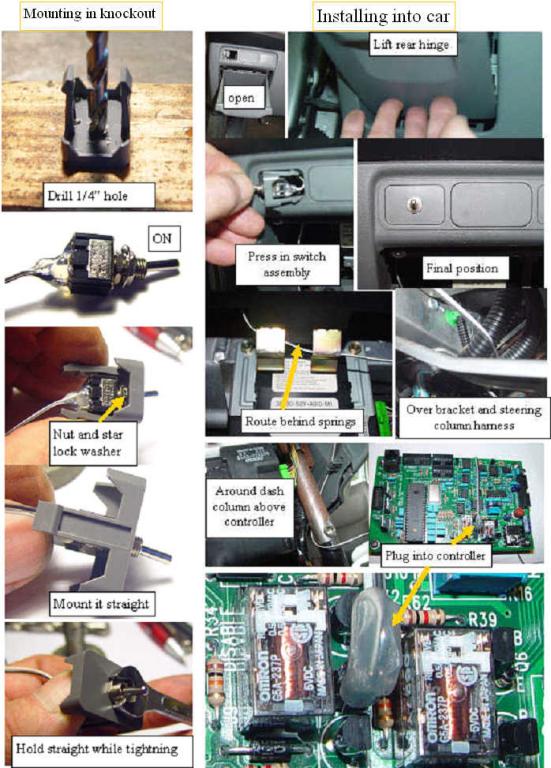
The MIMA system is designed to allow manual control of the assist and regen functions. If you need to disable this control, just flip the MIMA kill switch and the car reverts back to standard IMA and the MIMA card will not cause assist or regen no matter what the MIMA card tries to do. If someone that is not familiar with MIMA must drive, this is a simple way to disable the joysticks.
The switch can be mounted in one of the three knock outs above the small coin holder to the left of the steering wheel. Simply pop out the knockout by prying out with a knife. Drill a 1/4" hole in the center, mount the switch, run the wire, and plug into the kill switch connector on the MIMA card.