The controller
|
 | |
|
All wired up
|
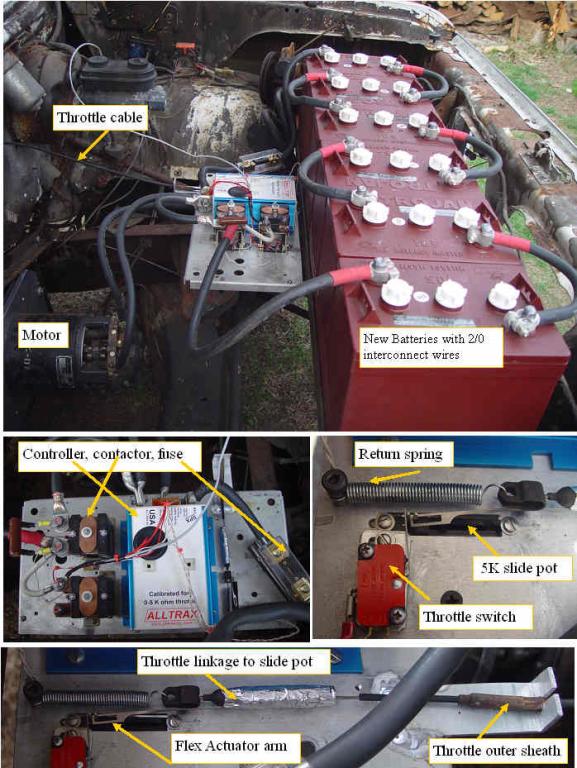
The next step was to mount the batteries and controller and wire it up. I bought some new batteries, as the 12 T105's that I had were pretty beat from to years of golf cart use. The batteries were mounted on an angle iron frame that was welded to the frame.
I got some beefy battery terminals, and invested in the correct crimping tool for the big 2/0 wire that was used for the high current wiring. $4.75 a foot for the welding cable makes one very careful to use as short a wire as possible. The throttle pot and linkage is always an expensive item, so I decided to try a simpler cheaper way. The truck throttle cable was fed through an aluminum bracket, and then to a spring to pull the cable out and lift the throttle pedal.
The travel of the pedal/ cable was limited by a small aluminum bracket so the cable travel is the same as the 5K slide pot travel. I found a piece of thin spring steel with a slotted end, that with a bit of sanding fit nicely into the slot in the slide pot actuator. The slide pot was moved to the end of travel, and the throttle switch adjusted to open when at the end of travel. The spring steel actuator was first held with zip ties, then taped to the throttle cable sleeve with black electrical tape, which is carefully coated with PVC pipe cement to make it permanent.
It works quite well considering how simply it is made. The first powered test showed a non linear response, and sure enough the pot was an audio taper rather than linear. I mounted the pot so the taper gave smooth low speed operation, and a fast ramp up in speed at the full throttle end. The worlds first log throttle.
|
|
