The end of the Plug and Play MIMA, and MIMA2
MIMA introduction
MIMA Operation
MIMA Users Page
Installing MIMA with The Plug and Play harness
Installation and introduction
1. Disassembly
2. Gaining access to the opening behind the seats
3. Threading the DB-25 to the front
4. Installing the rear connections
Pulling the connectors
Plugging in the MCM adapter
Notching the MPI foam
MPI thermal probe
Battery fan removal
insert the battery probe
5. Mounting the MIMA system in the car.
6. Accessing and connecting to the ECM
7. Installing the MIMA joysticks
8. Mounting the display
9. First powerup
10. The first MIMA operational test
Installing MIMA in a RHD Insight
FAQ
Installing MIMA with the pin replacement harness
software
The MIMA Joystick
The MIMA Display
The FAS system
DIY MIMA L
Cable impedance problem with last MIMA systems.
Learning to drive with MIMA
Hardwired Harness
Theory of Operation

Plugging in the MCM adapter

Plugging in the MCM adapter
Rear MIMA connectons

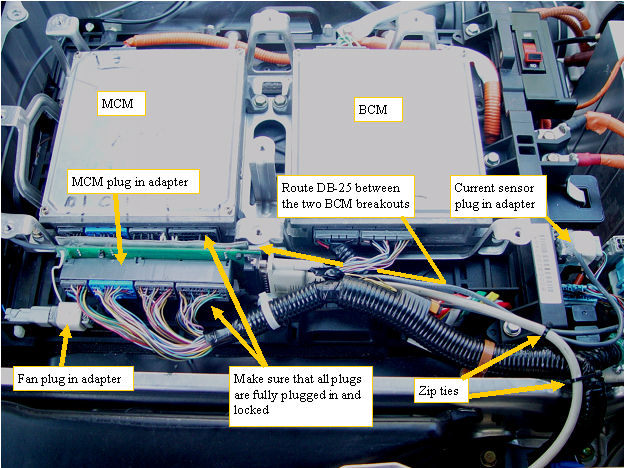
The MCM plugin adapter is plugged in between the stock harness and the MCM computer. Make sure the plugs are fully seated and locked.The fan plug in adapter and the current sensor plug in adapters are simply plugged in between the stock harness and the mating plug.
The adapter uses amp tyco sockets on the slightly larger pins in the stock female socket. If the adapter does not easily plug in,do not force it,the pins may simply not line up exactly with the sockets in the plug. Simply pull the plug in adapter back out and try again at a slightly different lead in angle. Once the pins start into the connector the plug in adapter should fully seat into the socket and lock into place. The stock connector is then plugged into the adapter to complete the circuit.