The end of the Plug and Play MIMA, and MIMA2
MIMA introduction
MIMA Operation
MIMA Users Page
Installing MIMA with The Plug and Play harness
Installation and introduction
1. Disassembly
2. Gaining access to the opening behind the seats
3. Threading the DB-25 to the front
4. Installing the rear connections
Pulling the connectors
Plugging in the MCM adapter
Notching the MPI foam
MPI thermal probe
Battery fan removal
insert the battery probe
5. Mounting the MIMA system in the car.
6. Accessing and connecting to the ECM
7. Installing the MIMA joysticks
8. Mounting the display
9. First powerup
10. The first MIMA operational test
Installing MIMA in a RHD Insight
FAQ
Installing MIMA with the pin replacement harness
software
The MIMA Joystick
The MIMA Display
The FAS system
DIY MIMA L
Cable impedance problem with last MIMA systems.
Learning to drive with MIMA
Hardwired Harness
Theory of Operation

insert the battery probe

insert the battery probe
Insert probe and remount fan

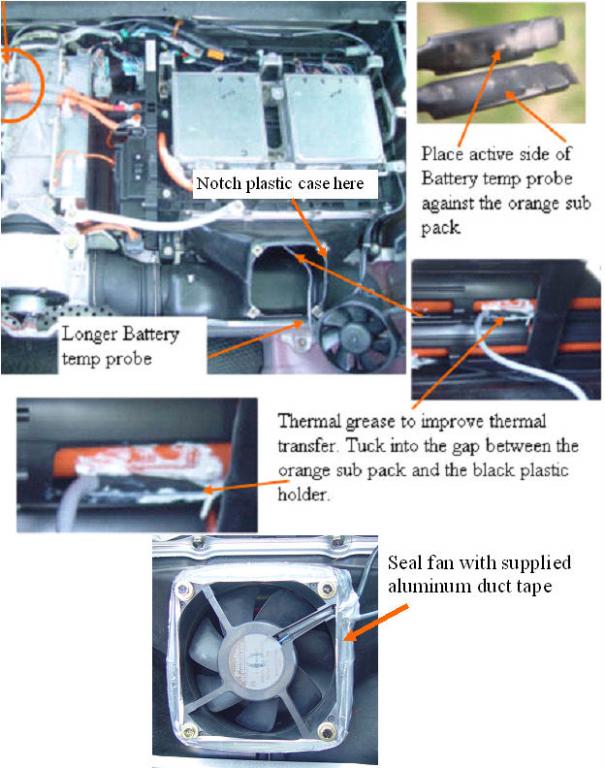
The fan enclosure will need to be notched to allow free passage of the thermal probe. The probe is coated with a dab of the thermal compound on the active side, and is inserted between the black plastic battery retainer and the battery with the thermal probe active side toward the batteries. The probe wires are zip tied to the battery wire, and the fan is remounted. Finally seal the gap around the fan to make the fan more efficient at drawing air through the pack.
The rear install is now finished. Leave everything open until we do the powerup test.