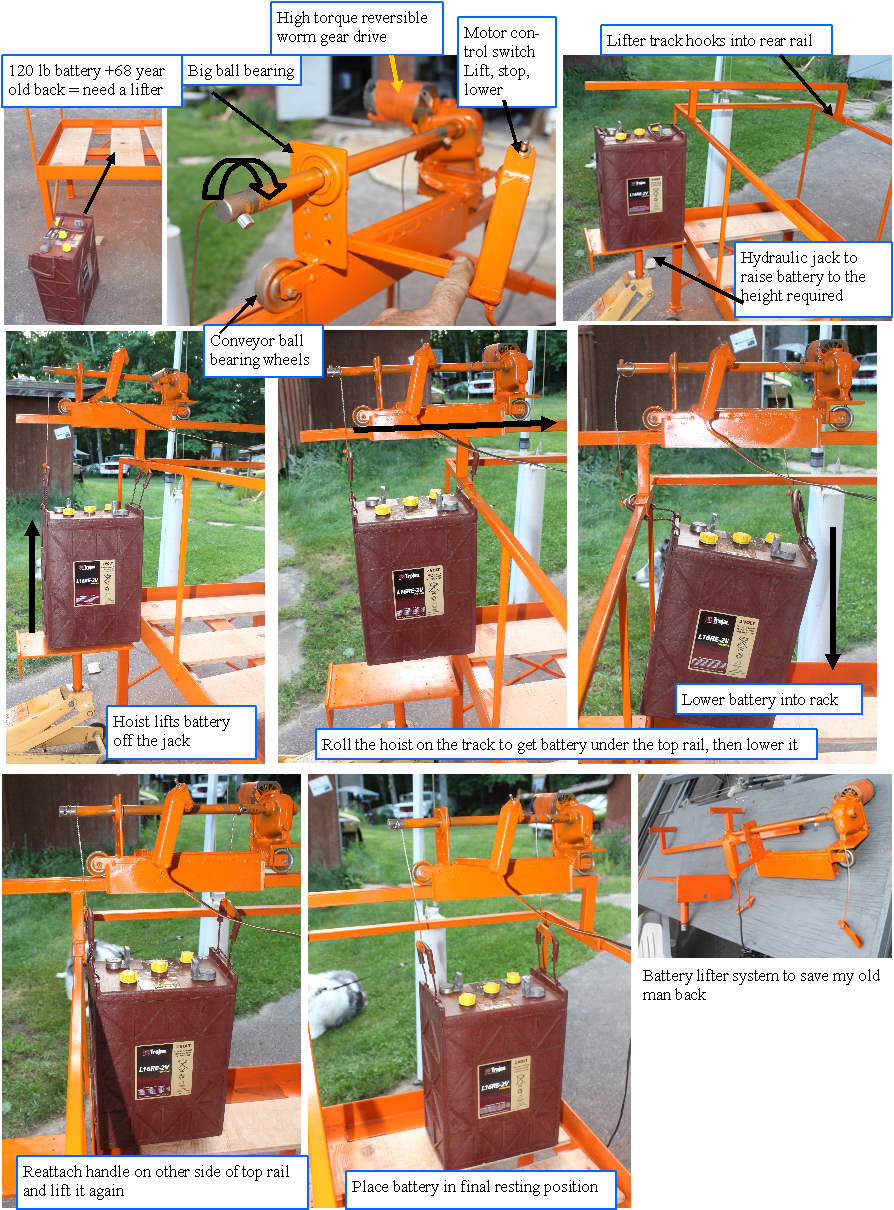
Getting too old to be slinging 120 lb batterys into the rack
|
 | |
|
Mikey the old man battery needs custom battery hoist
|
Ok, I made a nice rack for the battery's, but the batteries are so heavy that I am afraid that I may wreck my back loading them onto it. I can lift them and stand straight, but that only gets them half way to the height required to clear the lip of the big angle, and the top support rail only allows ~ 1/2 inch of clearance, so having full control of the weight at all times is required to pass the rail and get the battery in the rack. After looking at transmission lifts and other off the shelf solutions, I decided that I needed to design and build a custom lifter to do the job.
Went digging in the stuff box, and found a nice worm gear right angle Dayton gear motor which has a very high gear reduction, some ball bearing conveyor rollers, and misc shafts and square tubing.It is important to have a worm drive so the weight of the battery does not back drive the motor. I can lift it precisely due to the high gear ratio, and when I stop, the battery just stays there.
The top rail for the lifter clips into the rear rail of the stand, and the motor driven shaft is set at an angle so a wire rope can be dropped past the top rail on both sides. Made some clips that the battery handles fit into,with offset cable attachment points so the battery stays level so the hoist can be simple clipped on the battery handles.
Getting the battery to the best starting height is accomplished by a custom table that jacks into my big hydraulic jack.
The rope handles on the batteries allow me to grab one of the handles from the inside of the rack top rail, and the trolly lets me move the battery within the stand. I put it down, grab the other handle with the hoist from inside the top rail of the stand, and then easily move it to the final resting position.
It works well, Took 2 days to build,and 8-12 years from now when I have to start replacing batteries(optimist), and am 75-80 years old, I will really appreciate this tool.
(feedback)The lifter worked very well,with all of the batteries being put in place on the rack in ~ 1.5 hours. I developed a technique that allowed me to put the battery in place so only a single lift was required to get it in the rack.
Need to enclose the rack with plywood and make a lift up cover, and I will be ready to plug the new batteries into the system.
|
|
