The end of the Plug and Play MIMA, and MIMA2
MIMA introduction
MIMA Operation
MIMA Users Page
MIMA_L # 002 Tour de sol Road rally winner Hypermiler Brian H
MIMA 001 Hypermiler Rick R
MIMA 002 Yves M
MIMA # 003 Calpod
MIMA #004 Hypermiler thermal pilot
MIMA #005 Hypermiler Highwater
MIMA #008 Jack MPG
MIMA 009 JoeMultihuller
MIMA 010K Hypermiler Predrag
MIMA #023K Andy G HAFNHAF
MIMA# 24 IamIan
MIMA # 027 Paul Andrews first UK MIMA
MIMA # 029 Andy L
MIMA # 030 Eric H
MIMA #032 John F (Lightfoot)
MIMA # 033 Jason H
MIMA # 045 Midwest MIMA installer Ed Zandee
MIMA # 50 Dan Carrington
MIMA # 53 Amin Damji with his CVT
MIMA # 057K Carlton B
MIMA # 080P Allert Jacobs first MIMA in the Netherlands
MIMA # 69P,76P,78P,93P Texas install and Insight gathering
Hiroyuki Hayashi
MIMA # 145P Linda H solar vent
Installing MIMA with The Plug and Play harness
FAQ
Installing MIMA with the pin replacement harness
software
The MIMA Joystick
The MIMA Display
The FAS system
DIY MIMA L
Cable impedance problem with last MIMA systems.
Learning to drive with MIMA
Hardwired Harness
Theory of Operation

MIMA # 50 Dan Carrington

MIMA # 50 Dan Carrington
Dan's joysticks

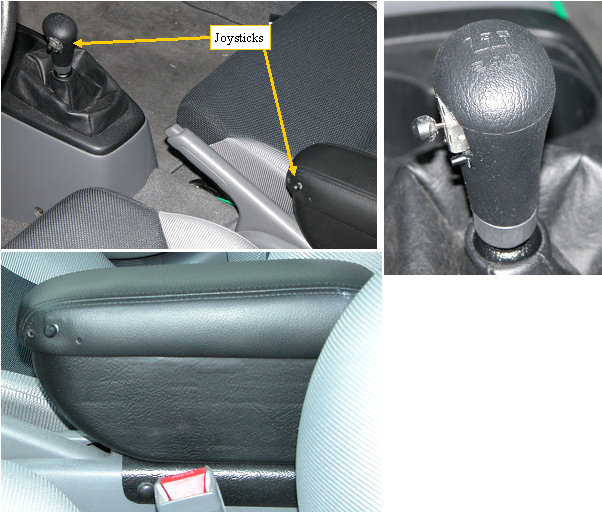
Here are pics of my dual joysticks. Both are built without the circuit boards. The shifter is cut away to fit the parts. I sliced the outer rubber to the base to run the ribbon wire down, and glued back with silicone and put some heat shrink at the bottom ledge to keep it from opening up. The ribbon wire was then fit through the stock gap in the boot, next to the shifter shaft. When the console loose, I fished under and pulled the ribbon wire through and then put a connector on it for the motherboard connection. The armrest is from ebay. I had to buy an un-glued lid to do the install as the normal ones are glued really well. The ribbon wire runs out the back and then under the consoles and carpet. Both work with my thumb. Forward for boost, rearward for regen, up and down for PIMA regen adjust and settings.