The end of the Plug and Play MIMA, and MIMA2
MIMA introduction
MIMA Operation
MIMA Users Page
Installing MIMA with The Plug and Play harness
Installation and introduction
1. Disassembly
2. Gaining access to the opening behind the seats
3. Threading the DB-25 to the front
4. Installing the rear connections
Pulling the connectors
Plugging in the MCM adapter
Notching the MPI foam
MPI thermal probe
Battery fan removal
insert the battery probe
5. Mounting the MIMA system in the car.
6. Accessing and connecting to the ECM
7. Installing the MIMA joysticks
8. Mounting the display
9. First powerup
10. The first MIMA operational test
Installing MIMA in a RHD Insight
FAQ
Installing MIMA with the pin replacement harness
software
The MIMA Joystick
The MIMA Display
The FAS system
DIY MIMA L
Cable impedance problem with last MIMA systems.
Learning to drive with MIMA
Hardwired Harness
Theory of Operation

Notching the MPI foam

Notching the MPI foam
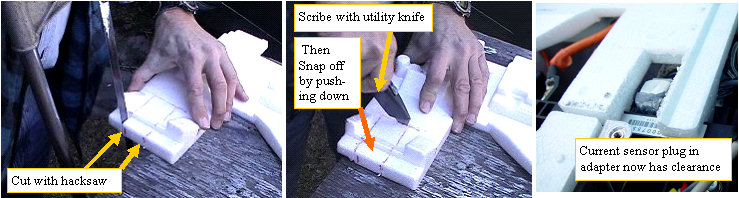
Cutting some clearance for the current plug in adapter

The MIMA current sensor plug in adapter sticks up a bit over the rest of that area of the current board. We must notch the foam to allow clearance. A hacksaw works nicely for the long cuts, and the utility knife will scribe a deep line for the short cut. simply lift the foam when it is cut and scribed, and press down on the piece of foam we want to remove and it will just snap off.