The end of the Plug and Play MIMA, and MIMA2
MIMA introduction
MIMA Operation
MIMA Users Page
Installing MIMA with The Plug and Play harness
Installation and introduction
1. Disassembly
2. Gaining access to the opening behind the seats
3. Threading the DB-25 to the front
4. Installing the rear connections
Pulling the connectors
Plugging in the MCM adapter
Notching the MPI foam
MPI thermal probe
Battery fan removal
insert the battery probe
5. Mounting the MIMA system in the car.
6. Accessing and connecting to the ECM
7. Installing the MIMA joysticks
8. Mounting the display
9. First powerup
10. The first MIMA operational test
Installing MIMA in a RHD Insight
FAQ
Installing MIMA with the pin replacement harness
software
The MIMA Joystick
The MIMA Display
The FAS system
DIY MIMA L
Cable impedance problem with last MIMA systems.
Learning to drive with MIMA
Hardwired Harness
Theory of Operation

Battery fan removal

Battery fan removal
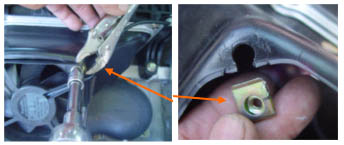
grab the clips so they don't rip out

The battery temperature probe will be installed inside the battery pack. First we need to remove the fan by removing the four mounting screws. The metal clips that the screws thread into usually must be held with vicegrips so they do not rip out when the screws are first broken loose.