Grid Charger
Grid charger owners and location, as well as some service links for hybrid services
Grid charger code V3.0 manual
Understanding the charging and balancing process
Pack discharger
SOC reset device
Insight Battery pack lifter
Grid charger test adapters
Reprogramming the charger
Installing the Genesis One Universal grid charger in an Insight
Installing the Genesis One Universal grid charger in a First Gen Civic
Harness options
The Universal Grid Charger
MIMA Pack Whack and rebalancing the battery
Mikes Insight
EV Insight with a Prius heart
Grid charger Operating Instructions V1.2
Designing a PHEV system for the Civics, Insight 1 and 2 ------------Micro V-Buck PHEV
Doug's V-Boost
Randall's Insight
Paul's Adventures in alternative evergy
Western Washington University X-Prize car
BlueBird1
Finding The Best Hybrid Mix
5th wheel part 2
Air cooled 5th wheel
Air springs arrive
No assist when warm
Attachment plate / Ripping the battery pack out .
Back to the 5th wheel
Back to the 5th wheel with some power in our pocket
Beefing up the rear suspension to handle the extra battery weight
Better wheel
IMA Battery Booster/Balencer/Charge controller.
Booster Battery progress
Booster pack test 1
Breaking away from the grid
Cleaning things up for the trek to Madison
DC/DC mounting and cooling
E-Wheel repair and inspection
Final 5th wheel
Finishing up the boost power supply
First full weight test
First power up of boost power supply
Got the exhaust finished
FAS
Holy Bat Dropings Robin it is an electric car
MIMA logo?
Air spring and EV wheel begin to take shape
More Prius batteries
New 5th wheel
One hour of electric priority
Portable charging system
Second boost test run
Some booster battery options
Starting to plan the trip to Madison
Test runs and 5th wheel
The Etek motor
The EV Wheel
The ideal battery for a 200 mile commute
Vboost +MIMA, a winning combo for the Insight
What is that orange tail on my Insight
E-wheel for any vehicle

Test runs and 5th wheel

Test runs and 5th wheel
Air system test and 5th wheelV2
I got a chance to do some driving with the air springs, and notice a few things. You need to keep at least 5-7 psi in the bags to inflate them so they move without damage. The min recomended is ~ 20 psi. At 6 PSI, the car rear is lifted about an inch more than without the spring. Conclusion. Unless you are carring weight, it would be better to take the springs off.
Unless you like the feeling of going down hill all the time.
I put two batteries and the spare in back to see how it would ride. The ride was smoother as one would expect with more mass. Even with two 61 LB batteries the springs only needed 8 PSI to get the height about normal.
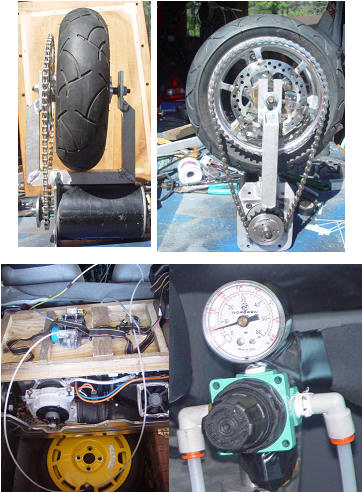
I worked more on the 5th wheel and it's attachment to the car. I had a policy of not modifing the car so much that I could not return it to normal, so I may as well go the whole way here. I was originally thinking of connecting the motor/wheel assembly to the torsion bar that the two rear wheels are mounted to, by clamping on. I am not happy with the positiveness of that for something that could be hit by a piece of truck tire or frozen slush.
The new improved plan will make an aluminum sub structure that connects to the sprung chassis, and clears the torsion arm and wheel support arms. It will be bolted through the bottom of the car so that it is made part of the structure. The air cylinder/5th wheel will attach to this sub structure. It will be made strong, over built.
I am not going to use chain for the drive, I will use a super strong gates cogged belt drive. The same thing the new Harley motorcycles are using. Hope to get Gates to give me the drive components. Curtis sponsored me with a 1204 36-48V 275A PWM controller, and two big decals for the car.
Vicor is also going to give me the BatMod constant current power supplies that I will need to regen back into the 48V battery if the oppertunity presents it self.