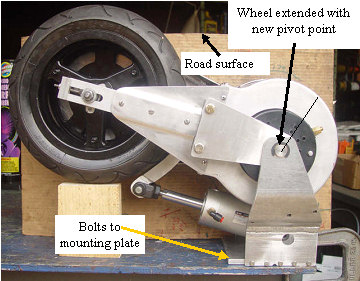
Final 5th wheel
|
 | |
|
new pivot position
|
After a lot of careful measurements, I have decided to pivot the 5th wheel right on the central axis of the Etek motor. I made bushings and pivot shafts and was able to attach them to the aluminum main plate. Instead of the two cylinders I found a single 2.5" bore unit that should be able to generate enough down force, and has enough travel. Made the whole unit so it attaches to a single plate. I hope to finish the system and mount it tomorrow.
The Etek motor will now be completely sprung weight, and the wheel should follow the road much better than the see saw pivot in the last mount.
WOW that Etek has some power.
I started on flat ground, and at set current limit for the controller(177A), I took off smoothly and got to ~ 31MPH before the amps dropped indicating I was at top speed. I did not measure the time, but it was faster than a good hypermiler would take off, about my normal takeoff speed, lots better than the wheel chair motor. The neat electric whine noise level even with the hard mounts throughout, was not very high.
I was able to climb small hills with no noticeable speed drop, at about 75A, so once rolling, I could probably have 3:1 ratio, instead of the 4:1 I presently have. The 60PSI in the spare tire/air tank, was able to generate 133 lbs of down force, with my mechanical linkage and 2.5" bore cylinder which lifts the rear of the car about 1/2 inch when down. When up, the wheel is held up with over 100 lbs of force. I only had a short wheel slip when I first took off with the wheel on sand, The tire flattens to about a 3"X 4" patch on the road.
I need to move the exhaust a bit to keep things from bumping when on rough roads. The wheel has about 4" of road clearance, and sits about 5-6 " behind the rear wheel track. I went about a mile under electric power, and the motor was not noticeably warm when I returned.
In all, I am satisfied that it is in the right power range for the Insight even with the extra weight. I have gathered the components to make it fit my Dodge caravan trailer hitch, I have to try it.
I disassembled the whole motor enclosure, washed it with alcohol, then reassembled and sealed with silicone. a MIMA type temp probe was installed right on the motor face plate, and I sealed the case. The temp will be monitored to understand the thermal characteristics, and the current limit will be adjusted accordingly. The motor can take 300A for 1 minute, I am only at 177A. lots of room to play.
Poor batteries, better keep the amps down.
|
|