Building the Solar HV charger/rebalancer
|
 | |
|
Building a HV charger/rebalancer
|
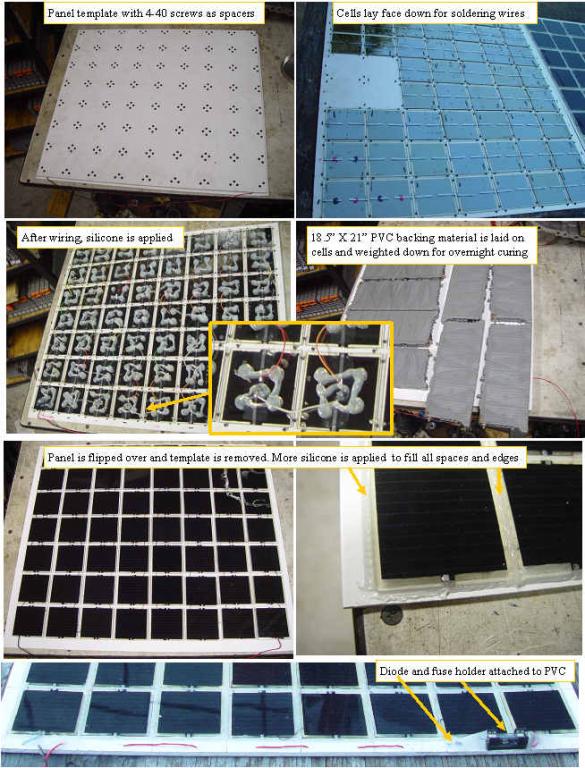
Finally got some more HV solar panels built. To make the process simpler and more reliable, I determined that a fixture to hold the cells in position while connecting wires and gluing with silicone was required. An 18.5" X 21" expanded PVC panel was drilled and fitted with 4-40 self tapping screws, with a pattern that positions the cells uniformly. The fixture will work up to 56 cells (HV panel). The cells are laid between the screws, and short stranded wires are used to connect the whole 56 cell array in series. The + and - end points have heavier wire. The rear of the cells each have four silicone bumps applied. and the backing PVC is carefully laid in position over the fixture and weight is applied. Overnight curing will fix the cells position and allow the whole fixture/panel to be turned over, and the fixture is removed.
Silicone is applied to all cracks between the cells as well as around the edges, and the panel is left on a flat surface for several days of curing.
The positive output is run through a fuse holder, and an isolation diode.
This single panel charges the pack at a max of 85MA. A dead pack would take over 80 hours to fully charge with this low current.Three of these panels in parallel would take about 26 hours to fully charge a completely dead pack.
Fortunately the packs usually are in the 20-80% SOC range. A pack that is at full on the Insight SOC gauge is about 80% charged, so it can still take ~ 1.3AH or about 15 hours of sunlight with a single panel, and a bit over 5 hours with a triple panel to reach the equalization stage.
Longer is better, as we want to bring up any cells that are not full, and the low current will not damage the pack.
|
|