****Refer to display comparison above for your type of display.**** To adjust the calibration, I suggest you put the car in neutral and set the e-brake. Some adjustments must be made with car over 19 mph to observe the changes on the display, but adjustments can still be made. System calibration and configuration: To enter system calibration, you press and hold the mode 2 button until the mode 2 and mode 3 LEDs light up, as well as all of the amp LEDs. If the car is stopped, mode 2 & 3 LEDs will flash alternately. This puts us in the display brightness calibration mode. To leave calibration at any time, simply press the mode 2 switch again. All calibration steps are saved when the joystick central switch is pressed. To move to the next calibration procedure, tap the mode 1 switch.
A. Display brightness: The brightness of the LEDs is set by moving the joystick auxiliary axis to the jog-down (right) or jog-up (left) direction in proportion to how bright (jog-up, left) or how dim (jog-down, right) you want it. All the LEDs are illuminated in the amp display so you can see the effect as soon as you move the stick. While in this calibration mode, the display will always reflect the present setting of the joystick rather than the stored value. This allows you to see the brightness in real time, as you change the stick. When the brightness is as you want it, the central switch is pressed to lock it in to memory. After pressing this switch the display will not stay at the set level, but will follow the joystick motion. When you leave the calibration mode, the set brightness will be applied to the display. You can do the adjustment as many times as needed to get it just where you want it. Each press of the central switch stores that value in flash memory.
When finished, tap mode 1 switch to move to the next calibration function.
B. Assist Magnify Factor: In PIMA, the assist set point is constantly compared to the actual MAP (Manifold Absolute Pressure) sensor signal. The difference once the MAP crosses the set point in the less MPG direction, is computed, and multiplied by this MAG factor to determine the level of assist. A mag factor of 1, will be the slowest activation after crossing the set point. Mag factor 2 is 2X faster, MAG factor 3 is 4X faster, and mag factor 4 is 8X as fast. The Mag factor is set in a similar way to the brightness adjustment, by moving the stick in the jogup/jog down direction, but differs in two ways. Since Mag factor only has 4 possible settings, you will only see 4 changes through the full jogup/jogdown motion. Another difference is that the jogup/down motion adjustment is made while you hold the joystick central switch down, and the value is stored when the central switch is released, the complete opposite of the brightness calibration; which is locked in when the switch is pressed, and adjusted when it is not. Sorry for the confusion, I will try to fix that the next time I need to get into the code. Move to the next calibration function by tap the mode 1 button.
C.PIMA ABC ramp rate: Since the MAP signal that is the control signal for both PIMA and ABC can change very rapidly with changes in throttle position and engine load, there is a need to slow down the actual time changes in assist or charge to some more reasonable speed to avoid jerky control. This calibration function allows changing the speed of response of the system to MAP changes. The speed is set with the same auxiliary axis and central switch activation as the other calibration functions. The extreme jog-down (right) position will reduce the ramp speed, the central position is a good default, and the extreme jog-up (left) position will make the speed as slow as possible; say, softening the change between assist and regen. The adjustment has 64 levels. If this adjustment is made while over 19MPH, the throttle can be pressed down and released to experience the different settings effects. The final setting is stored in flash, and will remain in effect until the calibration is again performed. Tap the mode 1 switch to move to the next step.
D. Joystick ramp rate: The rate that the joystick actions will be allowed to change is set identically to the PIMA, ABC ramp calibration, but the joystick wants to react more quickly, so the range of adjustments for Joystick ramp speed is only 15 levels. Tap the mode 1 switch to move to the next step.
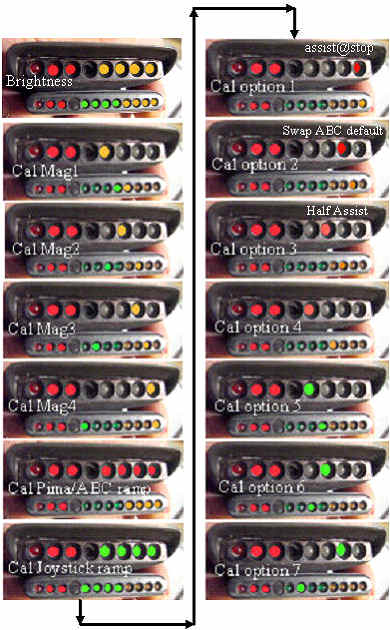
E. Option configurations, 1, 2 and 3: One of the reasons that MIMA is so useful is that it allows the driver to tailor his use of the IMA to the actual driving conditions he has to contend with, rather than settle for Honda's compromise system. The ability to configure certain aspects of the MIMA system for individual taste and needs, is what this configuration step allows. Blinking LED=0----steady on=1 low profile display configuration:R=RED,A=AMBER,G=GREEN LED--- POSITION----R-A-A-A-A-R-G-G-G-G-R OPTION POSITION----X-8-7-6-5-X-4-3-2-1-X
1. Option 1 STOPASSIST: Several people have voiced concern over MIMA's ability to activate assist, when at a stop, as a safety issue, as that could start the car from an autostop. Others want to retain that ability. This option is off by default, disabling assist when the car is stopped. To activate this function, and have assist available when the car is stopped, you will press the joystick central switch to toggle the flashing first LED to steady on. A second press will turn it back to off and flashing. Once you have it as you like, either press the mode 1 switch to move to the next option, or press the mode 2 switch to get out of the calibration mode and save the setting.
2. Option 2 SWAPABCSET: This option allows you to configure the ABC jog function. If this bit is flashing, the default jog mode when entering mode 1 will be that ABC jog will adjust the ABC charge level in amps. If this bit is set(not flashing), the default will be the ABC setpoint jog. Of course when in the ABC mode, the jog function can be swapped temporarily by pressing the central switch while jogged to either side.
3.*******code versions 1.5.6 and below********* Option 3 HALFASSIST: Several people have indicated that they would like the maximum level of assist to be reduced, to spare their weak batteries, and to make the assist adjustment easier to control. This feature will, when selected, limit the maximum assist to 50% of the normal when using the joystick. The result is finer control of assist, but only up to 50%. The full joystick travel covers the 50% range. Option 4 Not assigned Option 5 Not assigned Option 6 Not assigned Option 7 Not assigned Option 8 Not assigned
******** (Code version 1.5.7 and above)******** Half assist has been replaced with a 4 level max assist, which is set with the last 2 option bits. Assist level -------Bit 7-8 100%---0-0 75%-----1-0 50%-----0-1 25%-----1-1
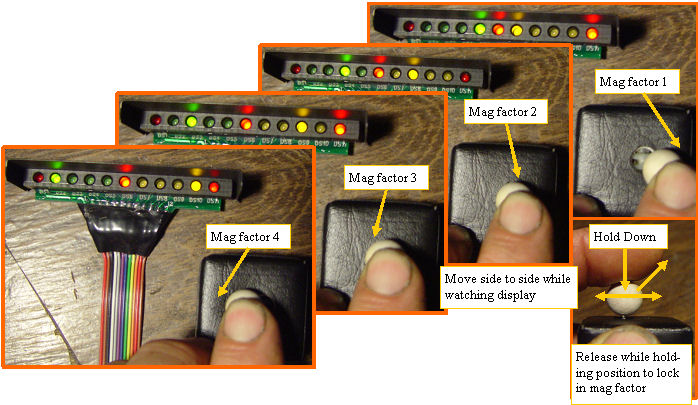
Setting the mag factor
Setting the mag factor
The mag factor is set by first entering the mag factor calibration step as described above. The leds will show the present mag factor. There are only 4 levels of mag factor. If the central joystick is pressed down and held down while the stick is moved left and right, the mag factor leds will change to indicate the new value. The central joystick is released while the correct mag factor is displayed to lock in the new mag factor. You must hold the pressed joystick in position while lifting your finger to get the new valur to lock in.