New England Hybrid Festival 2013
Mikes You Tube Videos
Mikes Saturday Hybrid-Solar- Electric Workshop
Insight 20 AH lithium battery system
assembling the pack core
BMS board mounting position?
Capturing the mounting boss positions
Cell tester is modified and lithium test fixture takes shape.
Charging experiments
Cleaning the cell tabs
fixing and deburring the heat spreaders
Final assembled pack core
Finishing the connection blocks
finishing the fins and end plates
First discharge graph
Getting started on the final design and build
Heat sink fins
heatsink vs no heatsink comparison
Higher thermal sensitivity look at the cell heating still shows no dents
Hot and cold cells compared.
How do the big guys do it
Insulators
Is using this asking for a problem?
main I/O terminals and Heat shrink
Making the 50 insulating strips
Painted cells to increase emissivity
Punching the holes in the tabs
Same discharge with huge heat sink on one side of cell
Testing the fans and layout of the BMS boards
The Battery case starts to take shape
The case is nearly finished
the connector plate is made and mounted
The tab punch
The world in IR Cool
Grid charger Users page
Mikes Surplus Loft
Renewable energy exhibits
New England Hybrid festival 2014

Getting started on the final design and build

Getting started on the final design and build
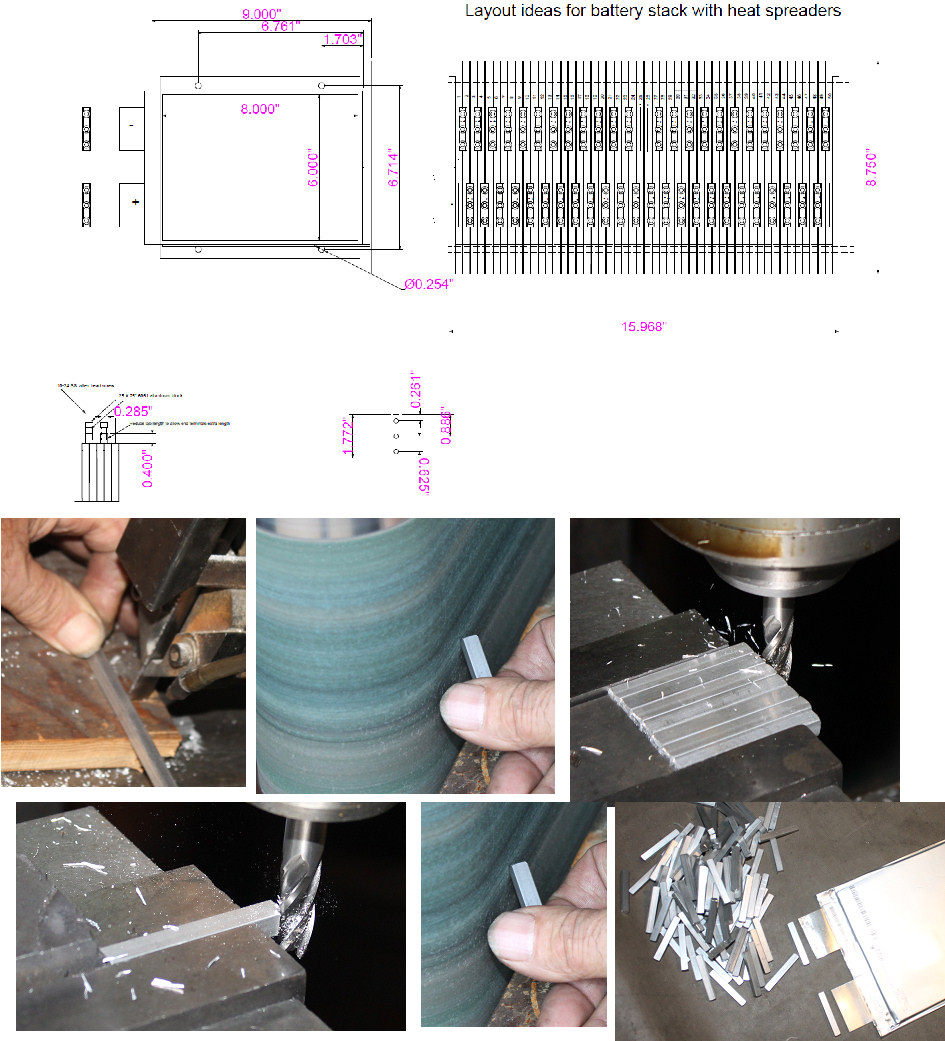
making the buss bars

After looking over all the data and lots of other peoples approach to using the A123 batteries, I still think my original cell to cell and voltage tap concept is going to be the way I will go. If a cell fails, I want to be able to fix it, and since the pack will have a smart BMS, it will tell me which cell is bad, so I may as well put in the work up front to retain that possibility.
Started by rough cutting the 1/4"X 1/4"aluminum 6061 T6 bars to a bit longer than we need with the bandsaw.
Then in order to remove the burrs, I ran all of them through a deburring step on the belt sander.
Next I milled all of them on one side, still longer than the final length desired.
Turned them all around, and made the second side exactly the final length required.
A final deburing with belt sander, and the 110 blocks are ready to drill and tap the holes.
Next task is the cell tab punch, and a final determination as to the best screw size to use for the clamping.