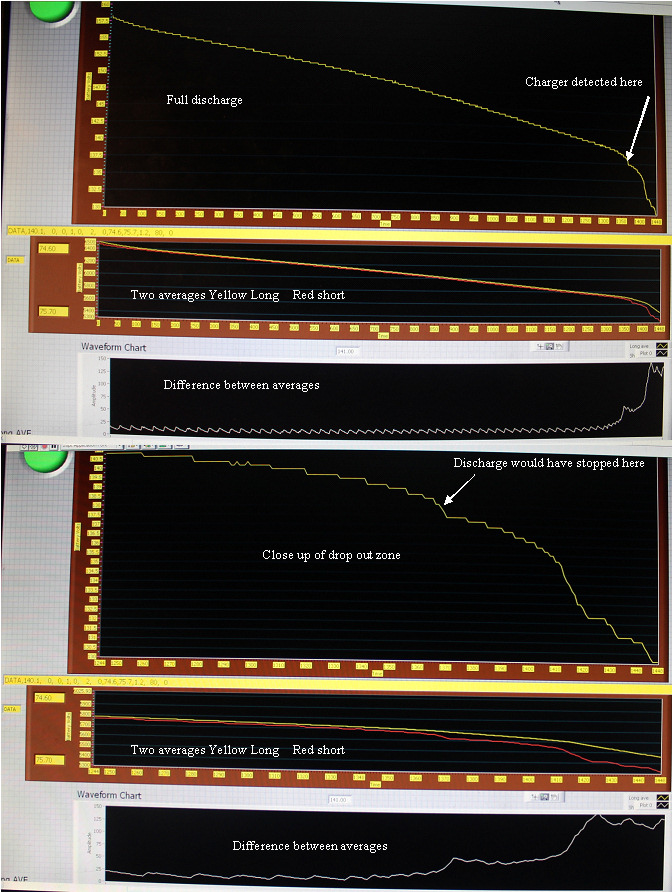
Getting past the drop out to see what is happening.
|
 | |
|
Seeing what comes after a dropout and testing the slope detect
|
Charged the pack very well overnight, and did another discharge,with the automatic detection only giving warnings instead of stopping,so I can discharge as deeply as I need to during this important test.This time I display the long term average of the last 50 datapoints,(Yellow) and the short term average (red) on the second graph.
On the third graph, I show the difference between the two averages. The ripple is the effect on the short term average as a bit change happens.
We see that the actual slope of discharge relates exactly to this difference. When first starting the discharge after a charge, we see a big number(missed it on this graph),but it was near 100 this number drops as the slope flattens out, and gets into the stable zone. On this Civic pack, on the top photo, you can see how consistent the rate of change was through most of the discharge.
The differential between the two averages was at 6-8 through much of this linear slope. The cell drop out, and the 4 others that followed were at a bit lower voltage than the drop out yesterday, so the cell is still improving.
The blip in the slope detector trace shows the rise in drop out slope when the first cell (subpack 10?dropped out,and that raised the difference from the 6-8 to about 25, and a more substantial increase when the rest started to drop, which reached over 140 before I stopped it manually.Clearly a nice clean signal.
The first slope change triggered the time/bit change detection system,and would have gone back to charge.
Once past the detection point, the charger was beeping at me.
I need to know if it was a real drop out, so I had to let it go. I figured I needed to see if any others were ready to go, and sure enough and saw 4 more cells take a dive before I stopped.
I used this opportunity to remove the ends of the pack, and try to identify the weakest subpacks.
I turned on the discharger and recorded the following voltages.
1) 5.60 *
2) 5.72 *
3) 7.03
4) 6.92
5) 5.59 *
6) 5.77 *
7) 7.04
8) 7.09
9) 6.99
10) 4.01 *
11) 6.95
12) 6.94
13) 7.07
14) 6.96
15) 6.98
16) 7.06
17) 7.05
18) 6.99
19) 7.05
20) 7.04
Looks like sticks 1,2,5,6, lost a cell, and stick 10 lost 2.
At this point I could pull those sticks, and determine the bad cells, replace them, and the pack would be in much better shape.
May present a way to fix a pack fairley cheaply?
I will get my cell level tester going again, and see what the cells in the weaker sticks look like.
|
|