New consulting relationship with GreenTecAuto begins
What actually goes wrong with the batteries????
A look at todays Hybrid and EV battery packs
Battery packs exposed
Keeping Warm In New England
Plugging into the SUN
Making a small solar concentrator
Building MIMA and the plug in adapters
All of the parts are nearing completion
Building a better joystick
Building the display components
Making a connector
Making the current and fan connector shells
Making the plug in boards
The Plug in adapter boards are here and are being built
MIMA construction crew
PLUG in adapters for fan and current sensor
The plug in system
TPS smoothing mod
Converting a telephone truck to electric
DIY dual pulse Capacitor Discharge Spotwelder
Chevy Bolt EV joins the family
Getting in shape while making electricity
Retirement
Replacing gasoline with solar electric lawn equipment
What is Genesis One?
How to stop the aging process DIY
MIMA Install Day 2005 a Big Success!
Building a hybrid car grid charger
Tapping into the Wind
Expanding MIMA with the Distribution board ( users projects )

Building a better joystick

Building a better joystick
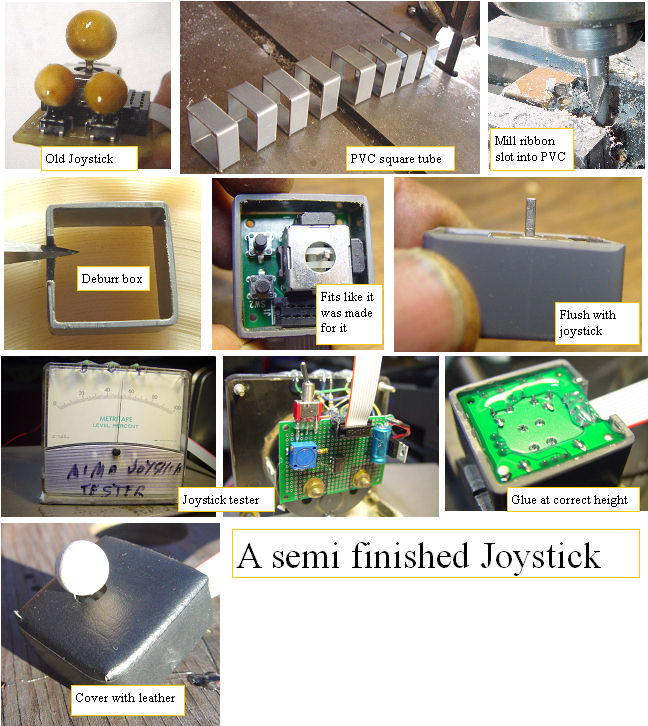
Finishing the MIMA joystick

All previous systems came with a bare PC board with joystick and two switches,some epoxy putty, and some on line examples of how one may finish the joystick with some careful putty application.I personally made an epoxy box around the board that allowed me to put leather over the epoxy, with the two switches just below the leather so they could be operated by pressing the leather above them. It makes them difficult to press by accident, and keeps the dust out. I felt bad that even at the higher price for the system, I only had a bare board joystick. Wanting to give you guys a finished system, I came up with a way to finish each joystick to a nice looking version of my joystick.The process doubled the labor and adds some cost to each joystick, but I will absorb that so your job will be much easier. Enjoy!