OVERVIEW: MIMA/PIMA allows access to three added levels of control of electric assist and recharging (regen) available to the IMA system, to greatly enhance the Insight's efficiency and fuel economy. MIMA/PIMA also increases the amount of electronic assist and regen available for faster acceleration and more efficient battery management. Cars do not "see" hills, traffic controls, traffic conditions, weather, etc., but you do... The first level provides you with basic control of your IMA system. The second level provides you with complete control of your IMA system. The third level allows you to simply program your IMA system for your personal driving habits, traffic, and driving and seasonal conditions for hands free operation. Any changes you may wish to make to your program can be done simply while driving along, only takes a moment. And should you ever wish to do so, you can return to standard IMA mode with the flip of a switch while either driving along or stopped.
Default mode: The car starts in the standard IMA mode, just as though MIMA was not installed. Joylock and FAS features are available in both MIMA modes and are simply explained on page two.
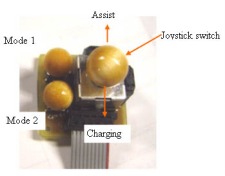
MIMA on demand: When in Default Mode, if you move the joystick forward to the assist direction, the system switches to MIMA active mode or mode 1, and will activate the electric motor in proportion to how much you move the joystick. Return the joystick to center and the system reverts to standard IMA mode. Move the joystick rearward in the charge direction, again switching to MIMA active, and charging will occur in proportion to how much you move the joystick.
MIMA active: You enter this mode by a fast tap of the mode 1 button. In this mode, the standard IMA system is off, and even if the batteries need charge, or you accelerate at maximum, the IMA will not respond. This is good, as it lets you use the full power of the gas engine for cruising, rather than sharing power with the battery charging. Once the engine load is low, an adjustable background charge can be set to come on, be adjusted to a different level, or turned off all automatically. Of course, the joystick can still control both assist and charging in this mode.
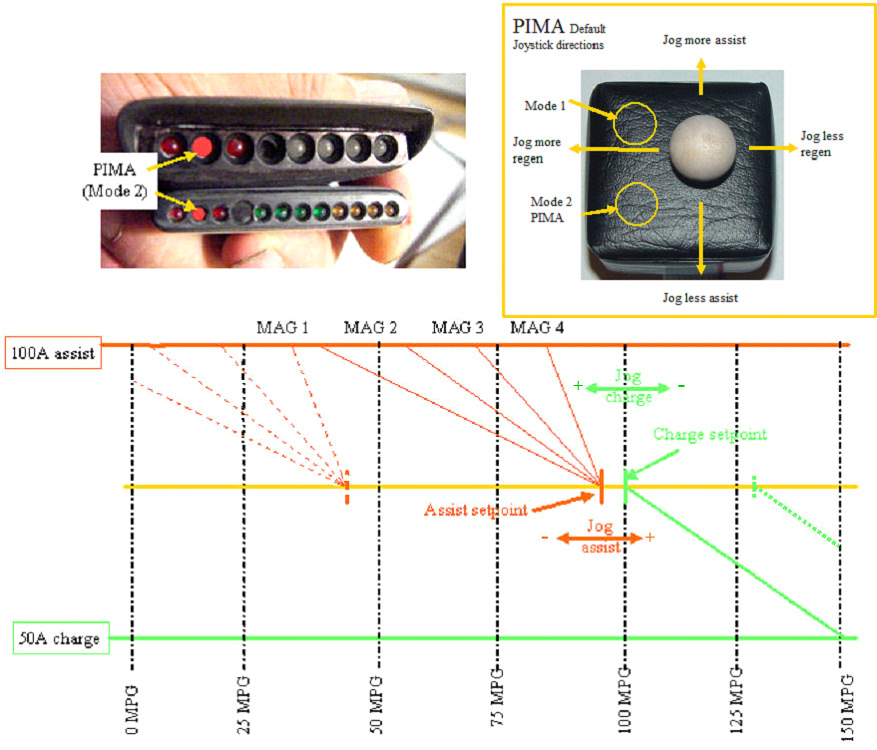
PIMA: You enter this mode by a tap of the mode 2 button. PIMA is very similar to the standard IMA mode, with the major difference being that you can set the point of activation of both assist and regen, as well as determine how aggressively the assist increases as you press down further on the throttle. In the standard IMA, as you press down on the throttle, and the engine load increases, you reach a point where the electric motor begins to provide power to help the gas engine. PIMA allows adjustment of that activation point. Charging in the standard IMA is activated when the brakes are applied, or if the charge is low, the system will charge constantly (except at heavy ICE load) at a rate of 10-20Amps. In PIMA, charging is activated when the MPG reaches the adjustable charge set point, and gets stronger in proportion to the difference between the set point and the actual MPG. If the set point is at 100MPG, charge will reach full at ~ 150MPG.
MIMA on demand and MIMA Active (mode1)
Display for MIMA on demand is same as Mode 1
MIMA ON DEMAND: this is the default mode that MIMA boots up in.
A. In this mode when the joystick is moved out of center either to assist (forward) or regen (rearward), the system switches to MIMA active(mode 1 LED on) and provides direct control of the IMA. When the joystick is released normal IMA is resumed.
B. Joylock: When the stick is moved to the position you like, the Joylock can be activated by a short activation of the joy center switch to lock in that value of assist or regen. The central switch must be pressed with the stick in the assist or regen position that you want to lock. The stick can then be released, and the assist or regen will remain. The locked in value will unlock if the stick is again moved out of center, in either direction, or if the throttle is moved more than 10% from where it was when Joylock was first activated.
C. FAS: When the joystick is centered, pressing the central switch will activate the AR2 output, which is intended to control the FAS (Forced Auto Stall) relay system to kill the fuel to the ICE and stall the engine. For this to work, the car must be in neutral. The engine will restart if the brake vacuum is depleted, if the car is put back into any gear, or if the throttle is depressed. FAS activation is an option that was requested by some Insight owners who wished to include it to activate their separate FAS modification.
MIMA ACTIVE: A short tap of the mode 1 button activates this mode and turns on the mode 1 LED. If the car is moving slower than 5MPH, the system will slowly flash the mode 1 LED, and will revert back to normal IMA mode. Once the speed is greater than the 5MPH, MIMA active will reactivate.
A. When mode 1 is active, MIMA has taken over control of the IMA, so throttle based control of the IMA is disabled. Joystick action directly controls assist and regen.
B. The Joylock feature and FAS feature described above operate exactly the same as above while in this MIMA active mode.
ABC level jog
ABC or (Automatic Background Charge) is constantly operational in mode 1. ABC is a MAP based activation of a constant charge whenever the MAP indicates that the engine load is less than a set value. There are two means by which ABC can be adjusted, which are explained below. To change the default adjustment mode go to page 6, 2.Option 2 SWAPABCSET When jogging the ABC level, there are 31 levels. Jogging all the way up will give full ABC and all the way down no ABC. On a standard configured joystick a jog to the left towards the mode switches will increase the amount of regen, a jog to the right will decrease the regen, and if jogged to the limit in this direction will eliminate any regen
ABC level jog: The default adjustment mode for ABC is charge level control. The joystick if jogged to the jog left, will increase the level of background charging by 1 for each jog. To see the effect, of the jog, the MAP must be past the ABC activation threshold, so that ABC is active. The best time to adjust ABC is going down a hill and throttling up, as that will assure you are past the activation threshold so the effect of change can be seen on the display. A jog to the right will lower the amount of charging when in this mode. The charge level can be jogged all the way off, which will allow no background charging.
ABC setpoint jog
If the joystick is jogged to either jog left, or jog right, and the central switch is pressed while in that position, the mode 1 LED will flash quickly, to indicate that the jog function has switched to jog ABC set point sub mode. In this sub mode, a jog left will move the ABC activation point to a lower MPG to allow the activation at this lower MPG. A jog right will move the activation point to a higher MPG point. To revert back to the jog ABC level, again press the central button while jogging either up or down, or simply tap out of mode 1, and then back into mode 1, as the level jog is the default for this mode.
Mode 2(PIMA)
PIMA
PIMA, Mode 2 Mode 2 or PIMA (Programmable IMA) uses the MAP (Manifold Absolute Pressure [amount of vacuum]) sensor voltage as a control input for the PIMA.
As the MAP voltage rises(more load) the microprocessor reads this change, and when the value gets over a programmable set point, assist will be engaged and controlled proportionally to the amount over the set point.
As the MAP signal drops with reduced load, the assist reduces to zero, and after passing through a range between the set points where no IMA action happens, it engages charging proportionately to the amount under the set point. NOTE: the map signal changes with gear changes,mostly due to higher RPM, so if you set up PIMA for 5th gear, the setpoints will move lower on the MPG scale as you downshift.
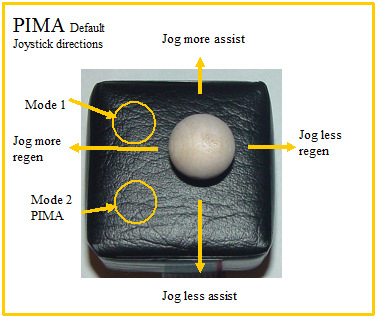
PIMA mode: The (Programmable Integrated Motor Assist) mode is the most powerful MIMA mode, as it allows nearly the same throttle based control as the standard IMA, but with the ability to set the activation points for both assist or charge, and to also control how fast the assist activates once past the set point. PIMA disables normal joystick control, and instead uses both joysticks to adjust the activation points for assist or regen. PIMA is entered and left by tapping the mode 2 switch. The mode 2 LED will illuminate to indicate it is on. If the car is moving slower than 19MPH, the mode 2 led will slowly flash, and PIMA will be turned off. The system reverts to standard IMA mode at this time. Once the car is going faster than the 19MPH, PIMA reactivates.
PIMA, Mode 2 jog calibrate during operation
First, enter PIMA mode by tapping the mode 2 switch. The mode 2 LED will illuminate to indicate it is on. Adjustments are made above 19 MPH.
A. Jog assist: Step on the gas till you see assist kick in, then slowley back off, till the assist guage is about half scale. To raise the level of assist at that point, jog the joystick to the assist position. The right most amber led on the mima display will flash during the jog to indicate more assist. To lower the amount of assist at this point, jog the joystick to the regen position. The left most amber led will flash indicating less assist. The visual feedback helps you to know if you are increasing or decreasing. If the road was flat, and the gas was held steady, you should have seem the ampmeter reflect the change in assist.
B. Jog regen: Let up on the gas till you see regen kick in, then slowley increase throttle, till the regen guage is about half scale. To raise the level of regen at that point, jog the joystick in the direction that flashes the left most green led, and to lower it jog the other way. The visual clue will be the right most green led.
If you jog too far, every other led will flash during the jog. This "ERROR" pattern means that you are against the limits, or that you are against the other adjustments point. A Jog for more assist, when the regen activation point is reached will flash ERROR pattern. You must back off the regen point to raise the assist point.
C. Assist Magnify Factor: This is where you would adjust how much assist will be applied when assist is on. It is adjusted in mode 2 Calibrate mode and is covered on page 5 under PIMA, mode 2 Calibrate mode.
NOTE: The assist and charge activation points are not allowed to cross each other, so if you are jogging the assist activation point to a higher MPG, or jogging charge to a lower MPG point, you will reach a point where it will not change any further. At this point you will have to jog the other set point down to allow further adjustment. When the two set points collide, the display will show X 0 X 0 0 X 0 X while the stick is pressed, so you know you are not changing things.
Setting the mag factor is much simpler than it sounds. The trick is to press down the joystick central switch while also moving it side to side to select the mag factor you want. While in that side to side position, simply allow the joystick central switch to release to lock in the new value.
PIMA, Mode 2 calibrate mode
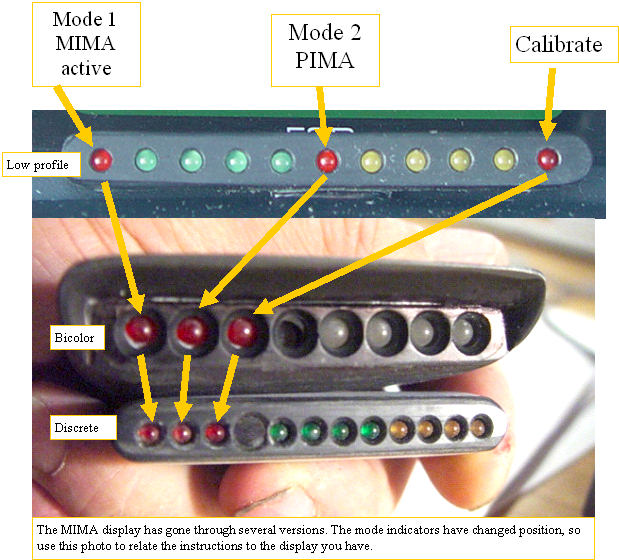
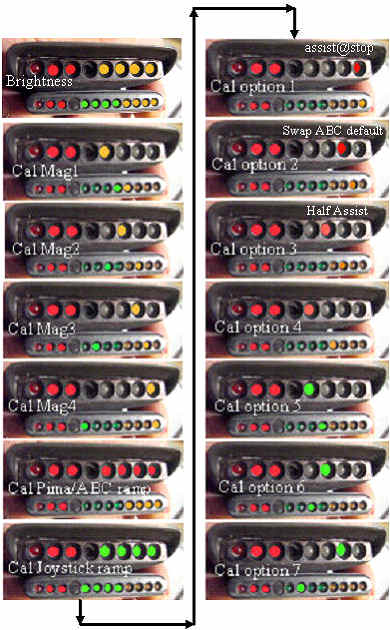
****Refer to display comparison above for your type of display.**** To adjust the calibration, I suggest you put the car in neutral and set the e-brake. Some adjustments must be made with car over 19 mph to observe the changes on the display, but adjustments can still be made. System calibration and configuration: To enter system calibration, you press and hold the mode 2 button until the mode 2 and mode 3 LEDs light up, as well as all of the amp LEDs. If the car is stopped, mode 2 & 3 LEDs will flash alternately. This puts us in the display brightness calibration mode. To leave calibration at any time, simply press the mode 2 switch again. All calibration steps are saved when the joystick central switch is pressed. To move to the next calibration procedure, tap the mode 1 switch.
A. Display brightness: The brightness of the LEDs is set by moving the joystick auxiliary axis to the jog-down (right) or jog-up (left) direction in proportion to how bright (jog-up, left) or how dim (jog-down, right) you want it. All the LEDs are illuminated in the amp display so you can see the effect as soon as you move the stick. While in this calibration mode, the display will always reflect the present setting of the joystick rather than the stored value. This allows you to see the brightness in real time, as you change the stick. When the brightness is as you want it, the central switch is pressed to lock it in to memory. After pressing this switch the display will not stay at the set level, but will follow the joystick motion. When you leave the calibration mode, the set brightness will be applied to the display. You can do the adjustment as many times as needed to get it just where you want it. Each press of the central switch stores that value in flash memory.
When finished, tap mode 1 switch to move to the next calibration function.
B. Assist Magnify Factor: In PIMA, the assist set point is constantly compared to the actual MAP (Manifold Absolute Pressure) sensor signal. The difference once the MAP crosses the set point in the less MPG direction, is computed, and multiplied by this MAG factor to determine the level of assist. A mag factor of 1, will be the slowest activation after crossing the set point. Mag factor 2 is 2X faster, MAG factor 3 is 4X faster, and mag factor 4 is 8X as fast. The Mag factor is set in a similar way to the brightness adjustment, by moving the stick in the jogup/jog down direction, but differs in two ways. Since Mag factor only has 4 possible settings, you will only see 4 changes through the full jogup/jogdown motion. Another difference is that the jogup/down motion adjustment is made while you hold the joystick central switch down, and the value is stored when the central switch is released, the complete opposite of the brightness calibration; which is locked in when the switch is pressed, and adjusted when it is not. Sorry for the confusion, I will try to fix that the next time I need to get into the code. Move to the next calibration function by tap the mode 1 button.
C.PIMA ABC ramp rate: Since the MAP signal that is the control signal for both PIMA and ABC can change very rapidly with changes in throttle position and engine load, there is a need to slow down the actual time changes in assist or charge to some more reasonable speed to avoid jerky control. This calibration function allows changing the speed of response of the system to MAP changes. The speed is set with the same auxiliary axis and central switch activation as the other calibration functions. The extreme jog-down (right) position will reduce the ramp speed, the central position is a good default, and the extreme jog-up (left) position will make the speed as slow as possible; say, softening the change between assist and regen. The adjustment has 64 levels. If this adjustment is made while over 19MPH, the throttle can be pressed down and released to experience the different settings effects. The final setting is stored in flash, and will remain in effect until the calibration is again performed. Tap the mode 1 switch to move to the next step.
D. Joystick ramp rate: The rate that the joystick actions will be allowed to change is set identically to the PIMA, ABC ramp calibration, but the joystick wants to react more quickly, so the range of adjustments for Joystick ramp speed is only 15 levels. Tap the mode 1 switch to move to the next step.
E. Option configurations, 1, 2 and 3: One of the reasons that MIMA is so useful is that it allows the driver to tailor his use of the IMA to the actual driving conditions he has to contend with, rather than settle for Honda's compromise system. The ability to configure certain aspects of the MIMA system for individual taste and needs, is what this configuration step allows. Blinking LED=0----steady on=1 low profile display configuration:R=RED,A=AMBER,G=GREEN LED--- POSITION----R-A-A-A-A-R-G-G-G-G-R OPTION POSITION----X-8-7-6-5-X-4-3-2-1-X
1. Option 1 STOPASSIST: Several people have voiced concern over MIMA's ability to activate assist, when at a stop, as a safety issue, as that could start the car from an autostop. Others want to retain that ability. This option is off by default, disabling assist when the car is stopped. To activate this function, and have assist available when the car is stopped, you will press the joystick central switch to toggle the flashing first LED to steady on. A second press will turn it back to off and flashing. Once you have it as you like, either press the mode 1 switch to move to the next option, or press the mode 2 switch to get out of the calibration mode and save the setting.
2. Option 2 SWAPABCSET: This option allows you to configure the ABC jog function. If this bit is flashing, the default jog mode when entering mode 1 will be that ABC jog will adjust the ABC charge level in amps. If this bit is set(not flashing), the default will be the ABC setpoint jog. Of course when in the ABC mode, the jog function can be swapped temporarily by pressing the central switch while jogged to either side.
3.*******code versions 1.5.6 and below********* Option 3 HALFASSIST: Several people have indicated that they would like the maximum level of assist to be reduced, to spare their weak batteries, and to make the assist adjustment easier to control. This feature will, when selected, limit the maximum assist to 50% of the normal when using the joystick. The result is finer control of assist, but only up to 50%. The full joystick travel covers the 50% range. Option 4 Not assigned Option 5 Not assigned Option 6 Not assigned Option 7 Not assigned Option 8 Not assigned
******** (Code version 1.5.7 and above)******** Half assist has been replaced with a 4 level max assist, which is set with the last 2 option bits. Assist level -------Bit 7-8 100%---0-0 75%-----1-0 50%-----0-1 25%-----1-1
Joystick Configuration & Calibration
Joy calibrate steps
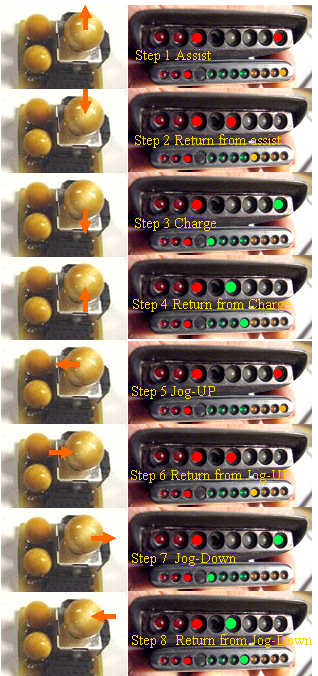
Joystick calibration: The flexibility of the joystick mounting and orientation options, and the ability to use two joysticks, make the joystick part of the system difficult to set up with a generic calibration. The biggest feature of this version of the code is this joystick calibration mode. The joystick is such an central part of MIMA, that MIMA cannot be operated until this calibration is set, as it would not know which axis is the master assist/regen axis, or the direction for assist, regen, or jog up and jog down. If the system has not been calibrated(the first time you use it after installing this chip) it will switch right to the JOY calibration mode. If you change joysticks, want to add a second one, or want to change the direction for assist/regen, or jog-up, jog-down, you can reenter this mode by first stopping the car. All joysticks should be connected at this time. Press and hold the mode 2 button. First it will be in mode 2 (PIMA), hold it a bit more, and mode 2 with flashing mode 3, or the standard calibration mode is activated, with all the amp LEDs on for the display brightness calibration. Continue holding the mode 2 switch until the mode 2 LED goes off, and the mode 3 LED alone lights up. The maximum assist LED will also come on. Now you are ready to calibrate. In the image, I am showing only one of the ways to configure the joysticks, either the X or Y axis can be assist, and the direction for assist and jog-up can also be different that the photo. We will use this illustration as the standard setup.
Step 1. The max assist LED is your cue to move one of the joysticks in the direction that you want to be assist. The joystick should be moved to the end of travel in that direction and held without moving in that position until the display flashes all LEDs, and turns on the minimum assist LED.
Step 2.The return from assist point will now be determined as you allow the joystick to return to center. It is important that you don't let it just snap back, or you don't push it. Just let the stick return with the built in spring. Let go of the stick, and once the system has read the same value several times in a row, the display will again flash all LEDs to confirm that this point has been determined. The display will then light the max regen LED.
Step 3. The max regen step is your cue to move the same joystick to the opposite direction from assist, and to hold it there until the display again flashes all LEDs to show that the point has been determined. Once that has happened, the min regen LED will light.
Step 4. The return from regen point will be determined when you let the stick return to the center, again being careful not to let it snap back or go beyond the natural spring return point. Once this point has been determined, the mode 3 LED will flash, and the max assist LED will again come on to indicate that you are ready to set the jog-up direction. Step 5. The jog -up point will now be set. Move the joystick along the other axis in the direction that you want to use for jogging setpoints up. Once this has been determined, the min assist LED will come on.
Step 6. The return from jog-up will be set next as indicated by the min assist LED.
Step 7. The jog-down direction is next.
Step 8. The final position is the return from jog-down. At this point you are half way through the calibration. The display will revert back to the original not flashing mode 3 LED, and the max assist, ready to go through the whole sequence again with the second stick if you have it connected, or repeat with the same stick if you only have one.
The settings are the basis of calibration values that are stored when the procedure has been successfully completed.
The first move for each axis (max assist and jog-up) will let the system know which axis will be assist and jog, and also let it know what stick motion should be next. If you try to move in the wrong direction or wrong axis, any time after the first move on each axis, the display will show 10100101. When you return to center, it will again show the cue for the direction it is looking for. Once the calibration is complete, the system will reboot and show the night rider pattern, and will operate with the new joystick calibration.