My Bolt is back home Drive replacement is finished , all systems working normally Hurray ! Only have the short trip from the dealers but everything seems back to normal Had to re-load my preferences for Hiltop charging, Radio settings again but it linked with my phone over Bluetooth So some things we're retained? Got to speak with the tech that did the work They got locked out of the system until they reinitilized one of the computers. Time to go on a long test drive.
Update have driven the car for 75 miles all seems perfect ??
*********Blog begins at the page bottom*************
Getting deeper into winter
Getting a deeper look at the winter conditioning
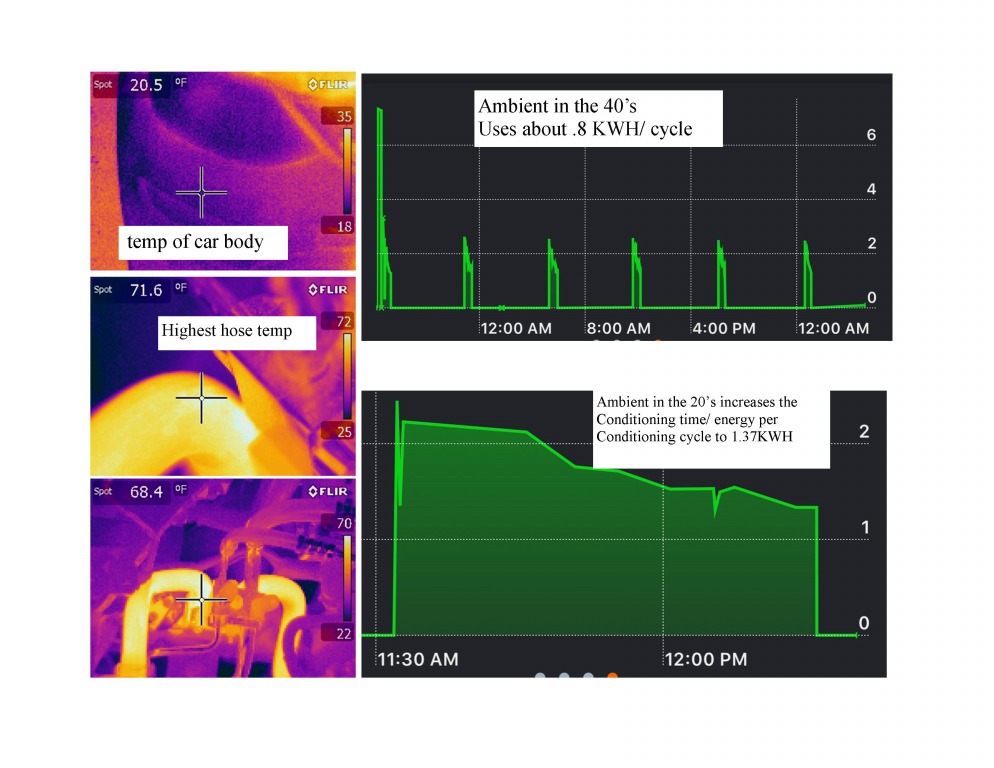
Got out into the garage with my flir thermal camera when the ambient was in the teens to get a deeper look at the conditioning process. Looks like the heating last longer and may cycle more frequently . Waited for the time when a conditioning cycle was active to capture some temperatures The pump is to the passenger side of the under hood area saw over 70 degrees in the hoses but with the ambient at 20 I expect the fluids will be at 80 or more range The run time per cycle is definitely getting longer as it gets cooler and i have confirmed that the cycles consume the same energy from the battery when the car is unplugged .
(Posted 12/15/2017 by mikey)
Battery conditioning
One complete battery conditioning event
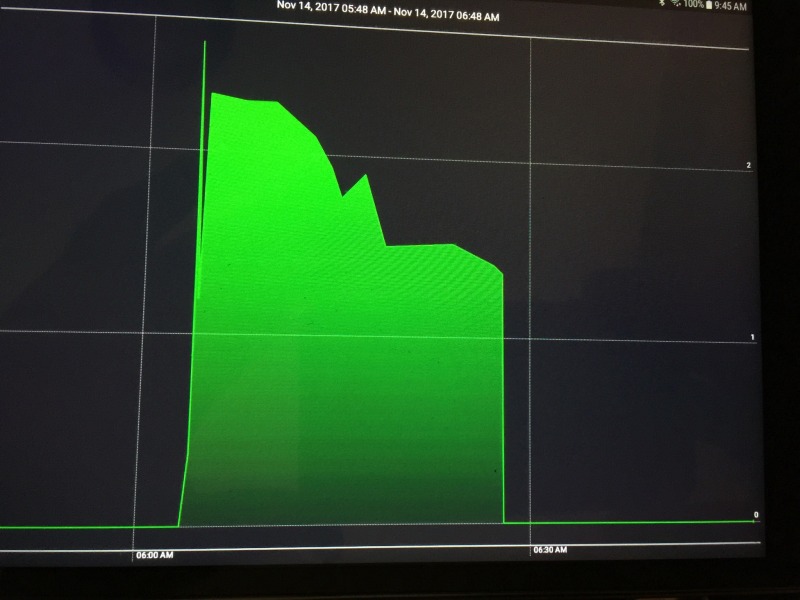
Managed to capture a conditioning event With more resolution Took .7kwh and 30 minutes Don’t quite understand the reason it would use less current As it warms up? A resistance heater and circulating pump should draw the same Power start to finish? We know the car is controlling current drawn from the evse so possibally it drops current as the fluid warms? Needs
(Posted 11/14/2017 by mikey)
Keeping the batteries warm in winter
Cold night battery conditioning
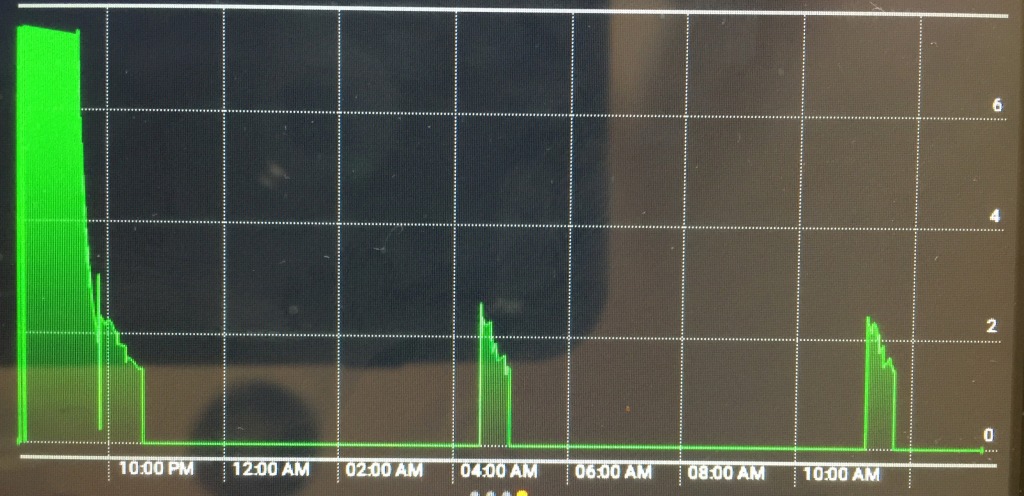
Winter temps are finally here so it is time to learn a bit more About how often the conditioning kicks in and how much power is consumed To keep the batteries warm Test was started with the pack that only needed 12 kWh To get to the hilltop reserve point A lower current warming cycle is applied after the main charge completed The temp was in the 20 degree zone during the test. My juiceBox pro40 evse has a nice datalogging Mode where it shows what is happening At about 6 hour intervals The charging ran for about 30 minutes at a peak rate of ~ 2kw I let the car sit in the plugged in condition and saw a second conditioning at another 6 hour interval I expect That under colder conditions both the interval and length of conditioning Will get more aggressive So 1/2 hour at 2kw is only 1kwh used each 6 hours Not as bad as I had expected.
(Posted 11/12/2017 by mikey)
Goodby to the batmobile
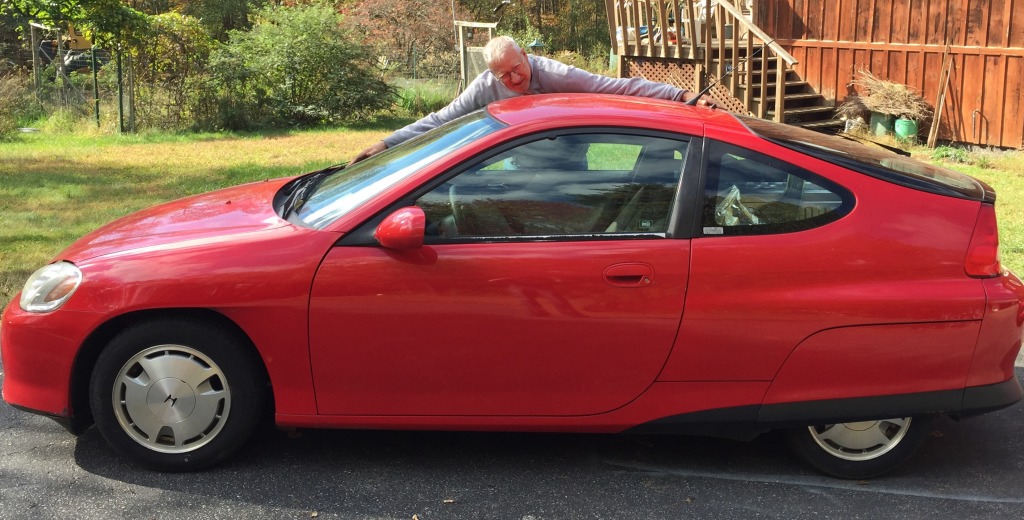
Goodby batmobile
New owner just drove my red insight away Had to give it one last hug.
(Posted 10/23/2017 by mikey)
Last look at my car collection
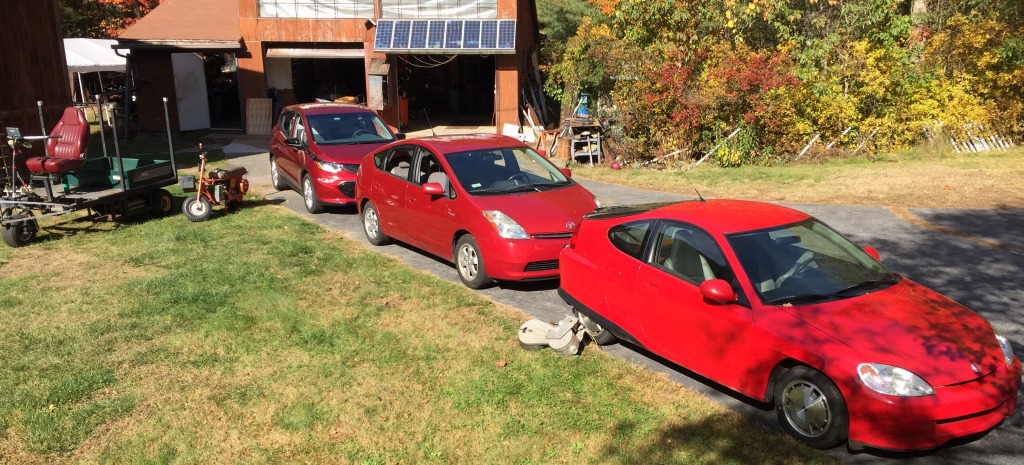
All my wheels
The Red batmobile is going to a new home tomorrow so I lined up all my wheels For a family photo Electric Bucket truck ( I’m in the bucket taking the shot) Yard buggy Minibike And newest member the Chevy Bolt EV The want to be EVs Prius And my red batmobile shown with e-wheel
(Posted 10/22/2017 by mikey)
EV meetup
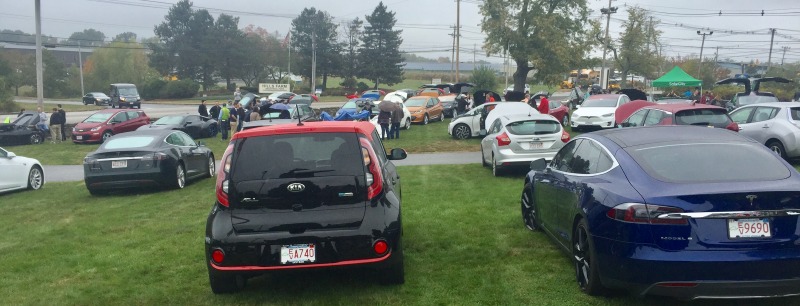
EV gathering oct 14 2017
Had an interesting day surrounded by electric vehicles And the people that own them Reminded me of the hybrid car meet ups I have attended Lots of Tesla’s as their group was the sponsor? Saw 6 Chevy Bolts 3 came from cargil in putnam
(Posted 10/14/2017 by mikey)
First test
First test
Plugged the hitch 12V lighter plug in and taped the detectors onto the upper brake light bar, right and left lower directional lights, led rear side marker for the running light. Turned the brake bar on and adjusted the pot so the indicator LED on the board turns on. Repeat with other lights ready to test. Worked perfectly with a real trailer
(Posted 10/8/2017 by mikey)
Making the trailer lights work
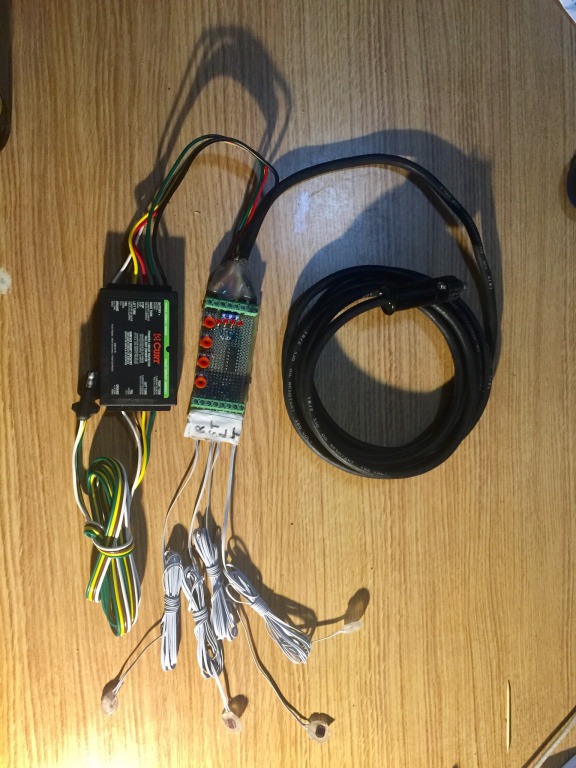
Complete test setup
I know that Chevy has a problem with owners towing trailers with the bolt . But they sell a trailer hitch as an accessory???? I have had a trailer hitch on my vehicles since 1974 when I got my first sailboat A trip to Home Depot for some plywood Bringing the motorcycle to the track, the uses for the diy guy Is so numurious that I need go no farther. I pulled my solar trailer to a mountaintop in VT With my Prius which is not designed to tow either.
Getting a proper hitch on my Bolt is of high priority. The mechanical install went very well Easy to do. Next we must connect to the car lights. Started by trying to remove the covers so I could get to the wiring, but it did not go well. Broke two clips getting it out. So I imediately put it back on knowing that the Bolt had Its first scar and vowed to connect those towing lights in a better way.
Optical repeater tail light controller .
Scrounged in my vast junk pile and found a drawer with CDS photo resistors The plan is to optically connect the trailer lights by sticking a photo detector On the 4 signals required. Stick a sensor on the brake light, the left and right directional , running lights.
I breadboarded a simple op amp comparator circuit with threshold adjustment pots for the 4 sensors. To do the actual power control and 4 to 3 conversion I used a powered trailer kit that E-Trailer sold me. The curt converter does the actual power switching and my opto defector interface board generates virtually the same signal that would have been generated if we would have connected directly to the car. Did some test with the prototype and it looks pretty good so far. The detector it self is just a cds photo resistor on the end of a small wire. I’m getting a huge on to off signal but today is not sunny Lots of detector tweaking to minimize any sunlight or headlights false triggering
Of course the manufacturer could have provided a readily accessible and clearly identified connector , a simple universal trailer control and save a lot of expense for the owner. Will test further next sunny day.
(Posted 10/8/2017 by mikey)
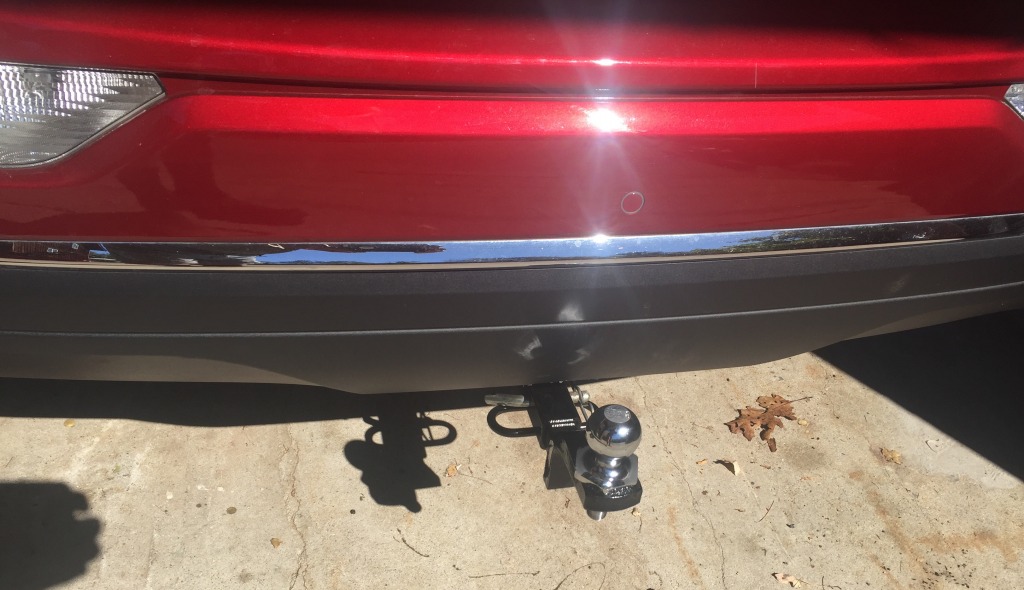
How it lookes
New hitch
(Posted 9/29/2017 by mikey)
Installing a trailer hitch on my Bolt
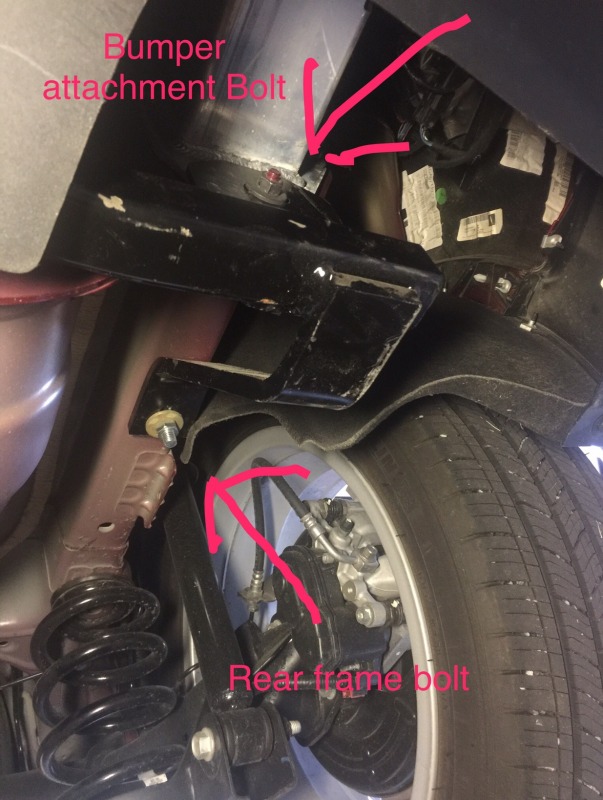
After some research I settled on a draw tite hitch from e-trailer It is rated at 2000 lbs and max of 200 lb tongue weight I don't expect my trailer to be anywhere near that but rugged is better than Light weight when it comes to trailer hitches The scariest part in the install is cutting out the slot in the Bolts rear bumper cover. Note*** Instructions say 3.25" wide x 5" tall in the center I assumed the 5" was measured vertically so my slot actually came in st 5.75" after putting it together it seems they mean 5" measured along the face of the rear cover Pop two rear cover plastic retainers Remove bottom two screws of the bumper mount Place two rear attachment screws with anti rotation bars And cool fish wire into the big hole in the cars frame Lift whole hitch under the now loose rear bumper cover And hang it from the two bumper studs . Start the two nuts but don't tighten until the frame bolts have been passed through the big hitch stabilizer arms Tighten the 4 bolts and the hitch is installed Will work on the light kit today
(Posted 9/29/2017 by mikey)
Very different than a gas car
Old drive is ready dropped and ready to be replaced
Photo shows the old complete drive on a stand Pretty big aluminum casting and very strong steel weldment Form the sub chassis that the drive is mounted on
(Posted 9/19/2017 by mikey)
Huge amount of things need to be disconnected
Lots to disconnect
To change the drive many things needed to be disconnected And when installed The AC compressor will need recharging The wheels aligned And a reinitilizing all the computers The tech indicated that when going through the training the focus was on troubleshooting rather than a drive replacement Hope it all goes well Their hoping it can all be accomplished and the vehicle back in my hands by the weekend??
(Posted 9/19/2017 by mikey)
Better look at the drive unit
New drive showing area that had leak
Where the drive was leaking
(Posted 9/19/2017 by mikey)
Drive unit
Bolt drive
The drive unit is pretty compact
(Posted 9/15/2017 by mikey)
Bottom cover
Inside view of leak area
This photo is the bottom cover from the inside. You can see where the fluid dripped just above a row of openings I expect that rolling up a paper towel and sticking through the central opening while moving it left and right would show the red fluid if it was dripping?
(Posted 9/15/2017 by mikey)
Transmission leak?
Coolant leak
While the cover was off I noticed red fluid on the bottom of the transmission. Looks like it came from the top under the inverter? Made a service appointment Fluid was transmission as verified by service tech. Just returned home without my Bolt, They want my drive unit and HV cables to be sent back to gm so they can better determine if this is a one off issue or a sigh of a manufacturing problem. The parts are on the way to the dealer and they will let me see the replacement process. Back to driving my Honda Insight and Toyota Prius Bummer
(Posted 9/11/2017 by mikey)
One complaint/ future modification?
Bolt EV Pedestrian warning noise maker
The quietness of driving an EV can be a pleasant experience, but when you are used to hearing the motor noises and suddenly hear only tire noise, for me at least, I find myself unable to judge my speed and tend to go faster than I think I m going. After a few hundred miles I got used to it. The Bolt has a small noise maker under the drivers side front wheel well. It makes a strange pink noise that is designed to warn pedestrians that you are there and in drive. It goes away after the car has reached ~15 mph. It seems to me that we should at least have a choice as to what the sound is. Maybe one would like a Harley motorcycle sound, or a bird singing, maybe a star trek like phaser. so one could have some fun selecting the sound like the ring tone on your cell phone?
Being a tinkerer by nature I got under the Bolt and located the sound maker. I disconnected the plug from the sound maker and the sound stopped, but the dash display indicated that the pedestrian warning system needed service. Plugged it back in and things went back to the normal pink noise.
Will have to get back under there with a scope and meter to see if the sound is produced in the sound output device, or if it is produced elsewhere and is fed to the sound maker which is simply acting as a speaker? Next time on the lift will dig deeper.
(Posted 9/7/2017 by mikey)
Hypermiling the Bolt EV
300 miles range
As a Insight Hypermiler I have been practicing good driving techniques for the past 17 years, with the help of the Insights instant MPG feedback, MIMA, and the trip MPG were all very useful tools to maximize MPG.
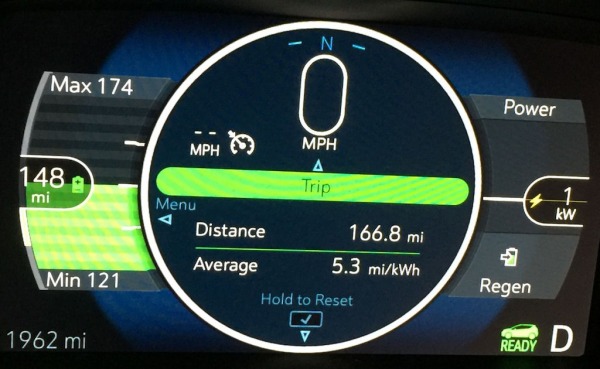
With an electric car, the miles / KWH is the metric of how efficiently you are using the charge in the batteries The Bolt has several nice features that let us know how our driving technique, climate settings,terrain, and outdoor temperature is effecting that efficiency . From that data it predicts the expected range remaining in the battery based on the last 5 miles driven. With an Insight which had an EPA estimated 70 MPG we have seen people with an Lifetime MPG in the high 90's. The Bolt EPA range is estimated at 238 miles on a full charge, people have reached as much as 350 miles. Knowing that simply getting off the highway or slowing down, and turning off the AC can yield that big of a range boost could really help with range anxiety if you find your self 50 miles from the recharging station with only 40 miles remaining on the predicted range. I have been averaging over 300 miles of range since I got the car, loving it so far
(Posted 9/7/2017 by mikey)
free solar charging
juice box pro 40 evse
Have been living with a battery powered Micro grid now for three years. The system works pretty well when the days are sunny and long and gets strained during cloudy weather when the output can be reduced by as much as 90%. My Solar battery bank is ~ 48kwh of storage. My solution is to switch back to the grid during those long cloudy spells in winter, and then back to the batteries when the output returns to normal. I usually get the solar batteries fully charged during good weather by noon or slightly later. This leaves the excess power to be simply wasted for the remainder of the day. My Chevy Bolt has a 60KWH battery bank so I now have a place to dump the excess power. Sounds good on paper but in reality it is not so simple. Since the 48V solar battery bank charging needs to be highest priority , and the sun output is a variable, the best system would automatically adjust the EV charge rate to take max advantage of available solar output without exceeding it which would have to draw from the solar batteries. My level 2 charger selection required an adjustable charge current the car would be allowed to draw. After some research I got a Juice Box Pro 40 and installed it on the post right between my two garage bays. The full solar charging current for the 48V solar storage bank is ~ 110Amps The EV charger running at full output off my 9kw output outback inverter,can draw upwards of 145A from the batteries. by adjusting the EV charging current I can allow between 1.4KW to the full output of ~7.5KW to be drawn, therefore keeping the solar bank charged while dumping most of the excess production into my car. The EVSE has a network connection so I can set the max current on my cell phone. while this works fine, it is a tricky thing to manage as a microwave oven turning on could exceed the solar charging ability. Automating the load management is looking like a project that needs to be tackled.