Grid charger Upgrade kit V 3.0
|
 | |
|
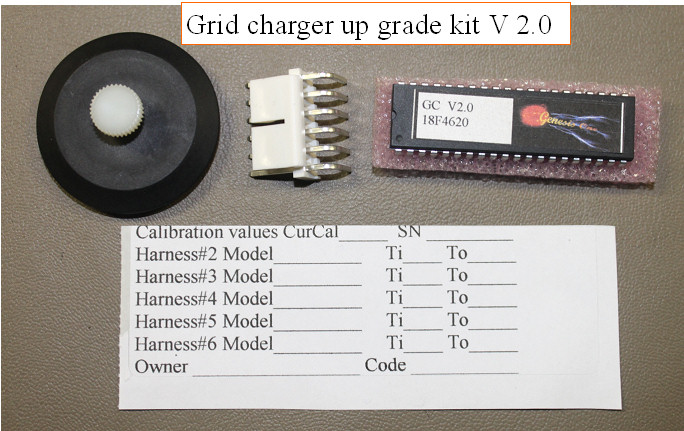
Upgrade kit V 2.0
|
A programming kit is available so further upgrades can be accomplished by downloading the hex code.
DIY reprogramming the charger
Important note.***************************************
After the charger chip is installed, the charger needs to self calibrate.
This one time procedure will start the first time the charger is turned on after the new chip is installed.
The charger does not want to be connected to the car at this time.
The 7 step process will finish automatically in 3-4 minutes, so just turn it on, and ignore the beeping while it does its thing. Once this procedure is completer one time, it will not happen again.
************************************************
At this point, many people have upgraded the charger to the V 2.0 and higher code, the latest code is V 3.0.
The original chargers have code V1.2, which is fine, with no bugs or other reasons that would require a code upgrade. On the other hand, code V 2.0 and higher have added quite a few enhancements, with the larger microcontroller and features that many people will find useful.
Discharger support would be the major one, as well as complete revamp of the serial communications. The charger can be operated stand alone, or as a slave to a PC based labview program where the PC controls the start stop and operation of the charger. V3.0 instructions
As people that have been following the progress on the grid charger will know, we were at 98% full on the code area on the original microcontroller, and 100% full on the non volatile variable space in the 18F4520 chip used in the charger. V1.2 uses this smaller processor, so when you upgrade from 1.2, you get the larger replacement chip.
Two charger owners have more cars than the charger has profiles for cars, and have asked if more can be added.
Again kind of like wanting to add more stuff to your garage but there is no room. After exploring the possibilities, the best course of action seems to be to change the chip to the 18F4620 which has twice the code space and variable space.
That will basically double the capacity of the chargers internal program space, and give us all the expansion room we will need to add 6 or more car profiles, and stuff we have not even thought of.
Unfortunately that upgrade process is not easy, as all the calibration values for the profiles as well as hardware calibrations for temperature power supply test and current will need to be carefully transferred from the old chip to the new chip. Since the AUX connector required for the discharger is also not included on the chargers in the field.
You can get your charger upgraded via three methods.
1. you sent it back to me in a well packed flat rate box, insured, with the LED protected, and on the overnight chargers , without the rubber feet, so it fits into a flat rate box. The shipping will cost you ~ $20. Include a check for $50 to cover the return shipping and the upgrade parts and labor.
2. Send me $25, and I will send you an upgrade kit, where I pre program the new larger processor with your chargers calibration data, and on first bootup in your charger, the program will log the 6 power supplys unloaded output voltage.
This one time self calibrate routine only runs once on first boot after installation.
The AUX connector and a new cover for the Aux port are also included in the kit.
DIY charger upgrade video
3. If you drop buy with your charger, we can do the upgrade here, in about 15 minutes. Cost $20
The new code is larger than can fit in the old 18f4520 chip, so ideally all of the chargers should be upgraded this one last time, and then we will be ready with plenty of room for future expansion.
|
|
