|
Shift lever joystick mounts | 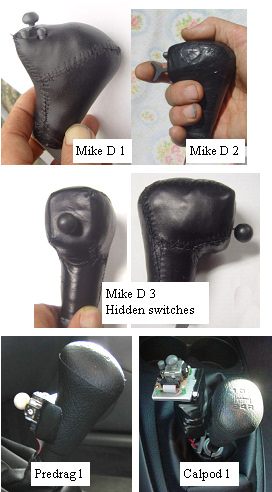 | |
As we explore the many possibilities that the tiny joystick board offers, several locations seem to be raising to the top of the list of possibilities.One of the places is on the shift lever as we go through the gears.The ability to control the assist and regen while shifting and accelerating or decelerating makes it a prime location, but certain issues need to be dealt with. The most important or which is accedental activation of mode 1 or mode 2. The small mode switches are set back from the central joystick location, so the easiest way to avoid the accidental activation is to use the switches with smaller, or no knobs.
I also have recessed the knobs into the epoxy so that they are in a cavity, and you must use only the tip of yout finger to activate them.
Predrag's mount is the simplest to make, where he applied the epoxy putty on the rear of the joystick board, and formed it to his shift lever which was covered with saran wrap to prevent damage to the stock shift lever knob. He chose to mount it further down than I, so as to prevent the false activation.
Calpod is making a complete control center as part of his mount, with his FAS, and other switches in the same assembly.He will do a finished mount once he has determined all of the functions that will be included.
|
Fabricating a mount
| 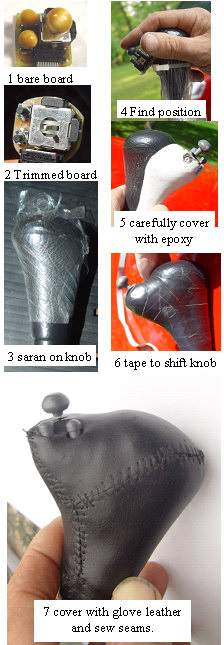 | |
Lets look at the steps that I took to make my first shift lever joystick mount. The small joystick board has extra material in the corners to allow for screw mounting, but we will be encasing it in epoxy, and want the smallest size possible, so I sanded the extra material off to make the board round.
I covered the shift knob with saran wrap to protect the surface from the epoxy.
I temporarily mounted the joystick board on the shift knob to find the most ergonomic position for the assembly. Black tape is better than the wire tie, as it is difficult to get the tie off when the epoxy is hard. Once I found the position that I liked, I placed a small quantity of the mixed epoxy under the joystick board, and against the shift knob, and further tweaked the position. At this point I put the partially finished assembly aside for the epoxy to harden, as it is very difficult to work with the outer epoxy finished layer while the inner epoxy is still soft.The epoxy can be worked for ~45 minutes to an hour, so you have plenty of time to get the angle just right. Give the epoxy 4-5 hours to get pretty stiff, before carefully placing the outer epoxy to finish the shape. Extreme care must be exersized to not get epoxy into the moving parts of the switches and the joystick. The assembly should be allowed to fully harden overnight.
The hard epoxy can be filed, sanded, drilled, tapped, and is a great material to finish, as it can be brought to a full gloss finish with fine sanding. For this mount, I was not too concerned with the finish, as I was going to cover it with leather. The epoxy can now be separated from the shift knob, and the saran wrap removed. I used black electrical tape to attach the assembly to the shift knob, but a dab of hot melt between the epoxy and the shift knob would also work. A great way to keep black tape from getting gooey is to coat the tape job with clear PVC cement after it is taped, this glues the tape together so it behaves as a unit.
Finally I took some black thin glove leather, and made a leather cover to make the shifter look finished.A look at my #2 and #3 shift lever mounts will show improvements in both look and ergonomics. |
Other locations for the Joystick
|  | |
The shift lever mount is a must for me, but driving with your arm stretched out while on the highway in 5th, can be tiresome, so another cruising joystick in a very comfortable arm position location seemed like a good idea, therefore the e-brake mount.
Nemystic chose the wiper stalk, as he likes to drive with both hands on the wheel.Predrag and Yves chose the bottom of the shift console which allows your hand to sit on the e-brake lever. This comfortable area has only one drawback, you have to make a hole in the shift console, but you are never going to take MIMA out of you insight anyways so it does not matter right?
The shift console rear is looking like this may become one of the other more popular places to mount either your single or second joystick. I chose the e-brake arm, since I did not want to cut the hole, and except for a little wierdness when you want to release the e-brake,it is working out well for me. Rick was #001,and at the time he was making some very long commutes,he uses an arm rest, so the slideable e-brake mount fit his need well. The only limits are your imagination. |
Some future possibilities
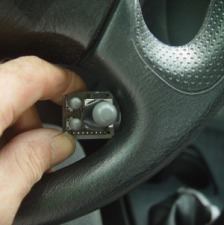
One of the best spots for the joystick would be on the steering wheel, but the 5 full rotations make a hard wired mount a little difficult. A wireless system could be in the future, but we will see. |
The MIMA Joystick : | Shift lever joystick mounts
|
|
|