How to test a battery to the stick level on the bench
|
 | |
|
Pack testing
|
I must get a request for how to set up a superbrain or other hobby charger 5 times a week,I don't use the hobby chargers, but instead use my cell level tester shown here:
cell level high current tester
what actually goes wrong with the batteries
Or my gridcharger and discharger.
The grid charger with discharger can cycle and isolate the weakest sticks in a whole pack quickly, and since that's what you want to do, anyways, there is no need to take it apart and cycle each stick separately.
Using the datalogger to get a better look
I will be doing a video on how to do that process once I get the grid charger backorders built up and get some time.
For now, I will talk about the different aspects of the process, and some considerations.
Charge termination:
The cells can take a high charge rate until they get full, and then they very quickly turn all the charge into heat, so the best overcharge test you have is to simply touch the cells when the charge is nearly complete.
350ma will get a cell lukewarm, as the heat is easily dissipated by the large surface area of the cell case. the cells in the middle of a stick will get hotter than the end ones as the ends are sharing heat from the adjacent cells.
1A in the full cell will get the cell so hot that it will be uncomfortable to hold it in your hand.
2A will cause the cell to get so hot that in 5- 10 minutes after it reaches the full point it will likely vent fluids and permanently loose capacity, as well as giving a good skin burn if you touch it.
10A will heat to the vent point in less than a minute.
Since the hobby chargers can charge at up to 10A, it is very important that you confirm that the cells are not getting hot when the charger/cycler stops charging.
If the charger lets you charge at high current and then drop to trickle of 200 - 500ma, that is better than letting the full current run to the end, as not all cells will get there at the same time, and the balancing will not be as complete.
The deltaV charge determination will work best once the cells are balanced, as an unbalanced pack may see one cell reach deltaV just as another is still rising,, so the charger will not see the first cell deltav and could overcharge the first cell.
All of the different hobby chargers have similar features, but all will not do as good a job of accurately terminating the charge .
This is why the 350ma range is so nise, as it can be maintained for as long as required to get that last stubborn cell to full, so we can say that the pack has all fully charged cells.
The cells may not have the same capacity, so when we discharge after a topping/soaking, we are truly seeing the weakest cell/stick in the pack, as they are all discharging at the exact same rate, so first guy to die, or drop out is the lowest capacity stick.
If 3 cycles does not improve it, it is probably not worth trying to save, so mark a red X on the stick, and continue to discharge to find the next weak stick.
We need a lot of refinement of the technique to figure out the best formula for the test, but a technique like this may yield better results than the individual stick cycling, in much less time.
All of this can be accomplished on the bench without the need to fully disassemble the pack.
Discharge determination:
When discharging a multi cell pack, one must always be aware that one of the cells could be much lower in capacity than the rest, and that cell will drop out first as it uses up the 3-4AH while the higher capacity cells in the stick may still have another AH of capacity.
The voltage method of discharge detection for the hobby chargers is simply looking for the overall voltage of the stick to drop to either
.9V/cell or 5.4V for 6 cells.
1V/cell or 6V for the stick.
A fully charged stick can be >8V
A cell drop out when the pack was @ say7.8V would drop us to 6.6V, and would not stop the discharge, as the total stick V would still be well over the <6V required to stop the discharge with min V set to 1v/cell.
An early cell drop out may not even be detected, so one would be wise to confirm that all the cells are still in the range of the rest of the cells in the stick right before the discharge terminates. The lower the voltage cells can discharge to as a group the better the stick balance is.
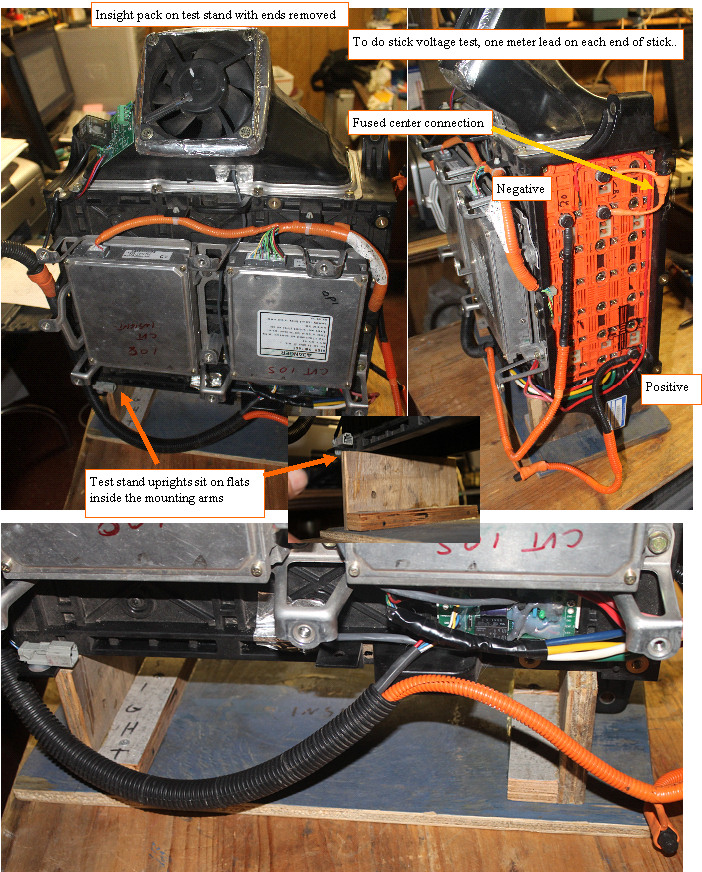
The gridcharger/discharger will charge the whole pack, and then discharge until the first cell drops out, and at that point, with the pack on the bench ends open, you can simply measure the sticks while the discharge is continuing, to see which stick was the weakest in the pack.
You can also pulse the discharger and get an approximate test of the internal Resistance of each stick, by measuring only the AC voltage across each stick.
Self discharge test:
A charge /discharge cycling of the pack, and recording of the run time of the last discharge gives a whole pack after conditioning value DCT that is the whole packs capacity. Since we want to identify the weak sticks relative to the rest of the sticks, this test all the sticks at the same time with the same load, under the same delay since the conditioning was done, and on the bench, can identify the weakest sticks in the process, it is a huge improvement over testing single sticks if the goal is to find and replace the weak sticks that are causing the problems.
On a stick level test with a hobby charger, one must cycle each stick, record the last discharge as an AH capacity, recharge, and then let the stick sit for a week or more and then discharge to see how much capacity was lost between the last discharge after the conditioning, and the discharge after sitting. The accuracy in charging to the full condition, and accuracy in waiting the same amount of time to do the delayed capacity test can all introduce errors, which could mask a weak stick.
Discharge current./ internal resistance
The sticks are asked to put out peak currents near 100A.
At the higher currents, the cells internal resistance becomes an important issue that will cause the car to set IMA codes.
A 170V pack that drops to 110 - 120V when you ask for 100A, is suffering from high internal resistance. The cells with the high IR will also heat up, as the current is driven through this higher resistance and can trigger temperature related codes. A good pack may only drop from 170 to 150 under the same load
The hobby chargers usually will not do a good job at measuring this aspect of the battery.
The 10A load will cause a voltage drop, but it is also discharging the cells, which also causes the voltage to drop.
A high discharge rate also means that one must be even more careful of the final discharge detection, as the 1v/cell drop could prematurely be reached if the cells have a high internal resistance.
A pulsed technique, where the discharge is pulsed like the charger/discharger can generate a small AC voltage across the sticks DC voltage that only shows the difference between the unloaded and loaded pack, and since we can also see each stick, a bad stick should show up clearly.
I am working on a bench accessory that will allow a >50A load to be precisely applied and removed from the single sticks to get a more representative measurement of this important value.
Several failure and deterioration modes can be present in a pack at the same time.
A.Shorted cell (zero volts)
Zap with capacitor is only way to try and correct that, but I have not tried to zero in on the best volts/capacity combination to use.
B.Vented cell(overheated)
Permanent loss of capacity, no amount of cycling can bring it back. A vented cell will have expelled a tiny amount of potasium hydroxide, due to high internal temperatures and pressures.(overcharging, overheating) The dried slippery feeling hydroxide will burn your skin, so if you see any whitish stain on the inside of the heat shrink, the stick probably has vented.
C. cell with memory effect or voltage depression
Caused by unbalanced pack, vented cells, aging, where the higher capacity cells never get to fully charge due to the cells that have lower capacity charging faster and stopping the charging process short of full capacity.
Cycling will help get the capacities balanced
D. Cell with high self discharge
Nickle whiskers grow between the plates, and lead to higher and higher self discharge, further magnifying the unbalanced condition.
Cycling helps to dissolve the whiskers and self discharge improves.
E. High Internal resistance
Loss of capacity, and venting , reduce the cells ability to hold its output voltage under heavy loads, so a stick that may test at 6AH at 2A load will heat up, drop its voltage, and nearly drop out immediately at 60 -100A .
Note that I am talking cell, not stick, a stick could have more than one type of failed/reduced performance cells, so stick testing by its nature will only yield good results if the cells within a stick are of similar performance/ and degradation.
So a "bad stick" is a stick with one or more bad cells, and I expect that any used stick we can find will likely have degradation of one or more cells, so there may not be any "good" used sticks left.
Bumble Bee batteries told me that he would be selling single sticks of the new Maxima cells (better battery). I tested a stick, and the cells looked solid.
With the charger, The best repair may be to identify the weakest stick in the pack, with the charger/discharger, then replace that with a new maxima stick, and use the charger to rebalance as required.
Maybe one identifies the worse 6 sticks and replaces all of them.
The charger keeps the known unbalanced pack (New mixed with old sticks) balanced.
When that no longer works, identify the next bad sticks, until the whole pack is replaced.
It is likely that only 2-3 sticks are causing all the IMA codes and loss of performance that many are suffering, although, I have seen whole packs that have very low capacity, more in the civics, where the cooling system is questionable, and vented cells are found.
So much more to say, and I hope to cover all of this in more detail on a video soon.
Please consider all I say, as my opinion only, and I welcome people to offer alternative opinions so we can all better understand this pretty complex set of failure modes and how they interact to cause a pack to behave badly.
We have 100 testers with chargers, and another 50 are about to be unleashed, then I will get going on the Video version of this blog.
Good luck.
Mike
|
|
