Grid Charger | 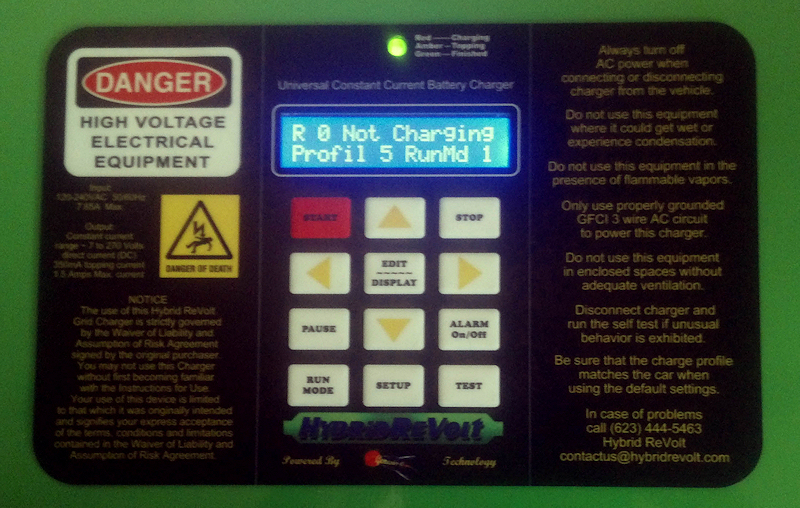 | | | Hybrid Revolt charger keyboard |
*****************************************************
NOTICE 11/07/2013
*****************************************************
Any charger orders that are received will be returned.
We have SOC reset devices, and charger upgrade kits, as well as the programmer kits still available.
Matt from Hybrid ReVolt has purchased the charger design, and is almost ready to sell them.
As you can see from the photo, he has changed the color from safety yellow to green, and has also used a white on blue LCD instead of my black on transflective green.
You can send a request to him for availability and to get on a waiting list here:
Contact Hybrid ReVolt
I will be available by phone and e-mail as always to support all of the people that have purchased chargers from me, and will continue to improve the software and develop new accessories.
Mike
**************************************
Lets start with a warning, This is a HV battery charger, the reason you can't go out and buy one at Walmart is that the voltages are lethal, which is why I ask that you sign and send me the liability waiver, and have some basic good sense about safety.
The charger and the battery can kill you, so please do not get one of these If you are not well versed on electrical safety, or are the type to treat safety as a secondary consideration.
When the main battery switch is off, the pack and associated wiring is quite safe, as no current can flow in or out of the pack, therefore, to charge or use the discharger, the main battery switch must be on.
Use a ground fault circuit for the ac power. Don't stand with wet shoes and handle the charger. Dont leave the charger banging around in the trunk or rear hatch. Don't use the charger if it is cold from sitting out in the car in a condensing humidity, as water could condense on the inner circuit boards. If there is condensation on the windows, there will be condensation on the inner circuit boards, and some HV leakage could result.The AUX connector on the side has full AC power on several of the pins, so do not handle the charger if the cover is missing, as your finger could stick into the hole.
We don't want to loose any of our customers, so treat this system like you would any other dangerous electrical device.
A word to the wise should be sufficient, but I had someone get a good shock when they lost the side cover and did not cover the hole, and stuck a fingertip in there.
**************************************************
The Genesis One LLC charger can charge Insight packs, Prius packs, insight 2 packs, Civic packs of both sizes, CRZ and basically any battery pack NICAD, NIMH, Lead acid, GELL cell, AGM that falls in the voltage range from 7V to 250V.
Use it to extend the life of your pack, when you get rid of the car, use it for your next hybrid, or sell it to someone else that is having problems. Charge your 12V batteries, charge a single subpack, it is truly universal.
With the new discharger and other accessories, it can also cycle and condition any pack.
If your pack stops responding to the charger, you can diagnose and troubleshoot your pack on the bench without removing the harness.
When you finally give up on the pack, you can get a new battery, or possibily a lithium replacement pack, and since the lithium pack will be equipped with a built in balancer, the charger will be able to keep either replacement healthy for the duration.
Not a bad investment if you look at the big picture.
Start the ordering process by contacting me via e-mail or phone. download, print,read and sign the forms, and send a Check.
If you want to use paypal for payment, you are responsible for the pay pal charges of 3% .Paypal account is 99mpginsight@charter.net
Grid charger order form
Grid charger Liability Waiver
Grid charger features and development
Zipcode to postal zone chart for postage determination
**************************************************
**************************************************
Got all the videos up on the 99mpg channel on you tube.
99mpg channel
Specs:
All chargers will operate on 90~264 VAC 47~63 HZ
GCO1 $675
250V max @ 350MA and 1050 ma Constant Current
1) 12V @3A (RS-35-12)
4) 48V @ 1.1A (RS-50-48)
1) 5-48V@ 350ma Constant Current (LPC-20-350)
1) 5-48V@ 700ma Constant Current (LPC-35-700)
Different Hybrids Battery Voltage
Insight 2 2010+ 100V
Insight 1 2000-2006 144V
Civic 2002-2005 144V
Civic 2006+ 158V
Prius 2004+ 202V
On the harnesses,
The charger cannot charge a pack without a harness, so you will need to buy one. The chargers are calibrated with the harness #1, and has provisions for calibrating out any small temperature deviations on the other harnesses that may want to be used with the charger. This is accomplished by having 6 car profiles available, which will automatically apply the correct temperature calibration for each harness/profile.
The Harnesses mount to the battery pack, and can be removed from the car with the pack.
The idea is to make the harness move with the pack so one can do bench diagnostics with the charger and the diagnostic accessory, that we will be working on in the near future.
The Insight harness must pass through the rear of the IMA box, so we took the approach that we would make the connector mount on the inside of the IMA box, just below the small aluminum cover on the passenger side of the storage box in the rear. For the occasional balancing charge, one would pull out the storage bin, and plug in under the cover.
To allow maximum flexibility in placing the charger connector, I will sell an extension harness, that will attach to the connector on the rear of the IMA box, with a length that you can specify. The base extension harness will be 16 inches, which will allow a comfortable connector location of under the narrow rug that covers the aluminum shelf.
The base price of the extension harness will be $35, with a $2 adder per foot of additional length .
The same extension cable, can be attached to the charger output cable, so one can mount the charger on a wall, and have a removable extension to reach the car.
The battery pack lifter will be offered for sale for $75, plus shipping.
The lifter can be returned (all pieces please) after the charger install, for a $50 refund, so it would cost you shipping in both directions, and $25 to rent the lifter and save your back.
Summary:
Universal Overnight charger model # GCO1---$675
Insight harness---$125
first gen civic harness------$150
Second gen Civic harness-----$150
SHop Harness ---------------$175
Extension harness-----$35 16"+ 25 cents/inch for extra length
Battery lifter to make handling the pack safer and easier.
Pack lifter details
******************************************
NOTICE
If people with a 350ma GCM1 or GCIM1 want to upgrade to the 1A GCO1 charger, we are allowing trade ins toward the GCO1.
The GCM1 trade in allowance is $350 7-250V 350mA
The GCIM1 trade in allowance is $300 7-195V 350mA
When available, the used chargers with the latest software and AUX connector mods and warranty will be available for the discounted price of :
GCM1 $400
GCIM1 $350
***************************************************
Shipping and insurance:
All chargers will be shipped via USPS large flat rate boxes, so we can pin down the shipping cost up front.
The cost for shipping and insurance will be $28 in the US
Canada and Mexico will be $64
Anywhere else in the world will be $88
The chargers. extension harness, and car harnesses will all fit in one box, which will make the shipping cost known irregardless as to the number of harnesses or the charger model.
Please be sure to add shipping and insurance to your payment to expedite the process of placing your final order.
Mike Dabrowski
**************************************************
Warranty:
As anyone that bought a MIMA system from me will attest, I stand behind anything I sell, probably to an extreme. I was a TV tech for 10 years, A field service engineer for 10 more, and know better than most how important service after the sale is.
It is not unusual for me to spend an hour or more helping with MIMA install or operational questions, and I fully expect to offer the same comprehensive help with the chargers.
I will 100% test all chargers before shipping, and will be available by e-mail or phone to help with in car troubleshooting or install issues.
The chargers will be designed to be as rugged and safe as possible if used as directed.
The chargers will be replaced or repaired for free if they fail in the first 30 days. You only need to pay shipping to me.
After that I will fix them for a yet to be determined fee.
I can only warrant the internal power supplies by passing on the manufacturers warranty which is quite good, at 2 years for the CC supplies, and 3 years for the fixed supplies.
More than one hybrid?
Because of the wide operating range of this charger,
all that is required to use the charger on other vehicles is a custom harness for the other cars.
Harnesses for other cars will be developed as required. The universal nature of the charger allows it to safely charge from 7V to 260V batteries, and anywhere in between.Useful for subpack cycling.
The charger is suitable for charging the 6.5AH NIMH batteries used in Hybrid cars, and may be suitable for other batteries, but the user must determine the suitability.
I will supply a 120VAC cord with the units, but the input connector is the same as on computers so power cords should be readily available anywhere in the world, and the units will operate at 90-264VAC 50/60HZ .
NOTE:
The charger harnesses will require mechanical and electrical connections and mounting in the IMA compartment. I will be including an operation and install video and will have printable instructions on my website detailing how to install and use the chargers.
I will also offer an installation service at my place, and will likely have several Grid charger install gatherings here as well.
As people in other areas install their chargers, I would hope they would assist other owners in their area to install a charger jack.
Lets keep our hybrids on the road, and stop a lot of the anxiety about batteries that is preventing more people from getting into this great intermediate step to a sustainable future. I expect that regular pack balancing will be a great way to keep a new pack healthy. Over time as the number of people grid charging their packs grows, we will have a great deal of feedback and will be able to develop very effective ways of keeping batteries healthy for the life of the vehicle.
|
FAQ about the chargers
Some answers to the common questions about the chargers and process.
Most popular question.
(Q)How do we use the discharger to do an automatic reconditioning with report card?
(A)You first assemble and test the discharger as shown here:
http://www.youtube.com/watch?v=nObPEYMKGlE
Next you set the charger for mode 6
Operating instructional video here:
http://www.youtube.com/watch?v=KWovoEMLeI4&list=UUx9zOrUjKD7WOh1ukKv5eNw&index=1&feature=plcp
PDF version:
https://99mpg.com/ProjectCars/V22Chargerinstructions/
Description of new features since video and manual:
https://99mpg.com/ProjectCars/programmingadapter/
The short discharger male female adapter goes between the charger and the car harness
The white plug plugs into the side of the charger as shown in the discharger assembly and test video above.
The best reconditioning will be proceeded by a soak charge, which you select in the setup options mode.
If your not sure about some of these modes, be sure to watch the operation video.
Hit start, if it may says voltage too low, wait for the prompt discharge anyways, and say yes. When it says V match, dont do anything, and after a short delay, the charger will start charging, will charge for 20 or so hours (soak) and then go into the first discharge, this stage can take 20 minutes to 4.5 hours, then it will automatically recharge with a plateau detect end to the charge less time than soak)and repeat the discharge recharge process automatically 3 times. when finished the charger will have stored the results in bank 0 (bank 1 if you so selected it in the setup options).
We will be releasing the final code V 3.0 in a few weeks, and then will do a new video showing the whole process.
Mike
1.(Q) What is the difference between the Maint and overnight versions, which should I get.
(A) the Maint will only have a 350ma output, but the Overnight will have a 1.05 A output.
The maintenance charger will do the balancing job nicely, but it could take 8-25 hours to do the full balancing.
The overnight will do the same job in 5-8 hours.
All other safeties and features will be the same.
If you don't plan on getting a civic or other hybrid in the future, you
could go with the GCIM1 which is a reduced output version that is the
most economical for the Insight.
If you want to be ready for another hybrid, you would want to get the
universal GCM1, which can do a maintenance and balancing charge to keep
any hybrid battery topped off and balanced.
If you want to get the best mileage, and use the charger like a mini
PHEV, as well as balancing, the overnight GCO1 would allow charging the pack off the grid, so
you can MIMA more aggressively with the knowledge that you could recoverthe charge without using gas each night.
So you need to decide what you expect to do, and that will determine the
best charger option.
**************************************************
2. (Q)Will the capacity of the larger (overnight) charger you are designing be enough to recharge a larger (aux) pack from the grid overnight? If not, would there be an opportunity to "piggy back" two of these units to get the job done?
(A) Yes the chargers should allow parallel operation, or charging of the booster packs.
***************************************************
3. (Q) Why do we need all the fancy functions on a grid charger when the simple 350ma versions that have been sold can do the job?
(A) The bells and whistles are not just for the techies.
On advise from the lawyer that drafted the Waiver, From a liability standpoint, I am sticking my neck out in order to provide the chargers, so I must do a robust design that would stand up to a liability claim against me. If I sold a black box with no fan, hot melt fastened internal power supplies, no temperature monitoring or feedback, and no way to tell when the charging was finished,no voltage or current monitoring and it came to a lawsuit, the waiver would offer no protection at all, and I could loose everything.
The PTC strip will detect if a single cell has a high internal resistance and is getting hot as it turns all of the energy into heat. The input to output temperature measurement presents a way to compensate the current drop back voltage on the overnight charger for temperature of the inlet air while still providing feedback as to the pack input to output heat gain and can act as a fan operational test.
The accurate measurement and display of voltage and current signals also allows a thorough operational self test, and easy phone technical support in the event of issues with the charger.
The system can be expanded to a full pack tester that will not only allow charging, but safe smart discharging to allow automatic pack cycling and detection of the weak subpack sticks.
**************************************************
4)(Q) Is this charger for the HV battery or the 12V battery?
(A) While I thought this was clear, the question has came up several times, so yes, the charger is for the HV battery. The chargers will charge any 6.5Ah NIMH battery that consist of 6 to 170 cells, and with the booster supply, the charger will charge up to 250 cells.
****************************************************
5)(Q)Why do we have to buy a separate harness?
(A)Since the charger can charge/balance any battery from 7V, all the way to the 200+V Prius, the internal harness is a separate custom designed component, matched to each model car, and therefore will cost a different amount for each version.
Some people have an Insight, a civic, and a prius, so they can buy 3 harnesses, and one charger, and can charge all of the vehicles with the same charger.
Making a custom harness is a detailed and time consuming process, and after building 75 of them, I averaged the time required to build them, added the actual cost of the parts, and applying a $20/hour rate for the labor, came up with the final price.
*****************************************
6)(Q) When the charging is finished, my car will not show that the pack is full, even though the charger just finished charging it?
(A) The State Of Charge(SOC) gauge in the car may not determine the batter true SOC, after a charge, as it did not see the current going in, since the car was turned off. The only time it will correctly regtister a charge is if the pack is less than 1/3 full when you last turned off the pack. This hit or miss situation will be improved when we introduce the SOC reset device.
SOC reset device
This will send a special serial command to the BCM telling it to adjust it self to read 19 of the 20 bars, or nearly full.
Another way to reset it is to pull fuse #18 under the dash.
MCM reset
*****************************************************
7)(Q) Conditioning a battery involves charging and discharging, Do I need to get your discharger to make the pack work properly, or is driving between charges going to keep the pack strong and balanced?
(A) I get into this on the discharger page.
Discharging the pack
*****************************************************
8) (Q) What considerations are required for a extended use of the charger storage/maintenance mode?
(A)
The battery does not like being charged when it is too hot or too cold, so the charger does not allow that.
The long term storage mode requires the charger to stay connected for the whole time.
The measuring circuits will very slowly drain the battery while the charger is connected, powered up or not.(~ 100 days from a full charge)
Powered up in the storage maintenance mode, the interval time can be set to up to a year between charges, and will automatically charge sooner if the pack voltage gets too low, so that could be set up for say a monthly charge.
The charger stores the mode in non volatile memory so it can also will recover and maintain the storage mode even if power is interrupted.
All good so far.
What it will not do is charge if it is too cold, or too hot, so I can imagine a situation where the battery would drain to the point where it should be charged, but it is too cold, so the charger would not allow charging and the battery could over discharge.
Another thing to consider is that the pack self discharging with no load, will do so one cell at a time, so even though some cells get to zero volts, there is no danger of them reversing, which is where the real damage from over discharging occurs.
The bottom line, if the place the car will be stored is going to stay between 50 and 90 degrees, the storage charge will keep the pack exercised and charged, but if it may deviate into the 40 or 100 end of the temperature range, the storage charge may not be as good as simply leaving the pack for the duration, and before using it, give it a good charge with extended soak before using it.
*****************************************************
9) (Q) My pack has been sitting for months what is the best procedure to get it back in shape.
(A) My advice for how to start.
read through the operating instructions
Have the charger on the table when reading it, and learn to navigate the software.
A pack that sat for some time will want a soak charge to get all the cells fully charged, so after you have familiarized your self with the operation, bring the charger to the car, make sure the car is in a cool spot, open a window or put a small object under the rear hatch to allow air to get in.
Connect the charger, select mode 1, and then in setup, change option 1 to turn on the soak.
Press the start button and the charger will first charge at 1A to 166V (cutbackV), then start the topping stage of the charge.
Variables effecting the charge :
TopTimeMn* default value is 840 minutes or 14 hours. The charger will maintain 350MA for the full 14 hours after the topping zone is entered when soak is on.
Unless one of the other safeties is reached
Max _CgTime* 900 minutes
MaxChg_mAH* 6500
MaxPTCVal* 200
TDifMaxRaw* 40 (1 degree F = 5, so 40 translates to 8 degreesF)
After the soak charge is finished, allow the pack to cool.
The next thing we want to do is to cycle the pack to get the lost capacity to recover.
Set the run mode to 6 Discharge Cycles
Scroll the bottom line to the left to view the MinDischrgV.* This important safety should be initially set to 135 for an insight. (Low limit for discharge)
Scroll more to view the SlopeDifMax* this should be set to 20 initially (depth of discharge, bigger number lets the discharge run longer, don't exceed 100
Scroll again to C_DcyclesMax* this determines the number of cycles the discharger will do before automatically stopping.
We don't want a soak for each of the recharges during the cycling, and we don't want the first discharge cycle to start with a precharge, since we just soak charged, so go back into setup and set soak to off, and the far right option bit to precharge off.
When soak is off, the charge will stop when the plateau detection sees that the voltage has been stable to 0.4V for the SampleTime* (default 30 minutes), and then go into the next discharge. After the cycles are done, the results will be in Bank 0. You may want to change the cycle storage memory bank to 1 so all future cycles can be compared to the first one.
After the 3 cycles are finished, the car can be reset by disconnecting the 12V battery for 30 seconds then reconnecting to allow the car to determine the SOC, and give it a try.
Good luck
If you don't have a discharger, you will still want to discharge the pack in the only way you can, using the car.
Reset the car to get the SOC to the top, then drive hard, with max assist, climbing a mountain,highway, or anything you can do to deplete the pack as fully as possible, with minimal regen.
After the discharge use the charger to recharge and repeat the process 2-3 times.
The charging balances the SOC so all cells are full, discharging recovers capacity lost to short cycling. It can take several cycles to get the capacity back, and again without the discharger, one cannot actually quantify the results.
****************************************************
10) (Q) try as I may, I keep getting confused by how to set variables, and the difference between modes and profiles
(A)You are confusing some of the variables and procedures.
The first thing to be aware if is that the editable (any variable with an *)variables include run mode and car profile.
Refer to the operating instructions here:
V 2 operating instructions
Page 36 and 37 show the list of variables.
Note how the list starts with battery volts, lets call that item 1.
When you scroll right > key on the charger, you move down on the list.
Also notice how the informational variables are first, then the setup, and finally the limits.
When you press the run mode button on the charger, we take you right to that variable in the list, and it is edited the same as all other * variables. start the edit with the edit/display button, and end with the same button once you have edited the digits. To bail out and retain the old value, press stop instead of edit/display.The top line only displays informational variables, the bottom line shows them all, and is where you always do the editing.
Run mode is telling the charger how you want to charge.
Profile, is where you select the car profile for the car you want to charge, as the charger supports 6 different profiles.
The run mode variable can be accessed by either pressing the right arrow key and scrolling through the variable list until you see the runmode*
or via the shortcut run mode key which brings you right to the car profile variable.
There are 8 run modes, so you can only enter 1 to 8 as of V 2.4 (latest)
There are 6 car profiles, so the charger calibration can be tuned to 6 different harnesses, so that variable only allows 1 to 6
The setup step 1 gets you to the car profile variable so you can edit it if desired. If the last profile (default 1) is ok, then you can simply press setup again, to get to the all important option select setup.
Read page 23, where it describes the 8 options.
The eeprom Bank, and temp C/F is supposed to be non volatile, but that is the bug that Version 2.4 fixes, it needs to be set each time.
****************************************************
11.(Q) How frequently should I charge the batteries?
(A) I get this question many times a day, here is my advise, and of course the many users out there may have feedback to help us tweak this advise.
We just don't know what the best frequency of charging is required to keep the car from having issues.
This has to be determined for each pack, with a procedure something like this:
After the initial reconditioning series, you will have the baseline information from your pack in bank 0, and should set the bank select to bank 1.
You can start by running a single mode 6 cycle, each month.
The charger will charge, top off the pack stopping when the plateau is detected, then discharge, then recharge to the plateau.
This is a nice conditioning, and should keep a decent pack in balance.
If you see recalibrations (SOC gauge dropping quickly (1 bar per second) from mid scale), or you see an IMA code in between your conditioning cycles, then you will want to run the 3 cycle series once a month, possibly with the soak turned on, to see if that prevents the recalibrations or codes, as well as giving you new data from the cycle memory to compare with your last cycles, to see if things are better or worse.
If once a month is not working, try every other week, and at the end of the pack life, you may want to cycle every week.
There is a very small amount of wear to the battery with each cycle, so there is no reason to overdo it unless the pack is misbehaving.
12. (Q) I am running a full reconditioning,for over a day, but have no idea where the charger is in the series of events. How can I see where the cycles are without stopping the charger to look at the bank 0 or 1 data?
(A) If you chose to soak charge, The soak time is predictable, The Maint Runtime of 1400 minutes will run the topping part of the charge for that length of time after it reaches the cutback V (166V).(insight and HCH1 profile)
The time to get there will depend on the SOC of the pack when you started.
You look at the charge charge LED color and the voltage to see where you are in the charge.
<166V, and you should see the charge light red
> 166V the charge light should be amber.
Once the charge light is amber, the 1400 minutes starts.
A timer on the lower line left field tells you how long the total charge has been running.
Therefore the first discharge should start about 24-26 hours into the soak charge, at a final voltage of 170-179V
At that point the green charge indicating led will go green, the shop lite should turn on, and the bottom line of the display should have a discharge timer that counts up as the pack discharges. Most packs will run the discharger for 1-4 hours depending on the pack capacity.
longer is better.
All of the information that is important is being saved in the charger, but be aware that if you stop the charge or discharge, and do not use the setup options to change the bank being used from bank 0 to bank 1. that bank 0 data will be cleared as soon as you press the start key to start another reconditioning cycle. When start is pressed in preparation for the next set of data, the whole bak that is selected is cleared to zero so you will loose the information.
If you let it run to completion then everything will be saved until you start another mode 6 cycle.
You can safely check on the cycles progress during a discharge as the top line of the display is active like it would be if the charger was just sitting idle, and therefore allows scrolling to the bank 0/1 pages to see how much of the data has been filled in.
When the first discharge finishes, the discharge information in bank0 cycle 1 will be filled in, when the first recharge is finished, the charge part of bank 0 cycle 1 will be filled in.
When the second discharge cycle finishes, bank 0 cycle 2 discharge data will be filled in, and so forth, so by checking the cycle data, to see which fields of data have been filled in with other than zeros you can see how far into the full reconditioning the process has proceeded.
The typical(Insight/HCH1) pack V where the charge will end will be between 172-178V, so as you approach that voltage you can expect the switch to discharge.
When in discharge, the pack will drop to between 145V and the settable MinDiscVolts which is set to 130V on the new chargers.
The lower the voltage when the discharge stops, the better.
We hope to see the discharger run time increase from cycle to cycle, and the MinDischVolts also drop.
The values stored can give a fair approximation of the pack condition,
It is important that the ambient temperature stays above 40F during the whole process, or the charger could stop the process due to a temperature drop.
The charge and discharge cycle data will include the R code for why the charge or discharge stopped. this important number lets us understand why the discharge stopped, and better determine if further cycles would help.
|
Grid charger Upgrade kit V 3.0
| 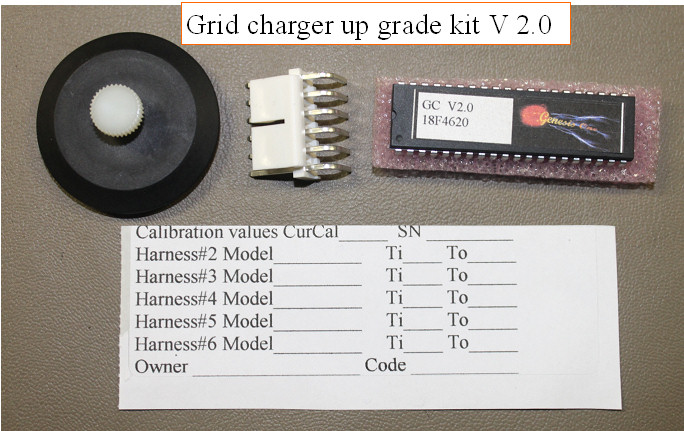 | | | Upgrade kit V 2.0 |
A programming kit is available so further upgrades can be accomplished by downloading the hex code.
DIY reprogramming the charger
Important note.***************************************
After the charger chip is installed, the charger needs to self calibrate.
This one time procedure will start the first time the charger is turned on after the new chip is installed.
The charger does not want to be connected to the car at this time.
The 7 step process will finish automatically in 3-4 minutes, so just turn it on, and ignore the beeping while it does its thing. Once this procedure is completer one time, it will not happen again.
************************************************
At this point, many people have upgraded the charger to the V 2.0 and higher code, the latest code is V 3.0.
The original chargers have code V1.2, which is fine, with no bugs or other reasons that would require a code upgrade. On the other hand, code V 2.0 and higher have added quite a few enhancements, with the larger microcontroller and features that many people will find useful.
Discharger support would be the major one, as well as complete revamp of the serial communications. The charger can be operated stand alone, or as a slave to a PC based labview program where the PC controls the start stop and operation of the charger. V3.0 instructions
As people that have been following the progress on the grid charger will know, we were at 98% full on the code area on the original microcontroller, and 100% full on the non volatile variable space in the 18F4520 chip used in the charger. V1.2 uses this smaller processor, so when you upgrade from 1.2, you get the larger replacement chip.
Two charger owners have more cars than the charger has profiles for cars, and have asked if more can be added.
Again kind of like wanting to add more stuff to your garage but there is no room. After exploring the possibilities, the best course of action seems to be to change the chip to the 18F4620 which has twice the code space and variable space.
That will basically double the capacity of the chargers internal program space, and give us all the expansion room we will need to add 6 or more car profiles, and stuff we have not even thought of.
Unfortunately that upgrade process is not easy, as all the calibration values for the profiles as well as hardware calibrations for temperature power supply test and current will need to be carefully transferred from the old chip to the new chip. Since the AUX connector required for the discharger is also not included on the chargers in the field.
You can get your charger upgraded via three methods.
1. you sent it back to me in a well packed flat rate box, insured, with the LED protected, and on the overnight chargers , without the rubber feet, so it fits into a flat rate box. The shipping will cost you ~ $20. Include a check for $50 to cover the return shipping and the upgrade parts and labor.
2. Send me $25, and I will send you an upgrade kit, where I pre program the new larger processor with your chargers calibration data, and on first bootup in your charger, the program will log the 6 power supplys unloaded output voltage.
This one time self calibrate routine only runs once on first boot after installation.
The AUX connector and a new cover for the Aux port are also included in the kit.
DIY charger upgrade video
3. If you drop buy with your charger, we can do the upgrade here, in about 15 minutes. Cost $20
The new code is larger than can fit in the old 18f4520 chip, so ideally all of the chargers should be upgraded this one last time, and then we will be ready with plenty of room for future expansion.
|
Products and projects: |
