|  | |
The Microprocessor and many of the other components of the MIMA controller board are static sensitive devices. The new Microprocessor is shipped in a special static protective case. Leave it in the case until ready to install.
In the summer months static is not much of an issue as the humidity is quite high, but in winter, Rh can be down to only a few %, and static build up is a real problem.
When you get the shift console open, and get ready to remove the MIMA connectors and board, make sure that you first touch any metal part of the car to discharge any static that you may have picked up.
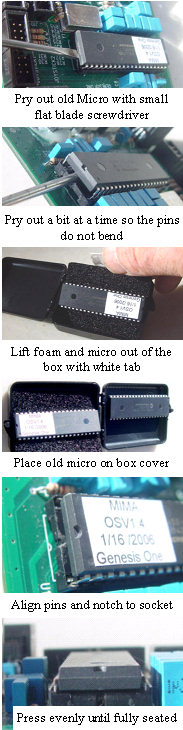
Remove the MIMA board from the car, and if possible wrap it in a static protective covering of conductive plastic designed for that purpose. This plastic is the type that computer boards are wrapped in. If you do not have access to that, be careful to hold the board from the edges. Find a flat work area indoors,again discharge any static charge that you may have developed by touching a grounded metal object (water fawcet) with the other hand. With a small flat blade screwdriver, carefully pry the old Micro out of the socket, being very careful to extract it straight out, by prying first one edge, then the other until it is free.
The packing matrial and envelope that the MIMA processor is shipped in, can be reused if opened by slitting the aluminum tape across the top. A new piece of foil tape is included in the package, that can be folded over the top to reclose.
The new chip is held in the black plastic case with some black conductive foam. A piece of white electrical tape attached to the black foam allows the foam and micro to be removed from the case to allow easy separation from the foam. Carefully take the micro out of the foam, and while observing the direction of the notch,(pin 1) and assuring that all of the pins are aligned with the socket holes, press it fully into the socket. If you bend a pin, you may be able to straighten it out, but utmost care should be exercised to avoid bending it, as the pin will break off if bent more than 2 or 3 times. Place the old Micro in the foam in the box,and save it in the shipping envelope until a new version of the code is available. Carefully replace the board in the car, again discharging any static on your body with the other hand before attaching it to the mounting bracket.
Plug in all the connectors, and off you go with the new MIMA software.
|
