As an inventor, I tend to come up with new ways to solve problems that come up in life or in my work, and as a CT yankee, I tend to solve the problems with things that are in my extensive pile of stuff. The following is a random bunch of things that I think others may be interested in. Enjoy! Mike
Some stuff to ponder
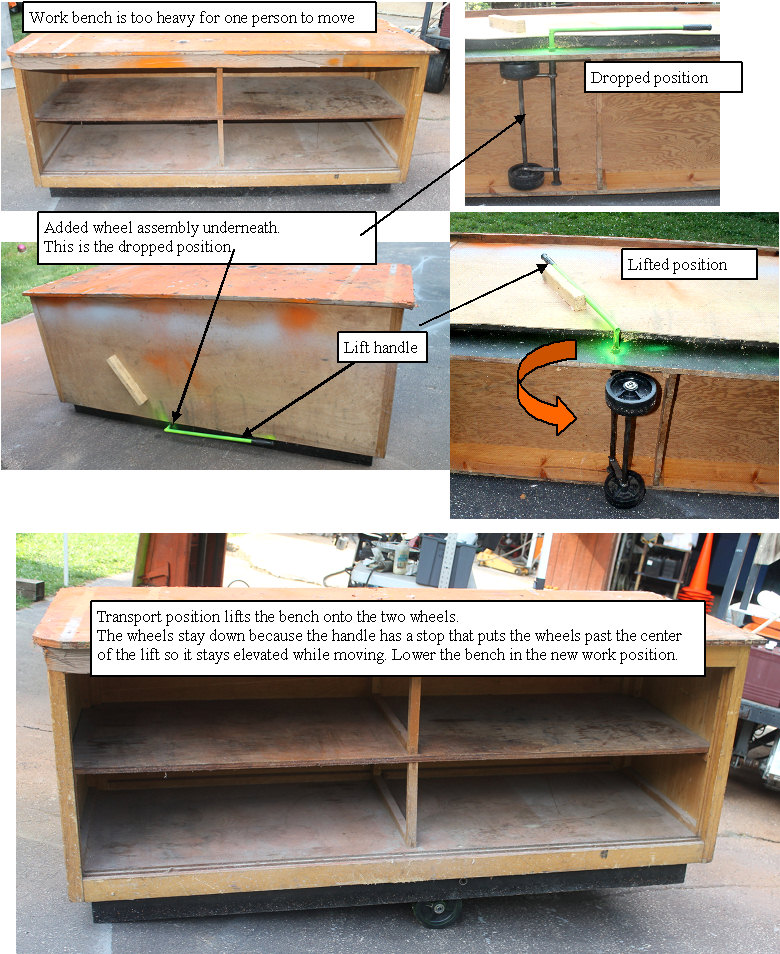
making a heavy workbench mobile
movable workbench
Had a big bench/cabinet that was in my battery room become surplus because of the large battery rack for the off grid batteries. The bench weighs about 150 lbs and is very difficult to move even with 2 people because of the size. we moved it outside and started using it while getting ready for solarfest, and found that it was a great workbench. I did some digging in my wheel box, and found some big plastic wheels. I built a simple lift assembly that lets me lift the bench onto the two wheels so I can move it my self. The long handle gives plenty of mechanical advantage so the empty bench is easy for me to raise and lower, and the central location of the wheels lets me rotate the bench in place for easy positioning. When the bench is lowered,the wheels retract completely so the bench is solid and stable. Now I need to put a durable top on it, and give it a good paint job and I will have a great workbench that I will be able to use when I get older.
(Posted 7/23/2014 by mikey)
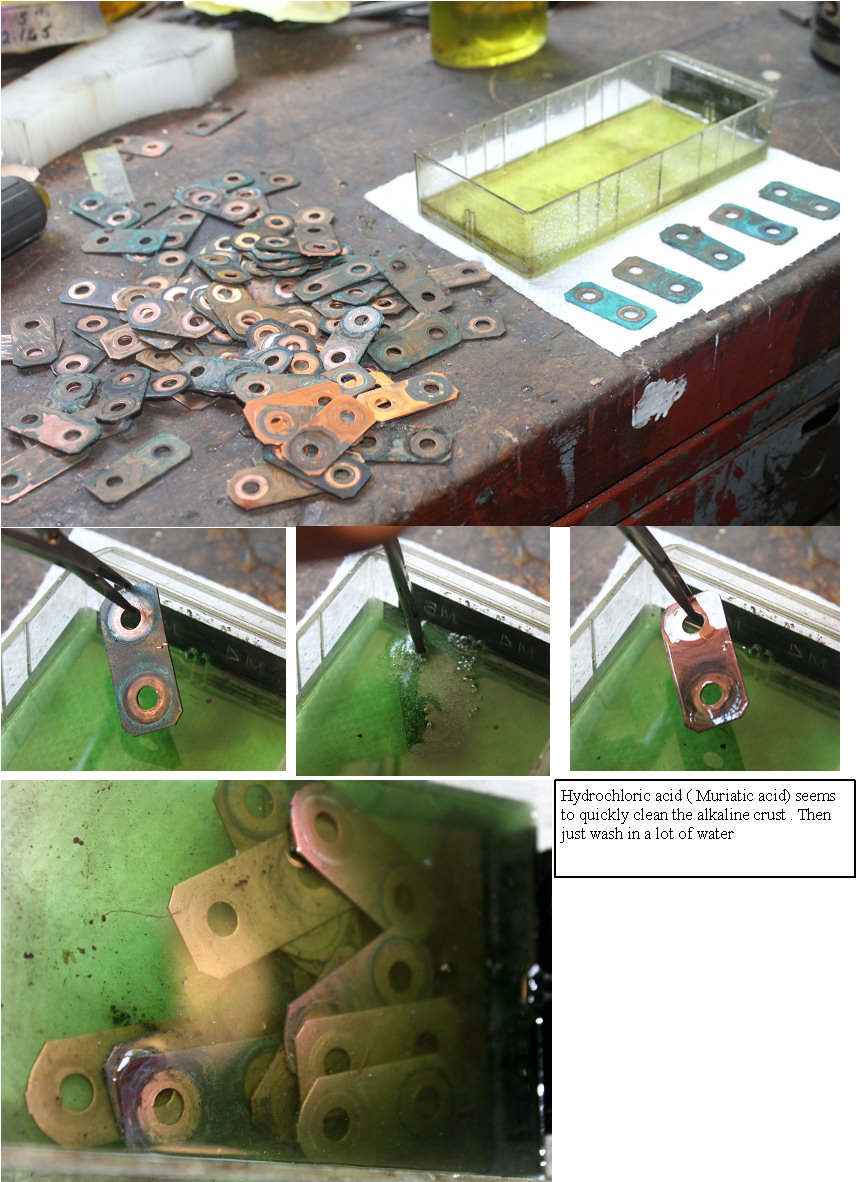
Cleaning the corroded buss bars from a Prius battery pack
Cleaning the Prius hybrid battery buss bars
The prius hybrid batteries have been having cronic issues with the copper buss bars between modules getting corroded by Potasium Hydroxide weeping through the terminal seals. The effect is a crust of hard material that is non conductive, eventually causing battery failure. I want to build up more of the 48V modules for my EV's, and wanted to find a way to clean the strips more efficiently than sanding and using steel wool, which can take as much as several minutes of hard work each. I remembered my Dad showing me how to make old copper pennies shine buy dunking them in muriatic acid (Hydrochloric acid). I still had a container of the stuff which can be bought at most hardware stores, so I gave it a try. It immediately causes the crust to dissolve in a flory of bubbles, and then it stops, and the strip is mostly shiny copper. A thorough wash in running water finishes the job by washing off all the acid. Time will tell as to how it look a year from now, but it looks good now.
(Posted 6/9/2014 by mikey)
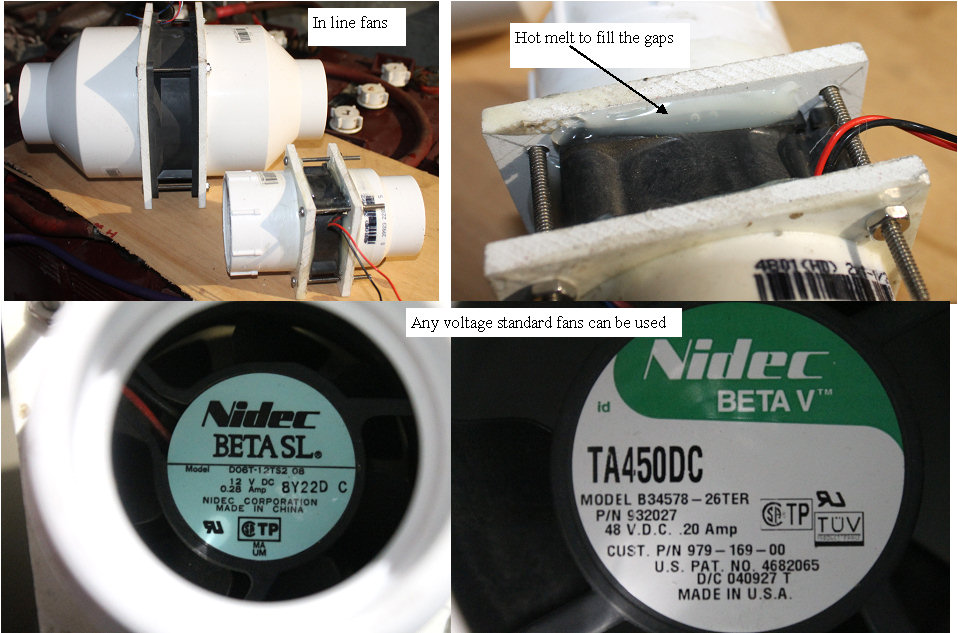
making a ducted blower from a computer fan
DIY in line ducted fan
I need a battery box vent for my solar batteries enclosure. Many people sell fans that can be installed in PVC piping, but they are expensive. I have a bunch assorted fans from 2" to 4" from the MIT swap meet, so I set out to make a ducted fan assembly for them. I found that the white PVC reducers were just the right size, so I took some white expanded PVC foam board, and using a 4" hole saw bade a simple flange. I glued the flange to the reducer, and used some long 6-32 screws and now have a nice ducted fan that can be inserted into the 1.5" PVC vent line. Made another for a 2.5" fan.
(Posted 2/22/2014 by mikey)
Making a simple IMA bypass connector from an old pack relay board
simple IMA bypass connector
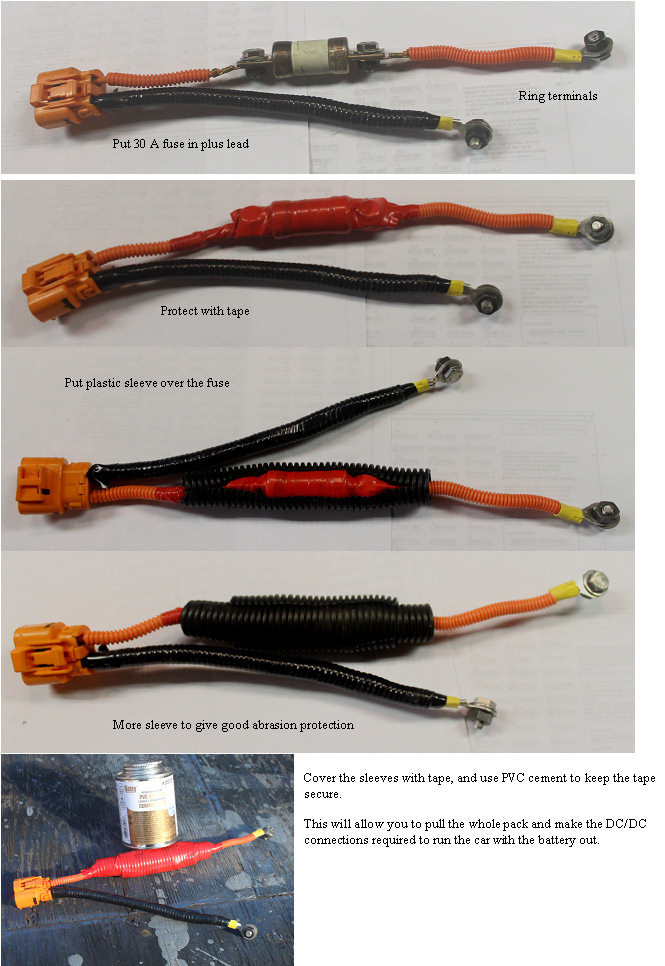
The IMA battery can be completely removed from the car, and the car will still function, if the DC/Dc converter can have the HV input it requires. The typical way to do this is to remove the whole connector/relay board from the pack, and use it to make those connections. If the fuse and connector from a used pack is available, a much safer and simpler IMA bypass can be construced. You remove the DC/DC connector, the 30A fuse, and make up some wires with ring terminals, and make a short bypass connector with those components. It is important to keep everything well insulated, and prevent ant possible shorts, so here is how I made mine. If you can leave the HV battery in the car, just pull the "A" connector of the BCM and turn off the HV battery switch location of BCM A connector
(Posted 4/29/2013 by mikey)
Where do you find high quality alligator clips?
beefing up some clips for high current
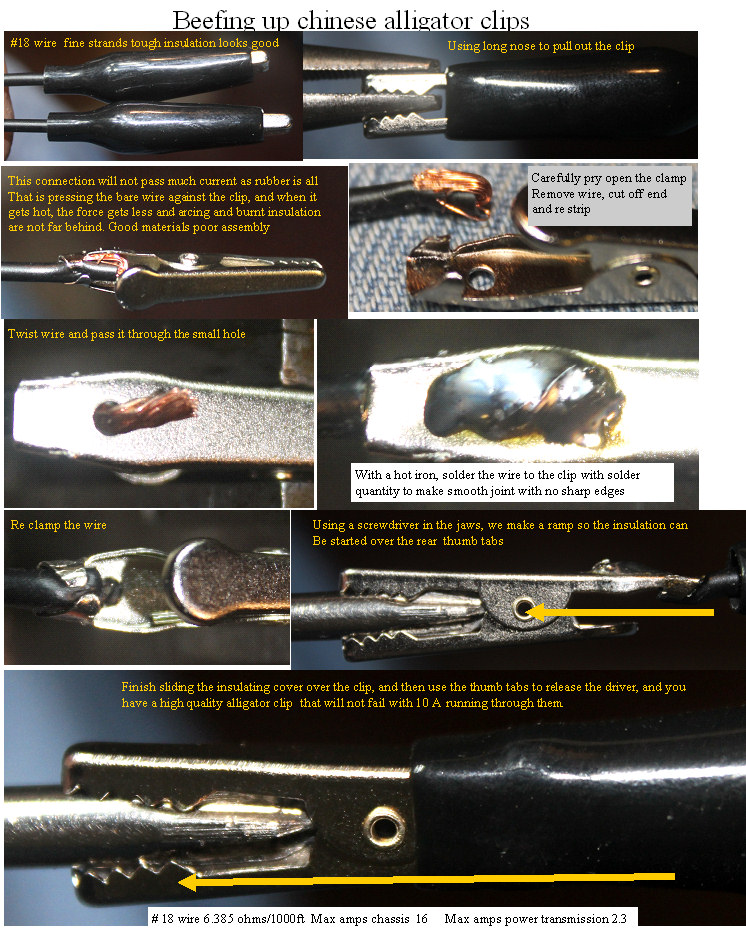
I wanted a quantity of alligator clips that could handle currents in the 10 A range, and bought some nice looking ones with # 18 wire. As I usually do with chinese made products, I always want to see if the product is made well or if some shortcuts have been taken in materials or workmanship. I removed one end with a trick I learned many years ago. You put a large diameter shaft (phillips driver) into the clip, which makes the shape like a ramp, so the insulating cover can be slid off, and then back on. In this case, I used some long nose pliers to force the jaws open, so I could grab the jaws to pull off the cover. The deeper you go with the pliers the better the ramp and the easier the covers slides back. One look at the connection, and I knew that this clip, despite the nice wire and tough clip, was not going to pass the current that the wire should comfortably handle. The bare copper was not crimped metal to metal, instead they crimped it with the rubber, which while capable of handling an amp or so, if we start passing 5- 10 A, the joint would rapidly heat up and soften the wire insulation, and thus decrease the clamping force, which would raise the joint resistance, which would raise the temperature in a death spiral that would end with fire. My investment would be wasted if I did not fix this only weakness in an otherwise good product for a fair price. I carefully pried open the two clamp pins Cut of the mangled end of the wire and make a new strip. twist the fine strands, pass through the hole from the inside Solder the wire to the clip with a heavy iron so the heat does not have time to heat the spring in the clip and soften it The solder joint wants to present a smooth surface to the insulating cover, so flow in enough solder to form that surface After the clip cools (blow on it to speed the process) bend the two clamps back over the insulation Using the Phillips driver to create the ramp. slide the cover back into position,and you have a first rate alligator clip that can handle some high currents, and will last.
(Posted 2/20/2013 by mikey)
Making an isolated hall effect current sensor with ring terminals
simple isolated current sensor
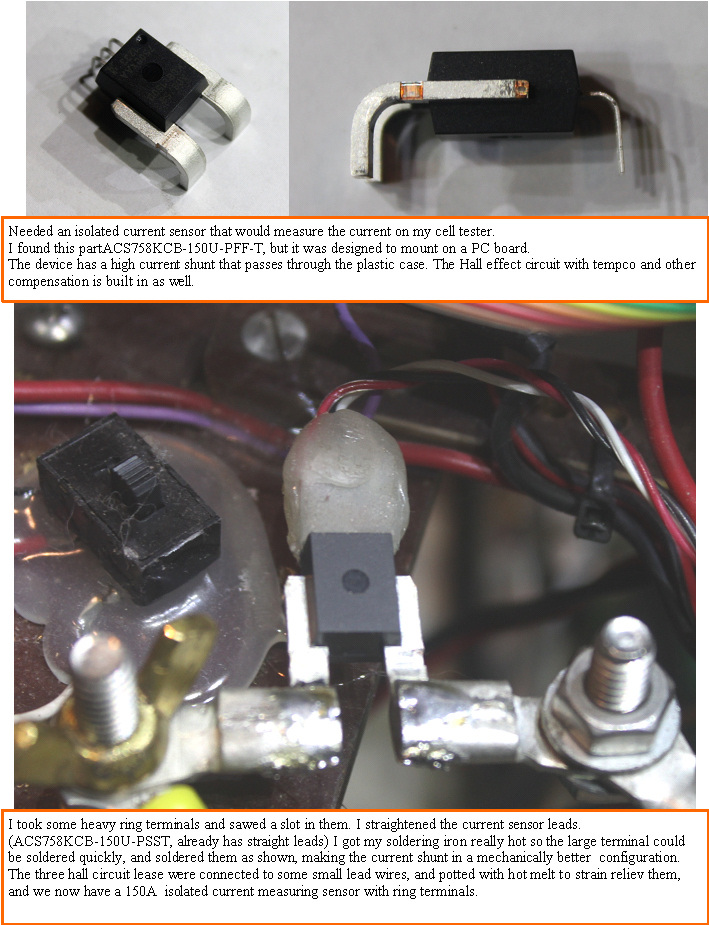
Needed an isolated current sensor to sense the current in my cell level test fixture. Found a neat part made by alegro that has a compensated hall effect sensor with built in current shunt. Unlike a regular current shunt where the resistance of the shunt produces a voltage when current flows through it, this device has an integrated hall effect circuit built in. The device comes in many flavors, with unipolar or bipolar sensing up to +-150A. The best part is that the hall circuit is electrically isolated from the current path. The down side was that the device was designed to mount on a PC board, so attaching it to the big 1/4" studs that I required was dificult. I carefully straightened the heavy copper buss bar leads and sawed a slot in some heavy 1/4" ring terminals. The terminals were soldered to the straightened leads, and the fine hall effect wires were connected to three wires and strain relieved with some hot glue. Works like a charm.
(Posted 2/5/2013 by mikey)
Measuring resistance of less than 1 ohm
measuring less than 1 ohm accurately
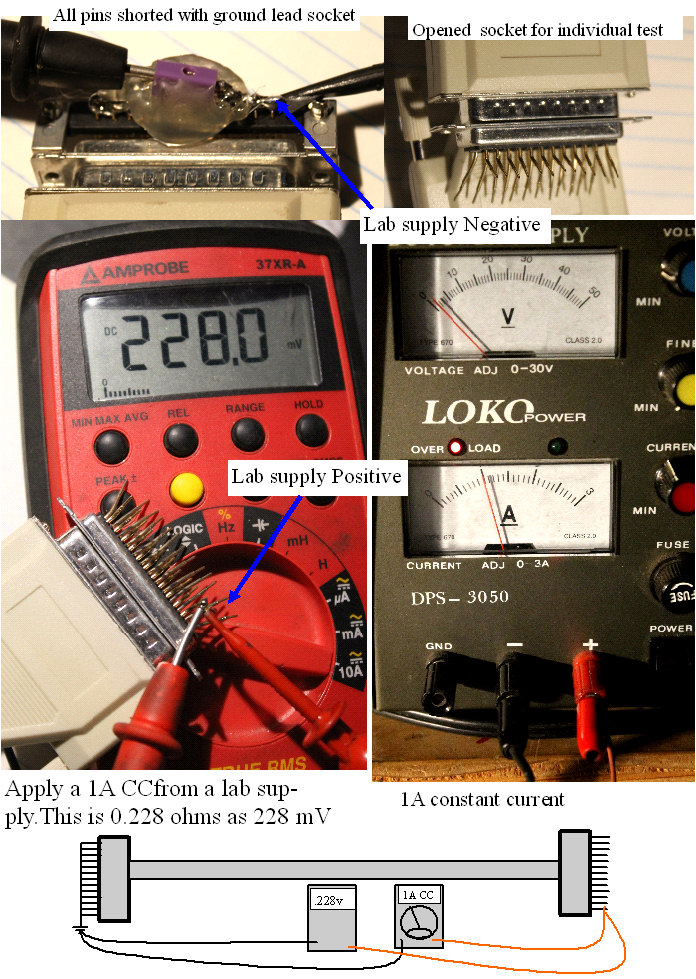
Having some issues with the resistance of a db-25 cable, and need to compare the end to end resistance of several brands to find the lowest resistance. Unfortunately when using most DVM's, the sub ohm accuracy and resolution is pretty poor. Special sub ohm testers usually use a 4 connection meter. two leads apply a constant current, and two pick up the developed voltage. I used my adjustable constant current lab supply, set to produce 1A CC. This current through the sub ohm cable wires will develop 1V/ohm, so the cables actual resistance can be measured with 0.001ohm accuracy. The voltmeter will read 220mV for the 0.220 ohms. Since the current is constant, and the current connections are separate from the measuring connections, the accuracy is very good.
(Posted 4/14/2012 by mikey)
Broken gas can cap
Fixing a broken gas cap
New England weather can get nasty, so having a generator and some gas is almost a necessity. I bought several 6 gal cans a few years ago, and one of the plastic caps split, and would not seal. I went on a quest to buy a replacement cap, but as was my experience in the past, they seem to keep changing the threads and size, and none of the replacements would work. I bought a new gas can last time, but hate to trash a perfectly good gas can for lack of a working cover. I washed the broken gas cap in alcohol to get any residue off. Then cut some small strips of my favorite aluminum tape, and carefully taped the cracked cover back in the correct shape. The type of plastic they use does not glue well, and there is a lot of stress on the cap when tight, so I got out my trusty epoxy putty, and mixed up enough to totally cover the cap. I rough sanded the plastic cap, and made some light saw cuts to give the epoxy something to attach to, and I made sure to get some under the bottom lip of the cap, so the broken cap was totally encased in the putty. The epoxy cured overnight, and the cap now works just like new, and I expect that this cap may last longer than the virgin ones.
(Posted 1/21/2012 by mikey)
Quick way to make a connector for checking the subpacks
Battery tap rotary switchvoltage tap reader
After several hours of trying to find the BCM connector that is the mate for the battery tap harness connector,I gave up. Using a pack that had no cells,so the connector would not have power. I took a small clear plastic bag, and carefully taped the cut up bag over the harness connector,and secured it with black tape near the base, where the wires come out. Next I inserted the pins pulled from one of the 104Pin headers used in the MIMA plug and play adapter, through the plastic into the harness connector female pins. Making sure that the pins were inserted fully,I covered the plastic covered connector with epoxy putty, allowing the pins to stick through the epoxy. I taped the epoxy with black tape to hold the shape. When the epoxy cured,I soldered a ribbon cable to the pins, making the order of the ribbon follow the taps from the - end to the HV + end in sequence. An aluminum duct tape dam that was adhered to the epoxy, made a cavity on the rear where the ribbon attached to the pins.The cavity was filled with hot melt, casting the wires and pins in place. I put a 12 pin .1" OC straight male header on the other end of the ribbon. The voltage taps can be read here, or I can plug in another female 12 Pin header, also attached to a ribbon, into a pill bottle(it was handy). I mounted a 20 position break before make dual pole rotary switch on the base of the pill bottle, and two terminals on the cap for the volt meter. I also made the conector for a civic pack, that plugs into the same female header on the rotary switch /pill bottle, so the same switch can do either. To use it, one unplugs the voltage tap connector from the pack, and attached a voltmeter to the two pill cap terminals, and I can monitor each 12 cell stick , in sequence, as well as the whole pack voltage. It took less time to build than I spent looking for the connector, and It can do both a civic and insight. The connector plugs in reliably and securely, after the plastic is removed. Not pretty, but it works well and is pretty rugged and safe.
(Posted 10/23/2011 by mikey)
Lifting the battery safely
Some insight battery pack lifting options
As anyone that has pulled the battery pack on their insight can tell you, it is just heavy enough to hurt your back, and it requires you to lift in a very awkward position. Honda has a special lifting frame that the techs use, so I thought that with the requirement that one pulls the Insight pack to do a clean grid charger install,it was time to see if a quick and dirty version of the lifting frame could be fabricated. Randall sent me a photo of one he made, using some handles, and a piece of plywood.
I made one with long handles, that allow comfortable lifting angles, and full control of the pack while removing or installing.
(Posted 8/3/2011 by mikey)
IMA motor coil shift in collision
Front end accident shifted IMA motor coil knocking it against rotor
I acquired a complete insight motor/transmission from an insight that had been in a front end collision.I was preparing to shim the IMA rotor so I could remove it from the engine,and discovered that the rotor was shifted sideways from the coil assembly to the point where it was rubbing on one side, and the other side had a big gap.
The mass of the coil assembly and severity of the impact seem to have shifted the coil on its mount. I could not see where the aluminum block or IMA housing had shifted, but do see some abrasion on the front of the block ? the problem is that if the casting was bent there the gap would have been on the other side???
When I get a chance I will eventually remove the coil assembly from the casting, and compare it with one that was not hit to see what actually moved?
The point here is that if you get in an accident, the coil can shift and rub the rotor causing some future failure. This should probably be inspected after a front end hit, but I really doubt that it ever is???
(Posted 3/20/2011 by mikey)
Using digital caliper to measure hole center to center distance
direct center to center hole measurements
The digital caliper is a great tool that no self respecting home tinkerer should be without. A simple technique allows accurate hole center to center measurements. First set caliper to measure the hole diameter, but instead of reading the diameter, zero the caliper. Now the hole diameter will be subtracted from any subsequent readings. Use the caliper to read the outer edge to outer edge of the two holes you want to measure, and the hole diameter will be subtracted from the measurement yielding the true center to center distance.
(Posted 7/10/2010 by mikey)
Reading the blink codes
how to read blink codes
While most of the nice OBDII code readers can tell us which P code is causing a check engine or IMA light, it cannot tell us the subcode ( Blink code). The photo shows which pins need to be shorted together on the Insight OBDII plug to have the car report the blink subcodes. Short with wire and the codes are reported.
When reading the IMA blink codes, the IMA light blinks and if the check engine light is on, it will blink Example: a 74 IMA code would be 7 slow blinks, and 4 fast blinks, if there is more than one code, the blinking will have a long pause, and then blink out the second code.It will cycle through all the codes in a circular fashion. Say there was a 74, and a 78, and a 63. The IMA light would bilnk the 74, then the 78, then the 63, and then start back with the 74 and repeat until you release the short.
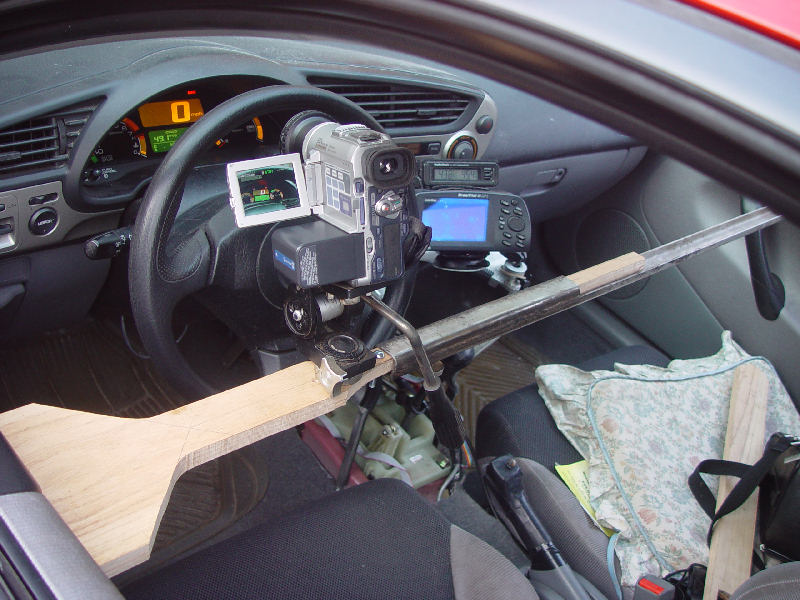
When shooting the MIMA video, I needed a way to hold the camcorder so it would shoot the dash display,with no hands, as I needed both to drive the car. I cut an oak board in a triangular shape with two soft rubber feet for the driver door side,and a square shape that fit into the steel square tube on the other. A locking screw was made by welding a nut over a clearance hole on the end of the square tube. It works just like a tripod leg. The telescoping arm is put between the two front doors and forced open so it presses against each, then lock it. A tripod head was attached so the camera can look at the dash while driving. The MIMA videos were shot using this technique.
(Posted 5/8/2010 by mikey)
Soldering iorn degausser
Another use for your soldering gun
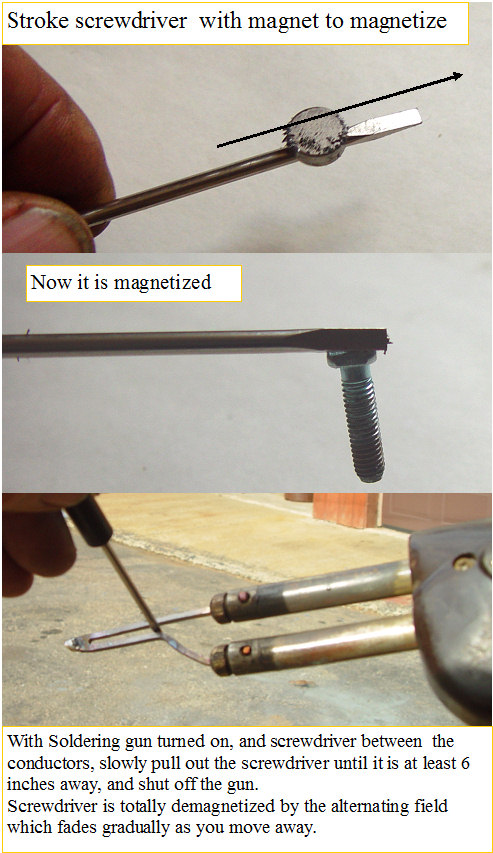
Having a magnetized screwdriver can be a life saver for getting a screw into a tight place, but that same screwdriver when used to nudge a small component around for soldering, or when it falls into a floor with steel chips that stick to it. We learned in science class that we can magnetize the driver buy sticking a magnet to it and dragging it off the tip, but how to remove it is a bit more difficult. Your trusty weller transformer type soldering gun makes a quick degausser. The high ac currents flowing through the soldering iron tip makes a strong AC magnetic field. If the gun is turned on, and the screwdriver is placed in the gap and them smoothly pulled out to at least 6 inches, all magnetism will be removed.While in the gap it is getting magnetized north south 60 times a second, as it is slowly removed this reversing field gets gradually weaker and weaker until it has erased all trace of the original field. Need it magnetized again, just grab the magnet.
(Posted 2/16/2010 by mikey)
Forever solar desk lamp
Recycled Insight battery cells
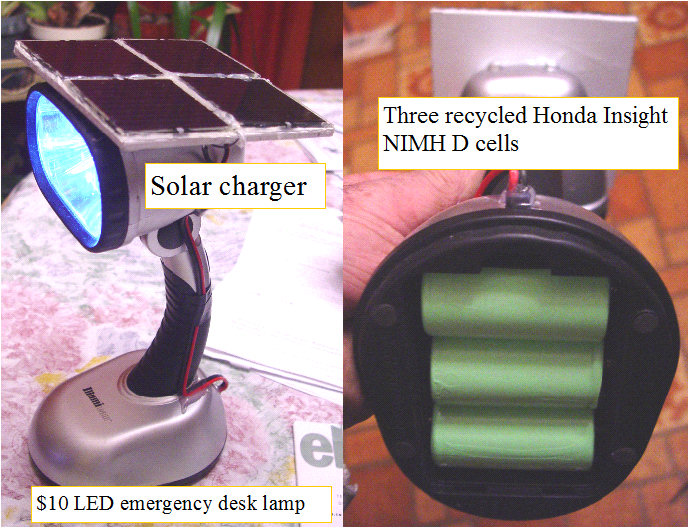
We lost our power a week or so ago, and the usual search for a flashlight with good batteries was a pain in the A**. In researching the Insight subpacks, I had to remove a weak cell from the stick to examine it. That left 5 pretty good D cells, the only problem being that they are welded together. I carefully used a dremmel grinder to grind off the welds, and in the end had 5 nice high rate NIMH cells. A few short pieces of heat shrink, and they were ready to be put to work. I installed them in a cheap LED emergency lamp, and made a small 4 cell solar charger.The solar panel current was passed through a diode so it would not discharge the cells at night. Now I am ready for the next power outage
(Posted 2/14/2010 by mikey)
Making a Cheap battery State Of Charge gauge more accurate
Making the SOC meter more useable
I had to buy some speed controllers and other EV parts for my yard machine, so I took a chance and got what was supposed to be a 36 Volt system battery SOC gauge. kelly controller SOC gauge
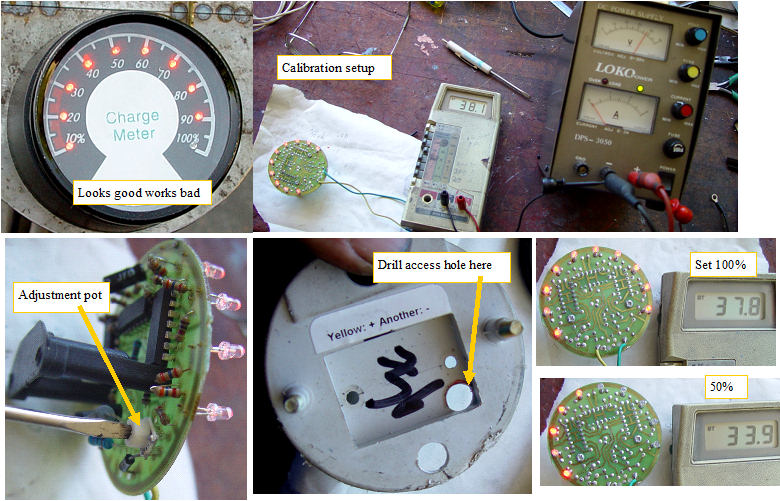
I took out a variable voltage power supply, and checked the led display's SOC against a Trojan battery company equivalent voltage chart, and found that it was not even close. I could not use it as it was, and the thing was glued together with no way to get inside.I took my band saw and cut the outer tube so the back could be removed. The circuit looks like a series of resistors that make up a voltage divider and some op amp comparators to turn on the leds when the voltage rises over the voltage divider taps. This type of comparator can be quite accurate, but it depends on voltage references and precision resistors,which this unit does not use. What was most interesting was that there is a potentiometer on the circuit that can adjust the divider current to make the whole scale move up or down. I set the power supply to the 100% SOC voltage according to the trojan chart, and then adjusted the pot so the 100% led just came on. I then adjusted the power supply down until each led went out, and noted where the 50% SOC was so I knew when to get to a charger. While this setting may be a bit temperature sensitive, it at least made the gauge usable. To gain access to the pot, without cutting open the whole case, drill a hole in the indicated place on the back cover and you should be able to adjust the gauge without cutting it open. Of course one could calculate the precision resistor values required for accurate SOC throughout the range, and replace the 10% resistors that they used, but relative SOC is all I need so simply getting the 100% and 50% points will be sufficient accuracy for me.
(Posted 5/26/2009 by mikey)
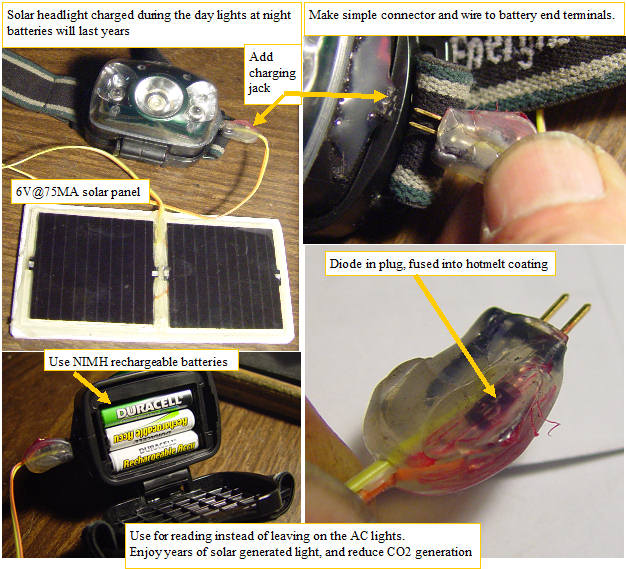
Solar headlight
carbon free light for years
Headlights are a great way to save energy, by taking your light with you rather than turning on room lights. I modified this headlight by punching a small hole in the side, and carefully soldered to the battery end terminals. The wires are run to a two terminal piece of some breakaway .1" on center headers. The solar panels are in series, and a diode is in series on the + lead, to prevent discharge of the cells at night. with 750MHA NIMH AAA batteries, a full day of sun will give several hours of light per evening. The batteries should last for years.
(Posted 3/31/2009 by mikey)
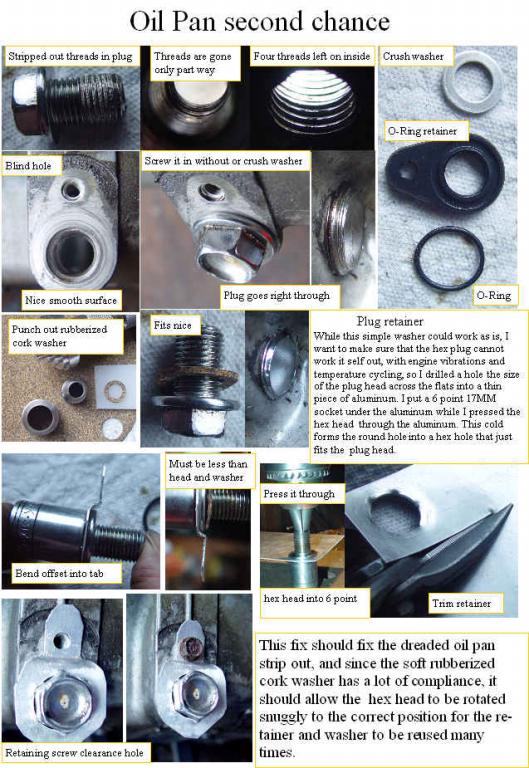
Insight Oil Pan second chance
Oil Pan second chance
Thanks to Jim Alger at Find My Insight who sent me a stripped out oil pan, I believe I have a better solution to the expensive replacement that many people have faced. This may have actually been part of the design, as I cannot see any other reason they would have put that strange O-ring retainer in the stack of washers. I carefully looked at the pan, and saw that there were at least 4 complete threads in the rear of the stripped out magnesium hole. I quickly realized that if the crush washer, and O-ring plate were gone, and I cleaned the remains of the old threads out of the hex bolt, that it threaded in fully, and actually came out the other side with the full 4 threads to hold on to. I got out the trusty gasket punch set, and made a nice 1/8" thick rubberized cork washer. I screwed the bolt back in, and found that from first resistance(initial crush), to where I felt I was going to squeeze out the cork (not likely)that I had nearly a 1/4 turn. This should seal easily between the hex plugs polished underside, and the nice flat surface of the oil pan. The only question that remained was could it work loose over repeated hot cold cycles. I decided that since there was already a nice blind threaded hole and bolt left over from the O-Ring washer, that I may as well make a hex plug anti rotation retainer, I dug up a thin aluminum sheetmetal plate, and drilled a hole that was just a smidge larger than the distance across the hex head flats of the hardened plug. This hex is 17MM, so as a backing cavity I used a 6 point socket, and pressed the hex head through the aluminum with my drill press. This cold forms the aluminum to make a nice snug fitting hex hole to fit the hex head of the plug. I cut out the aluminum and made a narrow tab, then carefully bent the tab to slightly less than the wide base of the hex plug and the cork washer so it would not bottom out when applied. Finally I drilled a clearance hole in the tab for the retaining screw. I tightened the plug with the retainer in position till the hole lined up, put in the screw, and believe that this oil pan will work as good as it did before stripping out, all without the need to do any machining or removal of the oilpan, and with only the addition of a single sealing washer. Cork rubber is good in oil, and is rated for -40F to 180F. I just happened to have a piece, but a better washer material may be Aramid/Buna-N, which is rated for -40 to 700F You can buy a pack of 5- 5/8" X 1" X .062 Aramid/Buna-N washers from http://www.mcmaster.com/ Part # 93303A284 for $8.10
(Posted 8/20/2008 by mikey)
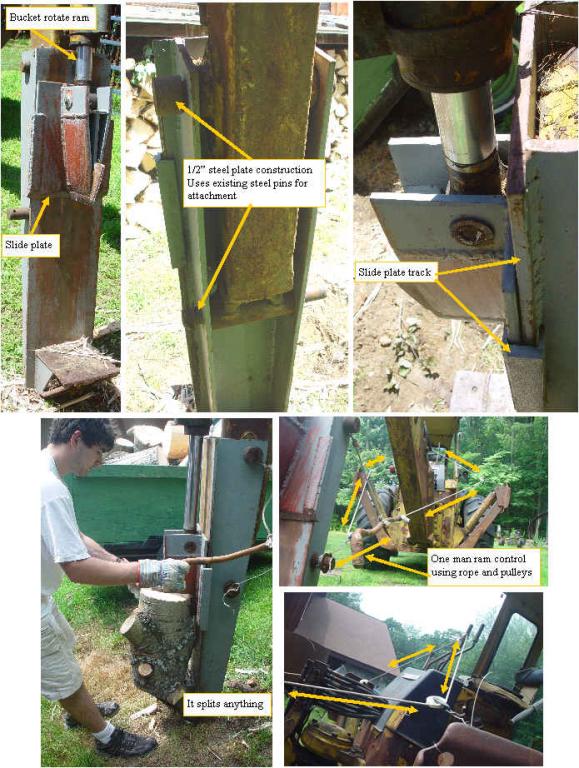
Back hoe log splitter
Splitting wood with a backhoe
I built a log splitter for my backhoe with 1/2" steel plate. A local steel yard cut the pieces for me, so All I had to do was weld it together. I remove the bucket and use the bucket curl cylinder to push the ram. It works quite well, and has enough power for pretty much everything that I have tried to split. To make it operable by one person, I rigged up a rope and pulley system that lets me operate the valve from the splitter end.
(Posted 7/11/2008 by mikey)
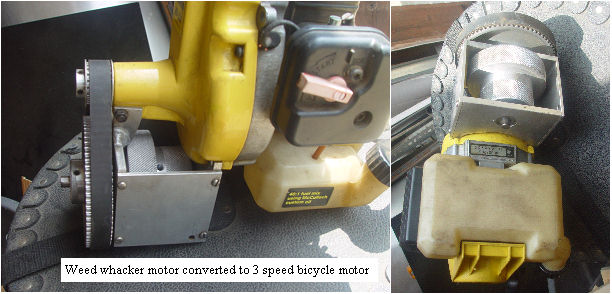
weed whacker motor converted to bicycle motor
Bicycle drive
About 12 years ago, I decided to build a powered bicycle, so I dismantled my seldom used weed whacker and built a three speed drive system that attached to the motor. I put it on the front wheel of a bike, with a hand shifter so I could move it through the gears. It worked pretty well as far as pushing the bike, with top speed being faster than I felt comfortable going. I could not stand the noise and fumes, so I removed it. I just ran into the motor/drive when looking for something else, so I figured I would snap a few photos in case someone else wants to play with a similar concept.
(Posted 7/1/2008 by mikey)
When cleaning the EGR does not fix the hesatation
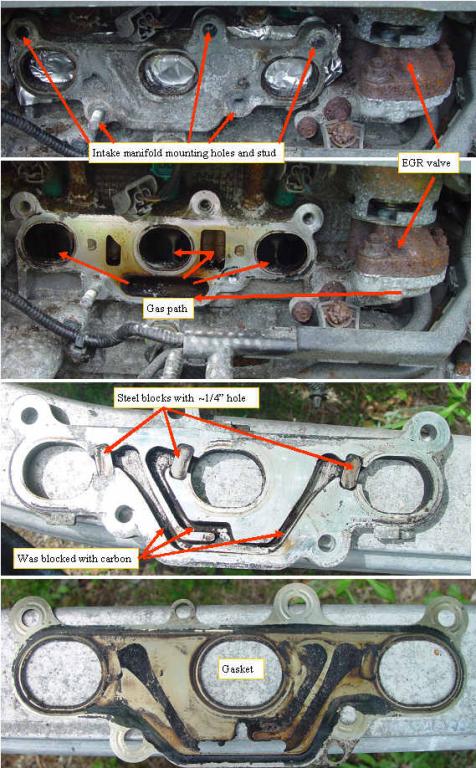
EGR chanels can get blocked
As any hard core Insight owner knows, the Insight will buck and hesitate under low throttle when the EGR valve either gets clogged, or develops a bad feedback potentiometer.The exhaust gas passes into the cylinder intake by passing through an aluminum casting. Each of the three channels that are fed by this channel has a steel flow control orifice in the path. When we removed the intake manifold on the green machine, this channel was totally clogged, and we needed a screw driver to clean it out. Probably should be cleaned whenever the EGR is serviced.
(Posted 5/24/2008 by mikey)
aluminum tape again
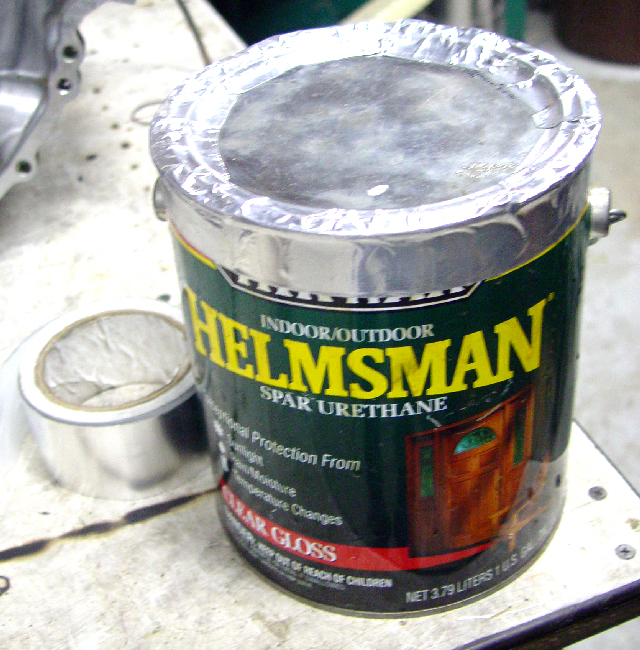
Re-Sealing that can
I needed to varnish a piece of wood, and as usual, the cover of the can was stuck so strongly (had been previously opened) that I had to damage the seal to get the cover off. Faced with loosing the rest of the mostly full gallon of varnish, I pulled out the roll of aluminum tape again, and was able to seal the top. Results: I opened the can three weeks after sealing it, and the varnish was perfect, with no skin on the surface.Looks like it works.
(Posted 5/12/2008 by mikey)
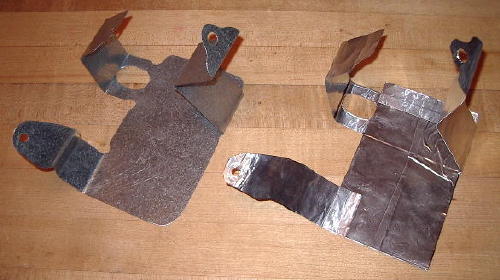
Handy use for Aluminum tape.
Need to make a template for a bracket? Aluminum tape works pretty good. Thanks to Randall Burkhalter for this tip. Remove the backing and fold sticky side to sticky side. A little stiff, holds its shape fairly well and flattens back out so a pattern can be transfered to the desired material. It can be cut with scissors, and when you get it into place, small mounting holes can be outlined by slightly pressing the aluminum tape around the edges of the hole or sticking a pointed object through the tape into the hole.
It worked very well for the bracket shown, as there wasn't a real good way to measure distances between the 3 mounting holes.
Making a pattern out of aluminum tape.
(Posted 4/3/2008 by mikey)
Rear view Video cameras
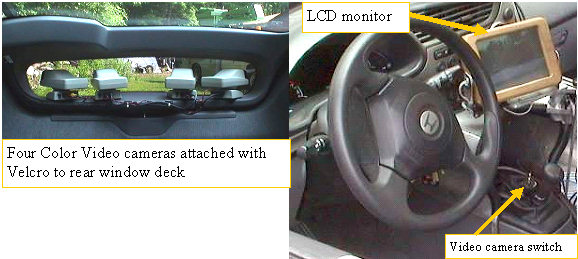
Rear view Video Cameras
Even before the rear MPG display, I played with using video cameras as a way to potentially replace the drag inducing rear view mirrors. I had acquired some LCD video displays and color cameras at the MIT electronics flea market. The cameras had a rather narrow field of view, so I set up four of them looking out the lower rear hatch window. I built a joystick operated 4 camera switch so I could easily select the camera. The display worked well except for when the sun shined directly on it, so I had a removable sun shield. The cameras worked very well during the day, or under street lights, but even with the automatic appture control, did not have the low light sensitivity to see much more than headlights of approaching cars. Of course to totally replace the rear view side mirrors, I would have needed two more cameras. With the correct choice of cameras,field of view, and a bright monitor, two side cameras should easily replace the side mirrors. Several years later,at Hybridfest, I saw Bill Kinneys Insight that was set up with exactly that system, which seemed to work very well.
(Posted 3/1/2008 by mikey)
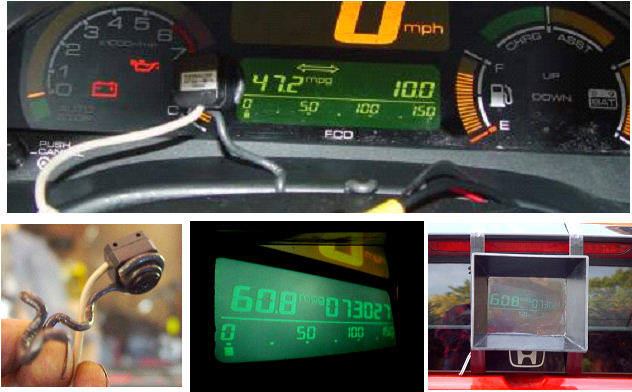
Real time external MPG display
Rear Real Time MPG display
Back in 2002, I decided that I wanted to let the other drivers on the road know what I was getting for MPG. I mounted a tiny color video camera on a bent piece of solid # 14 wire, which I stuck into the slot between the dash bezel and the steering column bezel. The camera was carefully focused so that only the bargraph and MPG displays were in the field of view. I made a waterproof rear LCD video display and fed the video signal to the monitor. It was a bit too dark for full sunlight viewing, but was quite readable under most other conditions. I hated it. I felt compelled to drive in my most efficient way, since everyone was watching, and finally took it out for that reason. Now if I were a hard core hypermiler that always got super numbers, it would have been another story.This was before MIMA, so maybe I need to dig it back out?
(Posted 2/28/2008 by mikey)
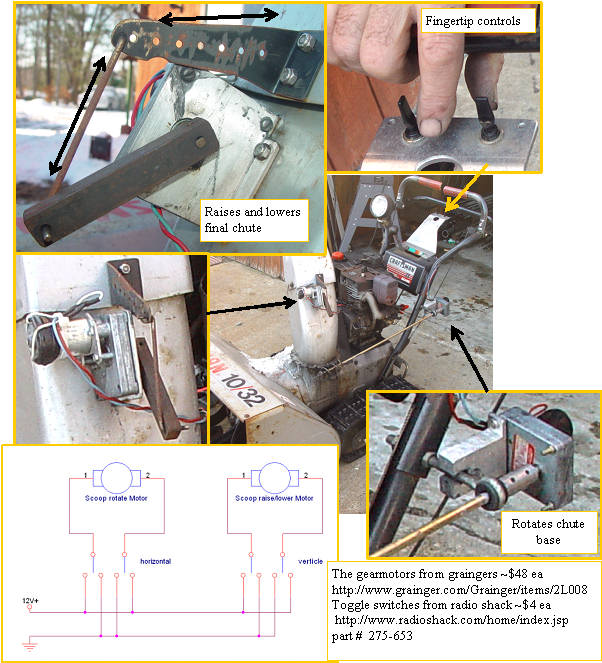
Motorizing a snow blower chute
remote chute operator
Tired of cranking the chute with one hand while trying to control your snow blower with the other. If you have a 12V light on the blower, this will work with no batteries. Cover the motors with a small plastic grocery bag when using. The chute raise/lower motor is mounted to the chute with a bracket, and uses a square steel bar for the actuator. The bar is attached to the motor shaft with a setscrew. The chute rotation motor is coupled to the chute rotation screw with a simple dual set screw coupling. The motor floats free, with an aluminum fork to stop the rotation. This type of attachment allows lots of slop and misalignment, and is easy to make. This has been part of my snowblower for the past 5 years.
(Posted 2/24/2008 by mikey)
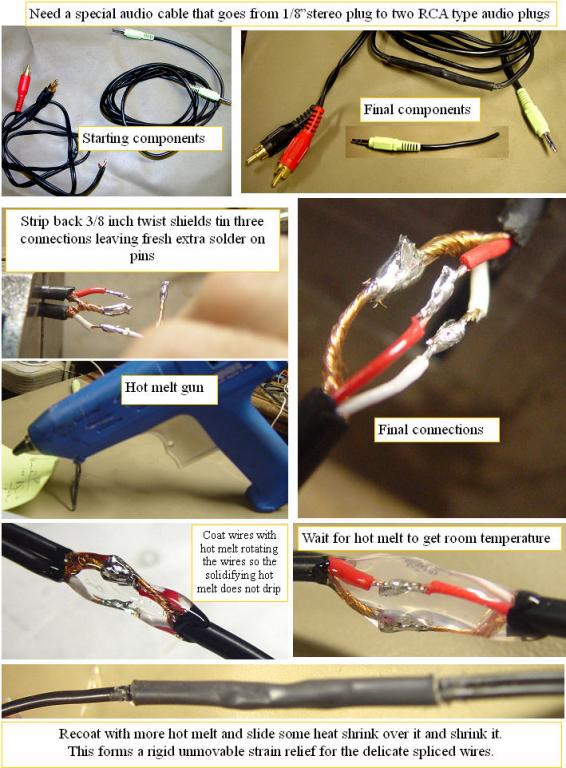
How I splice audio cables
Splicing delicate shielded wires
I got some nice amplified speakers the other day, and expected to plug them into the two audio out jacks on the back of my TV.I take it out of the box and find that it has a cable with a 1/8 " stereo plug, not the RCA plugs that my TV has.The speakers were designed for PC audio or gaming. I dig into my huge cable case and find a nice dual color coded RCA audio cable that was cut off to make an audio input cable for a device I built.Never throw away anything, so heres the proof that you should save everything that can be used again. Audio cables are a difficult splice because the wires are so delicate. This splice is stronger than the wires on either end, fully insulates and encapsulates and waterproofs the splice, and is tough as nails. works for other splices as well.
(Posted 2/19/2008 by mikey)
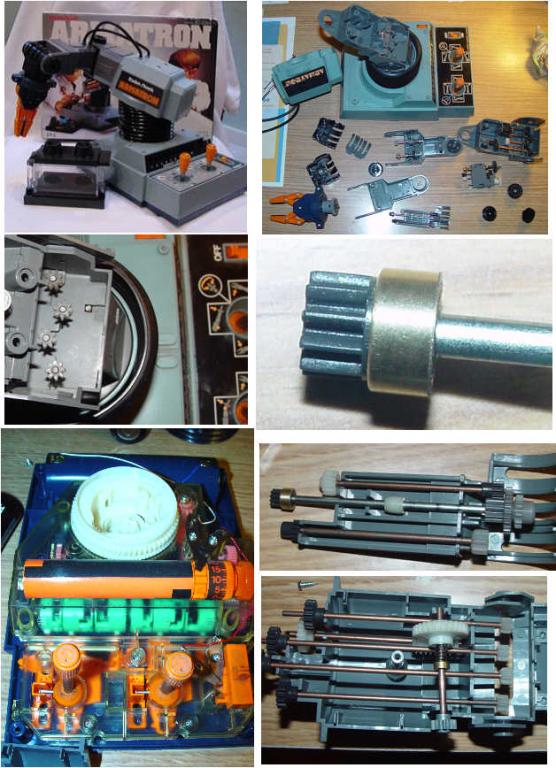
Fixing small plastic gears
Armatron disassembled
I pulled out my old favorite toy, the Armatron, to show a young friend. It did not work. The gripper would not work. I set out to fix it. After taking it apart the wrong way,by trying to disassemble the arm a section at a time, I soon figured out the right way, first remove the whole arm from the shoulder. The arm has two screws holding the square Armatron cover to the main shoulder area. Once that is removed, the two screws with big washers at the main shoulder joint are to be removed next. Then gently bend out the thin plate from the right side of the arm(side with no gear rack). This will allow you to totally disconnect the arm from the body. The arm sections are easily disassembled by removing the screws and covers. Don't forget where each shaft goes, and watch out that the shafts don't all fall out when you remove the covers.Some of the shafts are used in a not intuitive way. This is probably the most mechanically complex toy ever made,and is a really chalenging take it apart/put it back together puzzle. The base and control joysticks all are driven by a single motor. each axis of the joystick has two speeds and a neutral. If there is an interest, I can expand this armatron examination, and get into the whole drive train, as the gear shifting and power take off is really interesting. The problem was discovered,I found that a 10 tooth gear had split, and the gear was spinning on the shaft. I took a brass rod and drilled then bored a hole in it that was .001" smaller than the gear OD. Then I turned the brass rod OD so I had a thin brass tube. I tapered the inlet side, then pressed it over the broken gear. Then I pressed the gear back onto the shaft. The gear is still split, but will not slip on the shaft and the grippers now work properly. An old friend with a home built CNC machine made me a replacement. Thanks Bill, my toy is fixed.
(Posted 12/23/2007 by mikey)
Making some custom solar panels
Grabbing some sunlight
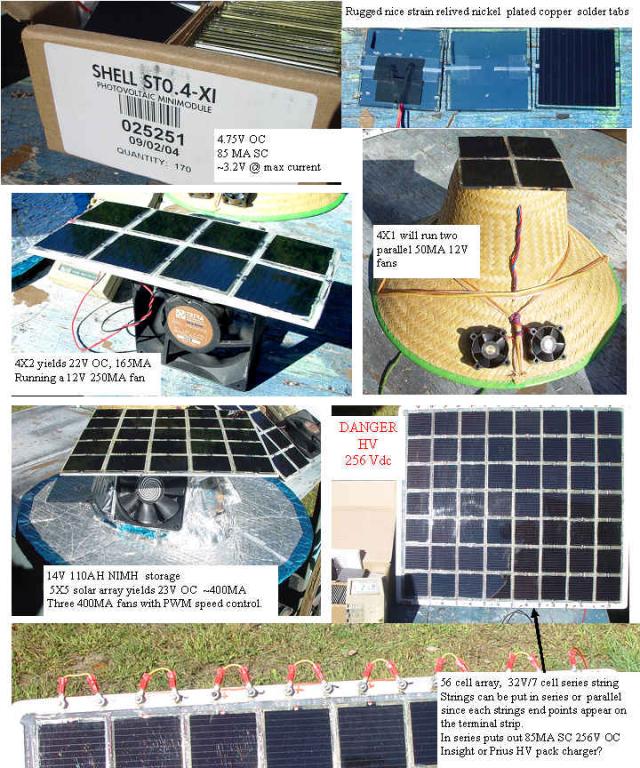
Bare solar cells are brittle, hard to make reliable connections to,only output 0.5V and need a cover to protect them if used outdoors. I picked up some cute solar cells that were designed to be used in outdoor solar powered night lights. They are actually a complete solar panel. They will output 4.7V with no load, and at their max current of ~85MA, the voltage is about 3.2V. The cells have plated copper flat wire terminals, and are pretty rugged. A guy in Foxboro MA is selling them on e-bay right now. Engine room
I found that 4 cells in series will start and run two small 50ma@12V fans. Made an air cooled garden hat for Sue. Next I wanted to run a 4" 12V fan , so I took a 1/8" thick piece of PVC sheet and glued 8 of the cells to it with silicone calk. This panel puts out 165ma and develops ~8V across the 250MA fan, which runs it nicely, but not at full power. I then made a new panel for my solar power demo hat, which has 3 4" fans. The panel will not run the fans alone, but will charge the NIMH 1100MAH AA cells that are embedded into the hat. The panel outputs ~400MA and will allow several hours of runtime. The final panel is a reconfigurable output 22.5 Watt panel. Each string of 7 cells outputs 32V OC @ 85ma, and is terminated at the terminal area. The available configurations: 256V @ 85mA 128V @170mA 64V @340mA 32V @680mA The price of ~$4.12/Watt is not cheap compared to larger ready made panels, but the voltage range of 3.2 to 4.5V allows a single cell to power a pic microcontroller, and the ease of use and mounting allow custom panels to be made in any configuration you like. Next project is to connect the 256V panel to the Insight HV pack for parking lot topping off and re balancing of the battery charge. More on this project : Plugging into the sun blog When putting series strings of cells in parallel with other series strings, each string should have a diode to assure that back conduction does not take place.
(Posted 9/16/2007 by mikey)
Auto brake light
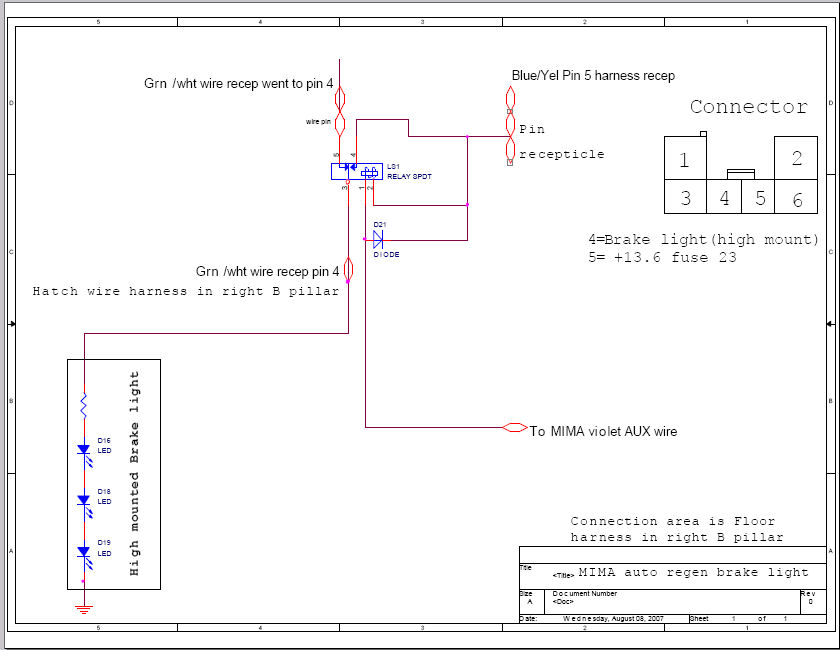
MIMA regen auto brake light
Calpod asked that a regen based brake light activation be designed for MIMA equipped Insights, as the car can slow down pretty fast if full regen is applied. Without the brake lights to warn the guy behind you that you are slowing down, you could get rear ended if he is not awake. The software is already working, and the Violet MIMA aux wire will pull low when the regen is greater than 15A. The problem was how to interface to the car. If the brake switch was shorted by a relay, that would work, but as soon as the brake light is activated, the car will try to apply full regen, as that signal feeds to the MCM. In looking at the schematics, I chose the connector in the passenger side B column as the best place to tie in. This spot is where the drive signal for the high mounted brake light is located. With this circuit, only the high mounted brake light will activate when MIMA or the car is over 15A of regen. Any small 12V relay with SPDT contacts should work.
(Posted 8/9/2007 by mikey)
C-band dish solar furnace
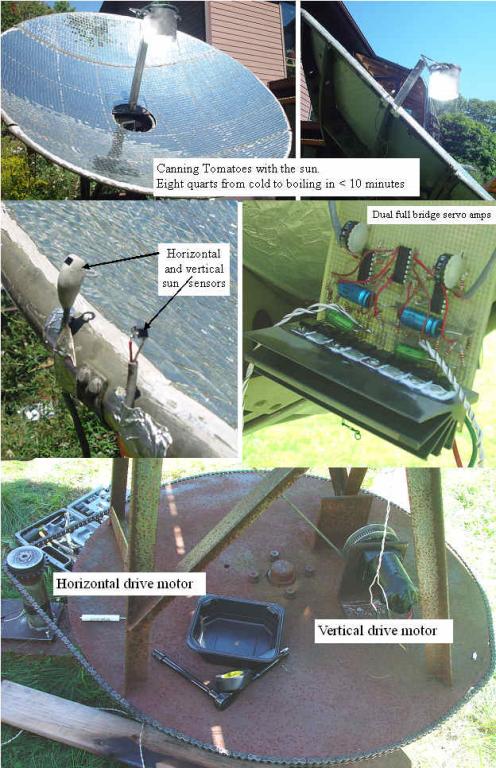
Canning Tomatoes with the sun
Back in the 60's I was given a nice rugged parabolic dish, and had covered it with mirrors. It works pretty well. I have reached aluminum melting temperatures, and run a steam engine. Old radar dishes are not readily available but old C band dishes are. Start with an old C-band satellite dish. Cut Bathroom mirror tile into 2" or 3" inch squares. Glue tiles to dish with silicone rubber,then glue aluminum foil to the back with a thin coating of silicone to seal out moisture, and protect the mirrors back.The small gap between the mirrors will allow eventual total curing of the silicone, but it takes several months for a full cure. The layer of aluminum foil stops the degradation of the mirrors rear surfaces. My dish has been outdoors for over 30 years and the mirrors are still like new. The horizontal and vertical drives are run by a sun tracking servo amp that keeps it pointed at the sun. A schematic of the basic tracker is available on the downloads page:Simple Tracker schematic This generic servo will operate on 12-24VDC, and will run dc motors over the same voltage range. The power transistors need to be mounted on a good heatsink with electrical isolation between the collectors and the heatsink. The servo gain pot will want to be tuned for best accuracy of tracking without oscillation. The sensing photo detectors are mounted at + and - 45 degrees to form a half bridge.The + of one detector connecting to the - of the other. This "shorted" connection forms a current bridge where the two photo diode currents cancel when evenly illuminated, and change polarity and amplitude of output when unbalanced. The idea is to have the servo always drive the dish to the null point. I Canned some tomatoes this morning. The 8 quarts of water and tomatoes reached boiling in 6 minutes, but then it was boiling too fast. I had to drape news papers over the mirrors to turn down the heat. I will need to make an adjustable shade for the thing, so I can adjust the boil to a slow steady one. Tracker worked well.I need a steam engine for the thing, and I could make some electricity or pump water. More information on this project: Plugging into the sun blog
(Posted 6/6/2007 by mikey)
Insight Battery pack turbo cooler
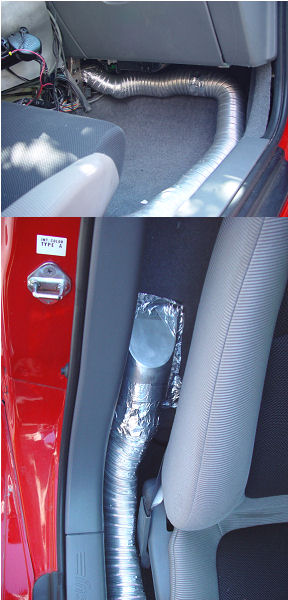
Insight Battery Turbo Cooler
As any owner will tell you, when you are pumping charge in and out of the pack with MIMA, it can get hot, especially in summer. The battery is cooled with a two speed fan that draws air into the battery pack from behind the passenger seat inlet vent.MIMA will force the two fans on at full speed when the temperature of the battery gets over 95F. I made a Turbo Cooler for my pack by ducting the passenger foot AC outlet to the battery pack input duct. I set the fan on high, and the duct to foot only. The driver side vent is ducttaped over, so that all the air comes out of the passenger side. The increased air flow helps a lot, with mild MIMA use, but if you are really pushing the hybrid ratio to the electric side, the pack can still get into the 100 F range. Because of the large thermal mass of the heavy batteries, it takes a lot to cool them even a few degrees. To Turbo Cool the pack, I wait till I am going down hill, so the power is nearly free, and turn on the AC to full, set to 60 F. A long hill and you can cool the pack several degrees.
(Posted 6/5/2007 by mikey)
Put your exercize to good use?
Like most Americans I eat too much and do not get enough exercise. I also watch TV too much. I modified an exercise bike to produce electricity. The electricity runs a tv, radio, lights, fans, to use the power that I am generating. Old car alternator, with a a small battery to get the field excited to start the generating. 250 Watts is a lot of work. For a light workout pump during the show, and rest during the commercials, For a full workout watch a DVD movie and pump the whole time.
Dont stop till the commertial
(Posted 5/13/2007 by mikey)
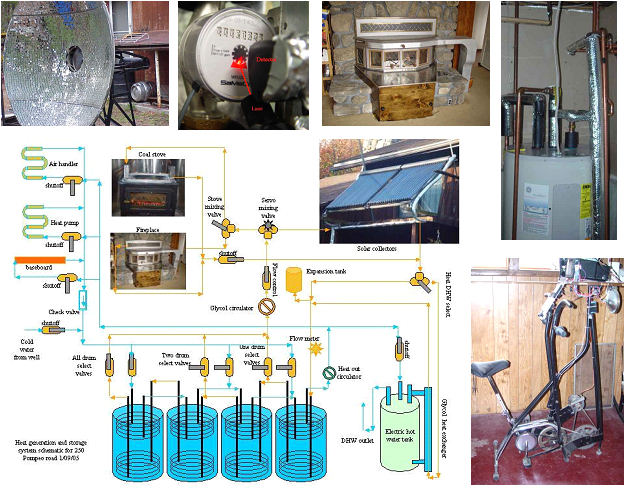
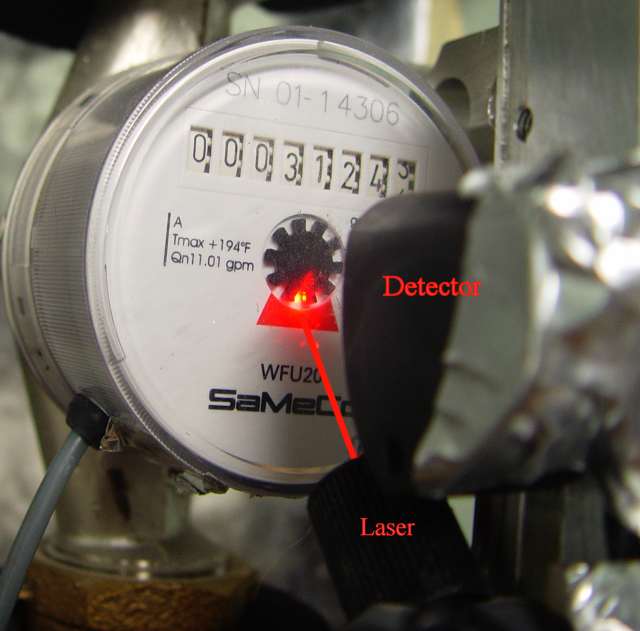
Some uses of laser pointers
We all should have a couple of laser pointers sitting in the "used to be cool toy box" There are many uses for those lasers other than the usual pointer application. Detecting things: I have used them for generating an electrical signal when detecting things. I needed a flow meter to detect the flow rate of the heat exchanger for my solar heating system. To buy a unit with high accuracy, and a readout, was in the several hundred dollar range. I found this cute German made home water meter for less than $100. It only had one pulse output for every gallon, which was not sufficiently accurate to measure the sub gallon per minute rates that were sometmes necessary. I mounted a laser pointer so that it shined through the notches on the rotating disk that was right on the flow turbine, so it turned hundreds of times to each gallon of flow, and gave multiple puldes per revolution. I mounted a photodetector in a blackened tube, and glued a lens on the front of the tube. The detector assembly was focused on the notches of the rotating disk. and was able to generate a pulse stream for each rotation. This pulse was buffered, amplified and converted to a digital pulse that was read by the controlling computer to regulate the speed of the pump to produce a constant flow rate.
Detecting a rotating disk
(Posted 5/13/2007 by mikey)
Black tape and PVC cement
Making it one piece
I have been using black electrical tape since I was a kid. My Dad was a DIY of considerable skill, and I used to play in the basement and be his helper, he always had several rolls of tape so it became one of my toys. Black tape has many uses, and has certain properties that make it a versatile tool. Insulation: The main use of black electrical tape is to cover bare electrical wires. If applied correctly, the tape will last for many years. If applied incorrectly, it will start to separate and get sticky in short order. Each wrap is good for 200-600V depending on the thickness, so a carefully taped wire can have better insulation than the wires on either side. The tape is designed to be pliable and stretch so it can conform to irregular surfaces. The trick to making a tight long lasting covering with tape is in when and how much you stretch it. Temperature extremes will make black tape stretch and contract, loosening the adhesion in the layers. To prevent this, when making the final wrap, always do it with nearly zero tension in the tape, to prevent the end from shrinking back when heated. A final and powerful way to make the taped joint stay together, is to use PVC pipe cement to coat the outer layer of tape and glue it together. The cement sets up in a few minutes, and will protect the tape for many years even outdoors in the weather, and the joint is waterproof.
The inner wraps need to be fairly tight so air is not trapped in side. The quality of black tape is a measure of how much stretch can be put into the tape before it breaks. Never stretch to more than 70% of the breaking point, as breaking point and pliability drop when the tape joint gets cold, and the tape could crack through all layers.
(Posted 5/13/2007 by mikey)
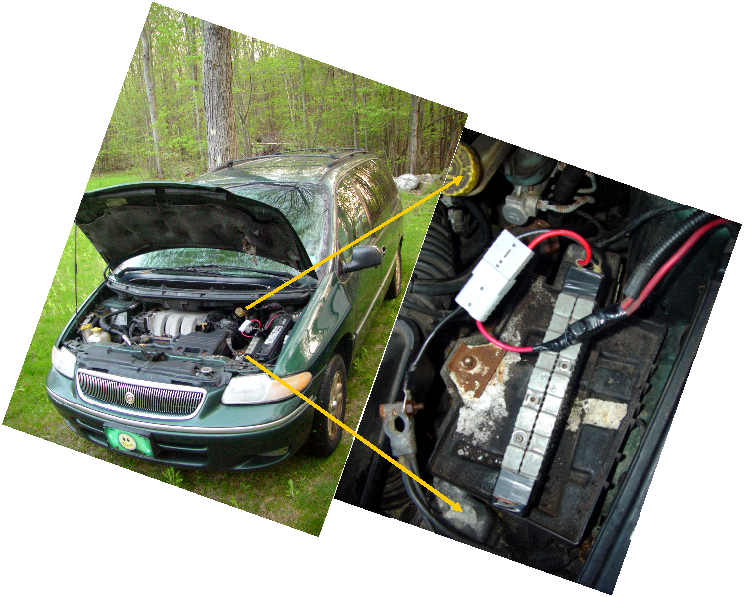
Those useful Prius subpacks
Prius NIMH batteries are called on to produce over 100A, and can be charged at 100A as well. I have been collecting the batteries and have quite a few, and have been finding some nice uses for them. I have several vehicles that I only use occasionally, and keeping a good 12V battery in each is wasteful, and is not that good for the batteries. I tend to carry a battery to the vehicle whenever I use it, and remove it when finished. Lugging a 50-75 lb battery over 100 feet is a lot of work. Just to see how it would work, I connected two 7.2V prius subpacks in series, and using a 100A Anderson connector, plugged them into a dodge caravan. The car cranked just like a new 12V battery. I put a connector on my 1965 John Deer tractor, and bang, it cranks effortlessly. My lawn tractor uses the same configuration. The batteries do not need charge regulation, as the alternator or vehicle charging system will regulate to 13.6V , about 80% SOC on the NIMH. A 5 lb starting battery compared to a 50 lb one. What a labor saver.


