Randall's InsightSometimes all it takes to get someone going is a slight push. When Randall Burkhalter installed MIMA on his blue Insight, that was just the beginning. He is experimenting with many aspects of his Insight, and deserves his own blog about what he has done and is planning. Also check out his MIMA users comments on the Users Page
Mike
If you have specific questions about anything here drop me an email to: randallsinsight
Randall
| 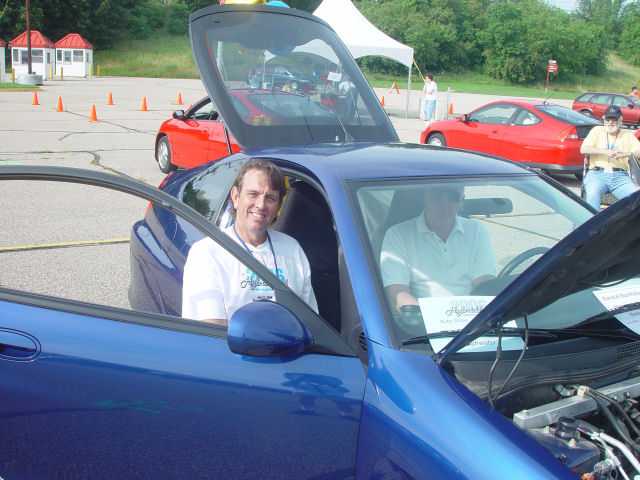 | | | Randall at the 2006 Hybrid festival |
|
On board charger. 5/17/08Finally got the on board charger up and running for the little 6Ah factory battery. Booster battery is next. | 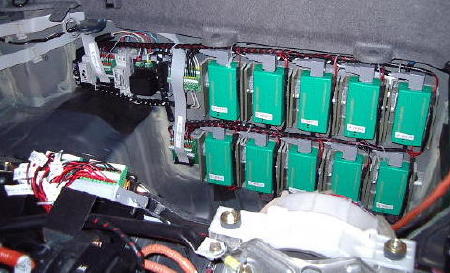 | | | On board charger for the NiMH battery. |
(Posted 5/17/2008 by highwater) |
Engine Blanket 4/03/08Brief update.
I had no problems with the Engine Blanket during the winter season. It is still on the engine at this time, and temps are still manageable by pulling back a corner of the radiator block, and/or climate controls.
As for increasing the overall FE, it certainly didn't make much difference this winter. Worst winter of the 3 years that I have driven the Insight. It does help retain some of the heat in the coolant. After a 10 hour workday the coolant would be in the 25-30F above ambient. At about 4 miles out I would be seeing 195F coolant temps. Then start burping the climate control to increase the cabin temps. And that's with easy does it hypermiling.
Combined with the WAI pulling from inside the heat shield on the cat, I noticed a decrease in the frequency of the NOx purge events. I think the little ICE was much happier.
(Posted 4/3/2008 by highwater) |
Engine Blanket 12/12/07 |  | | | Draft Blocker SP2 |
Finally got some sheet rubber in house, for the fender-well-cross-hole-draft-blocker project. Used .031 inch thick, BUNA N oil resistant rubber. As was suspected, the PVC stuff was too brittle in the cooler temps, but it did give a good indication how to better fit the version 2. The BUNA N has excellent temperature properties. There are two pieces for each side. The upper piece is held at the top edge with black RTV, the plastic inner fender liner, and the two piece push rivet that holds the liner in place. There is a 10mm hole in the frame that was in the right spot to hold both pieces where they overlap near the bend in the brakeline. Used a one piece push rivet there. Both pieces overlap again, and are held in place by a single piggy-back snap, on the bottom inside of the underside factory aero panels. The front most panel is also held by the existing two piece push rivets, in the factory fender liner panel.
Theory is this mod will help keep some draft out of the engine compartment, and also some slush and moisture from accumulating on the engine blanket material. Weight of the BUNA N is very minimal.
(Posted 12/12/2007 by highwater) |
Engine Blanket 11/25/07Brief update on the blanket project. Still running along without any problems. No real cool weather until now. Should start seeing some low 30F commutes.
In case anyone is wandering, I'm not expecting a huge windfall of FE increase with the blanket project. If overall I can see a 2, maybe 3 percent increase during the winter driving period, that would probably be about the max. I can already see an improvement in the warm up time. After 6 or 7 miles out, I could start burping 190+F coolant into the cabin heater core; However, I usually wait until ~203F to start opening up the climate control.
(Posted 11/25/2007 by highwater) |
Grid Tie-in 11/25/07Got a little work done on the grid charging stuff. The flip top plug and work box have been mounted, and a short piece of non-metallic flexible conduit installed over to that access hole seen in a previous post. | 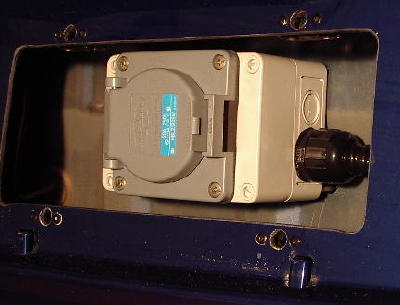 | | | Grid connection point,. |
(Posted 11/25/2007 by highwater) |
Engine Blanket 11/03/07Haven't had any really low ambient temps yet, but the coolant temps after the commute shutdown of >9hrs, are consistently running 25F above ambient. Seeing mostly low 30's for ambient temps.
I made some covers for those gapping holes in the wheel wells. Had some of that 40mil pvc showerpan liner left from a bathroom remodel. Held around the edges with silicone. It is pretty flexible to work with, but will probably get a little stiff with much colder weather. Next time I order from the McMaster Carr candy store, I'll get some sheet rubber. Also made something simular to cover the lower opening around the axles. Besides trying to keep the cross wind out of the engine compartment, these covers will help keep a lot of the water and slush off the blanket......Hopefully. | 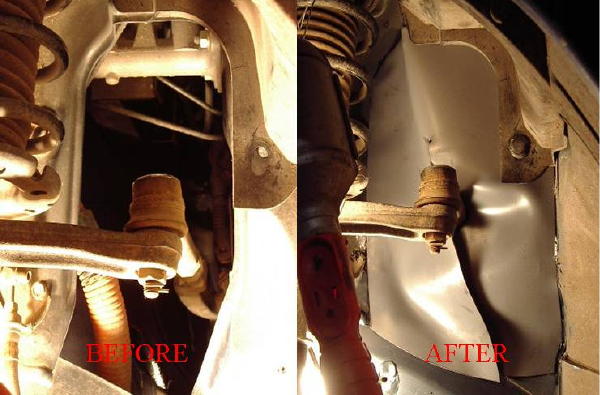 | | | Gapping hole in the fender well. |
(Posted 11/3/2007 by highwater) |
Engine Blanket 10/25/07 | 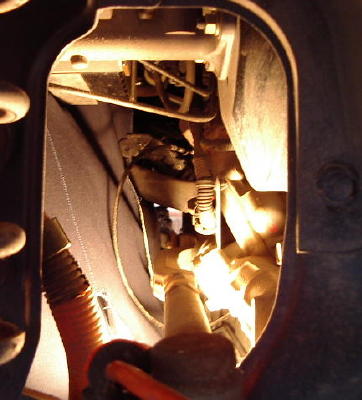 | | | Behind the Engine |
The change to the intake air did the trick. It is consistently running the 120-130(F) that I was looking for. That is, after the cat finally gets up to temp. All temps are still doing nicely, so I'll run it for awhile and see if it looks like it is going to help the pre-EV boosted FE.
I took the drivers side wheel off to take a look at that huge hole that goes through the fender well. Made a pattern for a cover, and will try fitting it tomorrow. Took a pic of the backside of the blanket. Doesn't really show much. The battery tray is visible in the upper left corner along with a portion of the master cylinder.
(Posted 10/25/2007 by highwater) |
Engine Blanket 10/23/07A brief rundown of the first round trip commute with the blanket.
All temps settle out nicely, after a few miles on the open road. Leaving the garage and getting through town, things are up and down, but once into the cruise then everything starts flat-lining. The reading at the clutch housing is a steady climber over the length of the commute, up to ~150(F) at shutdown. During the in bound comuute, I tapped out of MIMA and let the IMA do some charging to see if that would spike the temp in the housing any. It did seem to make it rise at a faster rate, but still no spike in the display, just a slow steady rise. I also blasted(for me) up some hills at 50 amps of MIMA joy, but still no spike. The 4 probes in the cat area, hang together at ~200 during the cruise. Not much wind to speak of on the drive or during the shutdown period.
OBD coolant ~195/200(F). I regulate the coolant temp with the climate controls(interior radiator) and the passengers window. I'm still running the full radiator block.
Shutdown ambient 47.4(F).
So after the commute shutdown:
Shutdown for 10hr27m.
Ambient 36.2
Inside the blanket: highs of 53.7 and 53.9 at the clutch housing and #2 coil pak. Low of 45.5 at the lower O2 sensor wires. About the same at the CV boot. This area at the lower end of the cat is open kinda like that pesky hospital gown thing. The blanket just wraps around from the sides, although it is zipped around the bottom panel, and pretty well closed/zipped up on the top. This is where the fresh intake air is drawn in across the cat on the way to the air fliter.
OBD coolant temp 63(F).
The area that has my attention at this point is the intake air. I have been experimenting with somewhat superheated intake air over the past year, and I have seen IAT on OBD between 160-170(F). As for optimizing FE, it appears to me that anything above ~120-125 does neither good nor harm. With the blanket around everything, the (IAT) is settling in on the 170 in a steady cruise. This is more than I want to run constantly. I have already made a manual change in the intake air supply for the next round trip commute test. I don't have an adjustable, automatic damper setup,....yet; to regulate the cold and warm air mix; but I do have some hardware options that can be changed quickly.
I did a visual underhood inspection of the blanket while making the change in the intake air. Nothing to report there. I figured there may be some wear where the front axles exit the blanket, but no noticable damage yet. I have some more of that conveyor belt material that I had intented to make wear guards out of, but I thought to hold off for awhile and let the wear, tell me just exactly where.
(Posted 10/23/2007 by highwater) |
Getting ready for grid tie-in. 10/21/07Have been gathering up hardware for grid tie-in. Got time this weekend to do a little work. Had to start by finding the right spot for the plug. I had thought about one of those flip down license plates from you-remember-when; but that wasn't going to work like I wanted it too. The plate spring contraption that I found, was just to stiff for a plastic bumper. I decided to just remove the plate, and get it out of the way, when the cord is plugged in. This pic has a shot of the hole plug that I plan on using for wiring entry into the interior. There will be a watertight twist-lock plug just behind the license plate, and flexible conduit over to where the hole is in the rear panel. Also, but not very detailed in the photo, are the receptacles for the quarter turn fasteners that hold the plate on. |  | | | Location for grid plug. |
(Posted 10/21/2007 by highwater) |
Engine Blanket 10/21/07Took the Insight out for a first run with the blanket.
Nothing catastrophic to report, on a 23 mile round trip run. This was driving in my default style of trying to maximize FE. I did do a few hills in 3rd, to see if there were any short term consequences. Ambient temp (F) was in the low 70's, running from 72.7 to 75.1. The highest temp recorded under the blanket, was 215 in the hot air pickup tube coming from the cat. Other temps under the blanket, in areas of possible concern were: 173.8 above the CV boot that is just below the cat; 182.2 between the cat and the block; 156.6 at the lower O2 sensor wires; 190.0 at the #2 coil pak just above the cat.
Short story is, I didn't see any show stoppers, so I'll give it a commute test tomorrow. Although it was 73F ambient, I plugged in the block heater for 2 hours before I left. Since the desire was to see what the temps would rise to inside the blanket, I figured to start as hot as I could. This will be another advantage of the blanket; to keep more of the heat in when using the block heater. The ambient won't effect what the block heater is trying to do, as much as it would on a naked:) block.
Some observations that I did make: All temps do rise during a FAS. This would be logical since the air is no longer blowing through/around the engine compartment to cool everything down, as it has shown to do, on prior data. This was the point of the engine blanket: trying to hold on to some coolant temperature between trips, and also during a FAS, or upcoming EV segment. Hopefully, the rise during FAS is an indicator that it will work as planned, during a longer shut-down period.
We'll see how a commute shutdown works tomorrow. It is supposed to turn pretty chilly tonight, down in the low 30's(F).
|  | | | Top side of Engine Blanket. |
(Posted 10/21/2007 by highwater) |
Engine Blanket 10/20/07Got the blanket installed on the Insight today. Here'as a shot of the underside before the belly panels are installed.
Location of the Thermocouples:
input 0: IMA motor / clutch housing
input 1: warm air pickup from the cat
input 2: air filter
input 3: ambient
input 4: CV boot below the cat
input 5: between cat and block
imput 6: lower O2 sensor wires
input 7: #2 coil pak above cat | 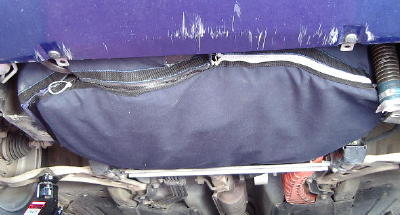 | | | Bottom side of Engine Blanket. |
(Posted 10/21/2007 by highwater) |
Engine Blanket 9/30/07 | 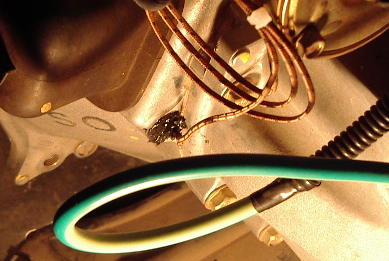 | | | Temp probe for the IMA motor. |
Well, it's finally getting cool enough, to road test the blanket. I re-installed the 8 channel thermocouple board so I could watch the engine compartment temps. There will be 4 probes in the area of the 3-way cat, 1 out in front of the radiator block, as a base line (ambient), 1 in the air filter housing, 1 in the warm air pickup tube coming from the cat shield, and 1 in the bell housing, where the IMA motor is part of the drive train. As this Insight gets closer to a greater state of EV, the temp of the IMA motor is of concern; particularly when enclosed in a blanket. Here's a picture of the probe location in the bell housing. There is a nylon bushing to insulate the probe from ground, that cannot be seen behind the black silicone. This location is just below the 12v starter, where I found a boss in the casting. A couple more weekends, and I'll install the blanket.
(Posted 9/30/2007 by highwater) |
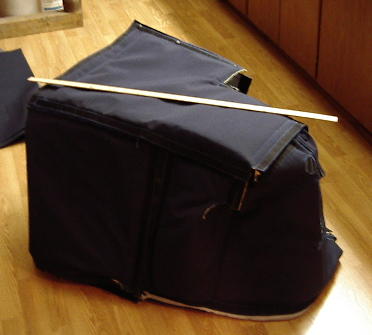
Engine Blanket 7/15/07Finally got the blanket sandwich stitched together. Without the benefit of being physically installed in the Insight, it sags a little, but here is a picture of it zipped together, holding itself up.
(Posted 7/15/2007 by highwater) |
Engine Blanket Installed 6/04/07
A picture of the blanket installed on the Insight ICE. The near top side of the blanket is complete with zippers and Velcro closure. The far top side lacks a zipper or two and some more Velcro, but this gives a good idea as to what I've been rambling about. Bottom panel not installed yet. | 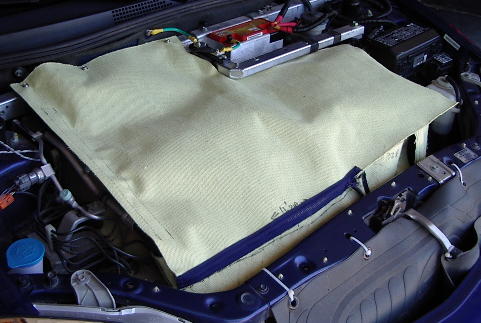 | | | Engine Blanket Installed |
(Posted 6/4/2007 by highwater) |
Engine Blanket 6/03/07
One of the obstacles to be overcome, was the near certainty of the pulleys abrading the blanket, should they come in contact over some length of time. On the left side of the engine bay, things get a little tight, and; although the material has excellent resistance to abrasion, it would be in the best interest of things, not to let the pulleys rub on the blanket material. The pulley paddle is born. Made from aluminum of course, it is secured to the engine with an aluminum bracket which is mounted just above the VTEC solenoid, and just below the left end of the fuel rail. The paddle is then attached to the bracket with two thumb screws. It extends down to encompass the face of the A/C pulley, which is on the bottom of the engine. The paddle is bent so as to spring away from the rotating pulleys. On the lower portion, there is a rub guard, made from a piece of conveyor belting. Should road vibration cause the paddle to flex, and slap the face of the A/C pulley, this rub guard will keep any unwelcome noise down, hopefully. We'll see.
(Edit: 6/10/07)
I added another bracket to the lower portion of the paddle, that secures it to the lower A/C compressor mount. This prohibits the paddle from being drawn toward the compressor pulley, when the bottom panel of the blanket would be installed. I like this much better as the paddle cannot slap the face of the pulley. Also condensed some of the pictures, and posts into this one.)
|  | | | The Pulley Paddle |
(Posted 6/3/2007 by highwater) |
Engine Blanket 6/02/07 | 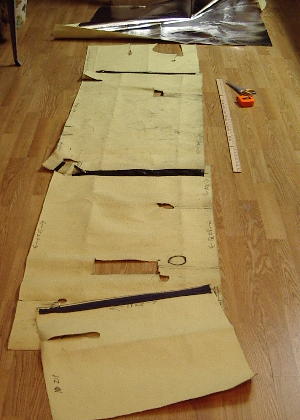 | | | Engine Blanket Layout |
This picture shows the blanket laid out on the floor, with the outside of the material showing. The shiny side will go towards the engine, with the end nearest the bottom of the pic going around the drivers side of the engine bay. The rectangular hole is for the engine mount near the under-hood fuse box. The much smaller square hole, in the next panel up, in the picture, is for the left hand side engine mount. The round hole just above the magic marker circle is for the upper radiator hose, and the lower hose goes through a hole toward the left side of the pic, near the end of the zipper. All the zippers are on the outside of the blanket, and protected by an overlap of material, on the engine side. Toward the top of the picture, you can see the short panel that will go around toward the back left side of the engine, with a large cutout for the heater hoses, throttle cable, and other items, going into the cabin through the firewall. The shorter openings, are closed with high temp hook-n-loop fastening, and the zippers, when the blanket is installed, zip shut going down. Top and bottom panels have not yet been cut.
(Posted 6/2/2007 by highwater) |
The Engine Blanket | 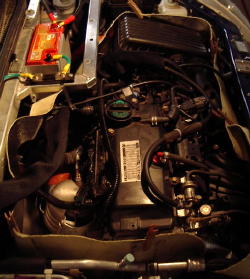 | | | Engine Balnket |
I mentioned this idea long ago at Insight Central. There had been, and still is, much discussion on keeping the little 3cyl warm. As we get to the point of more ICE off time, whether in extended FAS or EV only mode, particularly in winter, we need to retain the heat in the block/tranny assembly. I have the idea to more or less wrap the engine in a blanket. I sourced some very nice material that is rated at 1000F continuous contact, 3000F intermittent, and has excellent properties such as moisture/oil and abrasion resistance. Probably overkill, but I didn't want any trouble. This picture may be a little small for good viewing, but I will update, and add more before to long, as this is the mod I am having to make myself get finished.
(Posted 5/19/2007 by highwater) |
20 Ah HV Booster Battery
I had been looking for a supply of batteries, to use for a HV IMA booster pack, like Mike has done. These Pb/acid came available recently at a low price, so I got a pallet of them. They are 12v 20 Ah capacity, and with acid-pac, weigh 15 lbs each. Not near as robust as the Trojan pack in Mike's Insight, but with my conservative driving style, an extra 15 or so Amp/hours (compared to the 4 available in the factory IMA pack), should do nicely on my commute. It will be awhile before I get started on this, as I am making myself finish another mod first.
| 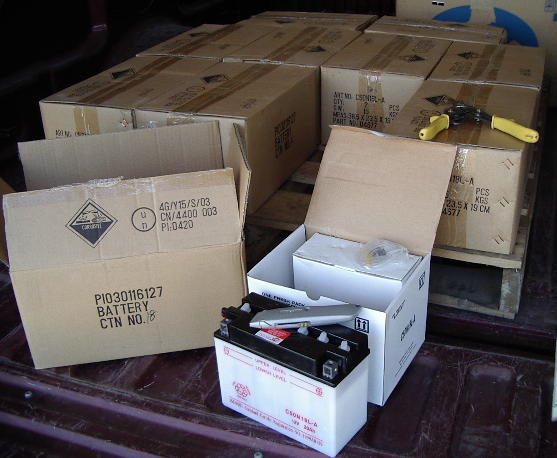 | | | Battery Shipment |
(Posted 5/19/2007 by highwater) |
Killing the EPS Fault Indicator. | 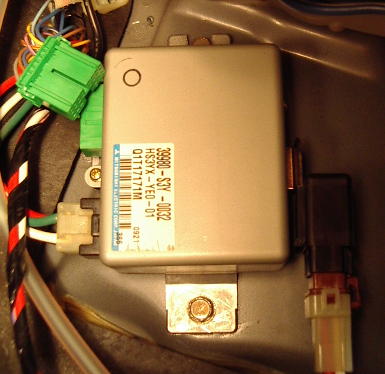 | | | Insight EPS Control Box |
I enjoy this little car, and I think there are others out there that would like to do some of these mods, and just need a picture or two, and to know that it will work. Here's an easy one. (Based on my early '01 model 5MT)
Many Insighters have pulled the power steering fuse (40A, #15, under-hood fuse box), not only to have a stiffer feel to the handling, but also to save some amp usage on the 12v system. But doing so, brings on that pesky EPS fault indicator on the dash. Recently while searching the manuals for a way to kill that EPS fault indicator, I happened on an easy fix. Simply unplug the EPS connector B (14 pin green) from the EPS control box, which is located, very near the ECM, behind the passengers kick-panel carpet. This will eliminate the fault indicator, and no trouble codes show up on OBD.
To get at the EPS control box, you will have to remove the rocker panel, and then carefully work the far upper/outside edge of the carpet back from under the dash. Since the release tab for the green connector, is on the back side, I had to remove the EPS box by removing the two (2) mounting bolts (10mm socket). Look closely at the picture, and you can see the relief which I cut in the upper mounting flange so the upper bolt would not have to be completely removed every time. Simply loosen the upper one and remove the lower one, the next time around. If you chose to cut the relief, it will take you longer to do that, than it will to put everything back together once you are done. This is very easy to do, easily reversible, and involves no wire cutting. I haven't tried it, but it looks like you could just reach over the top edge of the carpet, and plug it in, if you wanted to reverse your decision.
(Posted 5/1/2007 by highwater) |
|