The end of the Plug and Play MIMA, and MIMA2
MIMA introduction
MIMA Operation
MIMA Users Page
Installing MIMA with The Plug and Play harness
Installation and introduction
1. Disassembly
2. Gaining access to the opening behind the seats
3. Threading the DB-25 to the front
4. Installing the rear connections
5. Mounting the MIMA system in the car.
Running the DB-25 under the rug
The distribution board
Mounting the MIMA kill switch
The Kill sw socket
6. Accessing and connecting to the ECM
7. Installing the MIMA joysticks
8. Mounting the display
9. First powerup
10. The first MIMA operational test
Installing MIMA in a RHD Insight
FAQ
Installing MIMA with the pin replacement harness
software
The MIMA Joystick
The MIMA Display
The FAS system
DIY MIMA L
Cable impedance problem with last MIMA systems.
Learning to drive with MIMA
Hardwired Harness
Theory of Operation

The distribution board

The distribution board
Pluging in the cables

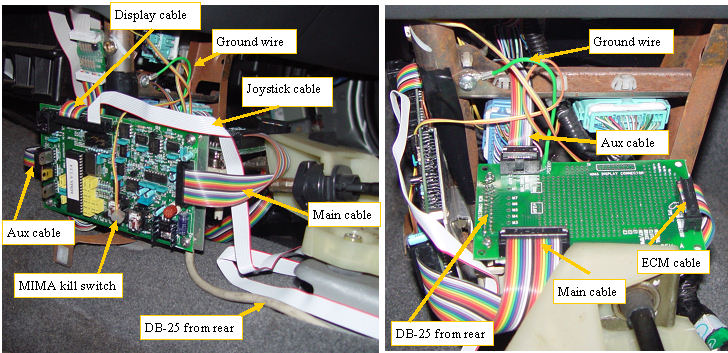
The new plug in system uses a distribution card to make the MIMA controller connections to the ECM, and MCM.
This card sits in the gap between the shift mechanism and the front of the shift console. The green wire from the distribution card will connect to the metal brace as shown. The MIMA Main and Aux cables will connect to the distribution card as shown. The DB-25 that comes from the MCM plug in adapter connects underneath the distribution card. And finally the 16 conductor duct tape protected ribbon cable from the ECM plugs into the right side of the distribution card.